| Quantity | 3+ units | 10+ units | 30+ units | 50+ units | More |
|---|---|---|---|---|---|
| Price /Unit | $28.12 | $27.54 | $26.68 | $25.53 | Contact US |
 FreeBCI BT-I Bluetooth Version 16-Channel EEG Acquisition Module STM32 ADS1299 1000Hz High Speed Sampling with 16pcs Electrodes
$660.39
FreeBCI BT-I Bluetooth Version 16-Channel EEG Acquisition Module STM32 ADS1299 1000Hz High Speed Sampling with 16pcs Electrodes
$660.39
 FreeBCI BT-I Bluetooth Version 16-Channel EEG Acquisition Module STM32 ADS1299 Support 1000Hz High Speed Sampling
$591.98
FreeBCI BT-I Bluetooth Version 16-Channel EEG Acquisition Module STM32 ADS1299 Support 1000Hz High Speed Sampling
$591.98
 FreeBCI BT-I Bluetooth Version 8-Channel EEG Acquisition Module STM32 ADS1299 2000Hz High Speed Sampling with 8pcs Electrodes
$354.12
FreeBCI BT-I Bluetooth Version 8-Channel EEG Acquisition Module STM32 ADS1299 2000Hz High Speed Sampling with 8pcs Electrodes
$354.12
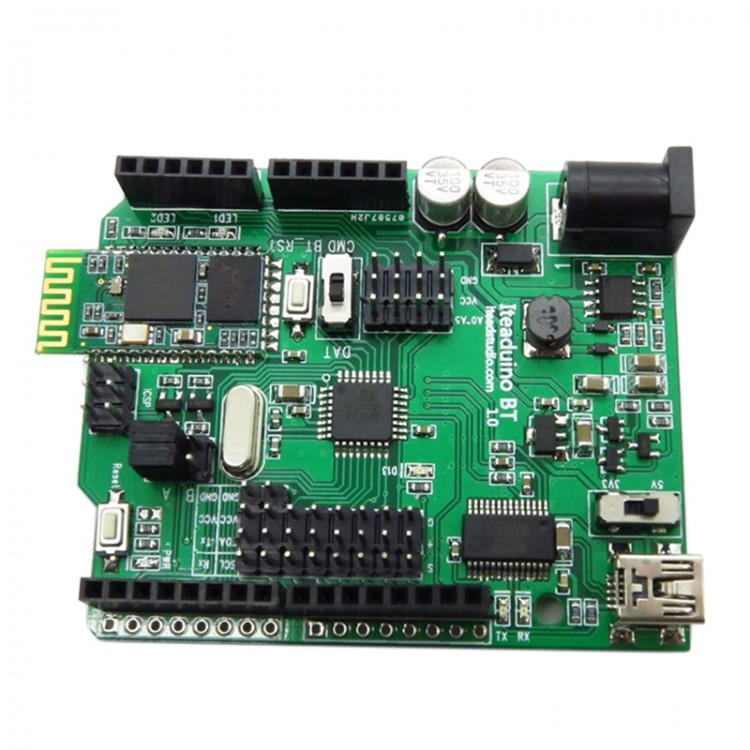
Iteaduino Arduino ATmega328 UNO Development Board Bluetooth HC05 Module BTboard for DIY
Description:
- Iteaduino BT is the development board that being added the bluetooth function based on Arduino Durmilanove/UNO. It can develop Arduino bluetooth communication project.
- The board for IDE program: Arduino Duemilanove w/atmega328
- The bluetooth part supports master/slave mode,and set through the AT command
- Can connnect the bluetooth module to the ATMega328 main control and Arduino communication through the jumper, or to the FT232RL though USB and computer communication.
- Iteaduino BT is compatiblr with 3.3V and 5V mode.
Features:
1. DCDC replaces the official Arduino part of the LDO power supply circuit, reducing the power consumption of the heat, the case of high current high voltage input power consumption is very obvious.
2. Standard 3.3V / 5V operation level switch, allows you to connect an external 3.3V device more convenient, regardless of the module or other development board communication, no longer need to do level conversion.
3.2 reset button, a reset ATMega328, a reset Bluetooth module.
4. By DAT or CMD switch to select so that the Bluetooth module can enter command or data mode, then reset module in command mode, can set the baud rate of the Bluetooth module, master-slave mode, name etc.
DIY:
Here is the steps fpr you to make a MBoard bluetooth car
The accessories: MBoard car; jiosticj expansion board; BTboard development board
MBoard car production tutorial:
The hardware data and schematics of BTboard are here: Click
The hardware data and schematics of joystick are here: Click
Code:
#define _US 0x5553
#define _DS 0x4453
#define _LS 0x4C53
#define _RS 0x5253
#define _UL 0x554C
#define _DL 0x444C
#define _UR 0x5552
#define _DR 0x4452
#define _SS 0x5353
#define ENA 10
#define ENB 11
#define IN1 7
#define IN2 8
#define IN3 12
#define IN4 13
#define LOWSPEED 100
#define HIGHSPEED 200
#define IN1_HIGH PORTE |=0x40
#define IN1_LOW PORTE &=~0x40
#define IN2_HIGH PORTB |=0x10
#define IN2_LOW PORTB &=~0x10
#define IN3_HIGH PORTD |=0x40
#define IN3_LOW PORTD &=~0x40
#define IN4_HIGH PORTC |=0x80
#define IN4_LOW PORTC &=~0x80
#define ENA_HIGH PORTB |=0x40
#define ENA_LOW PORTB &=~0x40
#define ENB_HIGH PORTB |=0x80
#define ENB_LOW PORTB &=~0x80
uint16_t value;
uint8_t r_buffer[4];
uint8_t number;
uint8_t command;
void setup(){
pinMode(ENA,OUTPUT);
pinMode(ENB,OUTPUT);
pinMode(IN1,OUTPUT);
pinMode(IN2,OUTPUT);
pinMode(IN3,OUTPUT);
pinMode(IN4,OUTPUT);
//ENA_HIGH;
//ENB_HIGH
run(0);
Serial1.begin(9600);
}
void loop(){
if(Serial1.available())
{
uint8_t readbuf = Serial1.read();
r_buffer[number]=readbuf;
number++;
if(readbuf==0x3B)
{
if(number==3)
{
value = (r_buffer[0]<<8) | (r_buffer[1]);
}
number=0;
command=1;
}
}
if(command)
{
command=0;
switch(value)
{
case _SS: run(0);break;
case _US: run(1);break;
case _DS: run(2);break;
case _LS: run(3);break;
case _RS: run(4);break;
case _UL: run(5);break;
case _UR: run(6);break;
case _DL: run(7);break;
case _DR: run(8);break;
}
}
}
void forward()
{
ENA_HIGH;
ENB_HIGH;
IN1_HIGH;
IN2_LOW;
IN3_HIGH;
IN4_LOW;
}
void backward()
{
ENA_HIGH;
ENB_HIGH;
IN1_LOW;
IN2_HIGH;
IN3_LOW;
IN4_HIGH;
}
void turnleft()
{
ENA_HIGH;
ENB_HIGH;
IN1_LOW;
IN2_LOW;
IN3_HIGH;
IN4_LOW;
}
void turnright()
{
ENA_HIGH;
ENB_HIGH;
IN1_HIGH;
IN2_LOW;
IN3_LOW;
IN4_LOW;
}
void stopcar()
{
ENA_LOW;
ENB_LOW;
IN1_LOW;
IN2_LOW;
IN3_LOW;
IN4_LOW;
}
void run(int direct)
{
switch(direct)
{
case 0:
IN1_LOW;
IN2_LOW;
IN3_LOW;
IN4_LOW;
analogWrite(ENA,0);
analogWrite(ENB,0);
break;
case 1:
IN1_HIGH;
IN2_LOW;
IN3_HIGH;
IN4_LOW;
analogWrite(ENA,LOWSPEED);
analogWrite(ENB,LOWSPEED+30);
break;
case 2:
IN1_LOW;
IN2_HIGH;
IN3_LOW;
IN4_HIGH;
analogWrite(ENA,LOWSPEED-15);
analogWrite(ENB,LOWSPEED+40);
break;
case 3:
IN1_LOW;
IN2_LOW;
IN3_HIGH;
IN4_LOW;
analogWrite(ENA,0);
analogWrite(ENB,LOWSPEED+50);
break;
case 4:
IN1_HIGH;
IN2_LOW;
IN3_LOW;
IN4_LOW;
analogWrite(ENA,LOWSPEED);
analogWrite(ENB,0);
break;
case 5:
IN1_HIGH;
IN2_LOW;
IN3_HIGH;
IN4_LOW;
analogWrite(ENA,LOWSPEED);
analogWrite(ENB,HIGHSPEED);
break;
case 6:
IN1_HIGH;
IN2_LOW;
IN3_HIGH;
IN4_LOW;
analogWrite(ENA,HIGHSPEED);
analogWrite(ENB,LOWSPEED);
break;
case 7:
IN1_LOW;
IN2_HIGH;
IN3_LOW;
IN4_HIGH;
analogWrite(ENA,LOWSPEED);
analogWrite(ENB,HIGHSPEED);
break;
case 8:
IN1_LOW;
IN2_HIGH;
IN3_LOW;
IN4_HIGH;
analogWrite(ENA,HIGHSPEED);
analogWrite(ENB,LOWSPEED);
break;
}
}
Then give BTboardthe control code, before that please pull out Jumper cap, or the code will be failed( the type of board is Arduino Duemilanove):
#define A0 YIN
#define A1 XIN
#define half_value 512
#define diff_value 20
String direct[9]={
"SS;",
"US;",
"DS;",
"LS;",
"RS;",
"UL;",
"DL;",
"UR;",
"DR;"
};
int tempx = 0;
int tempy = 0;
char number=0;
unsigned char times = 0xFF;
unsigned char last_times = times;
void setup()
{
pinMode(A0,INPUT);
pinMode(A1,INPUT);
Serial.begin(9600);
}
void loop()
{
int val_x,val_y;
val_x = analogRead(1);
val_y = analogRead(0);
tempx = abs(val_x-half_value);
tempy = abs(val_y-half_value);
if((tempx<diff_value)&&(tempy<diff_value))
{number=0;times=0;}
else if((val_y>(half_value+diff_value))&&(tempx<diff_value))
{number=1;times=0x01;}
else if((val_y<(half_value-diff_value))&&(tempx<diff_value))
{number=2;times=0x02;}
else if((val_x<(half_value-diff_value))&&(tempy<diff_value))
{number=3;times=0x04;}
else if((val_x>(half_value+diff_value))&&(tempy<diff_value))
{number=4;times=0x08;}
else if((val_y>(half_value+diff_value))&&(val_x<(half_value-diff_value)))
{number=5;times=0x10;}
else if((val_y<(half_value-diff_value))&&(val_x<(half_value-diff_value)))
{number=6;times=0x20;}
else if((val_y>(half_value+diff_value))&&(val_x>(half_value+diff_value)))
{number=7;times=0x40;}
else if((val_y<(half_value-diff_value))&&(val_x>(half_value+diff_value)))
{number=8;times=0x80;}
if(times!=last_times)
{
last_times = times;
Serial.print(direct[number]);
}
}
When the program is done, then plug the jumper cap into the B side, and the switch should be DAT side.
Finally, the rocker expansion board is superimposed on the rocker extension board, the jump cap on the 5V, and then on the power, USB power supply with 5V, the adapter power supply with 9v-23V. Switch on the car, Bluetooth will automatically match, the yellow indicator lights. Try turning the stick.
Package included:
- 1 x Development Board


")
