| Quantity | 3+ units | 10+ units | 30+ units | 50+ units | More |
|---|---|---|---|---|---|
| Price /Unit | $504.81 | $494.51 | $479.05 | $458.45 | Contact US |
 Opensource 3-Axis 3D Brushless FPV Camera Gimbal Frame Debugging-free for SARGO SJ4000/7000 Camera
$66.23
 Light-weight Aluminum Alloy FPV Drone Gimbal Bracket 22-28mm Hole Spacing Camera Stand for FPV Head Tracker with 2PCS Servos
$19.84
 Light-weight Aluminum Alloy FPV Drone Gimbal Bracket 22-28mm Hole Spacing Camera Stand for FPV Head Tracker
$16.42
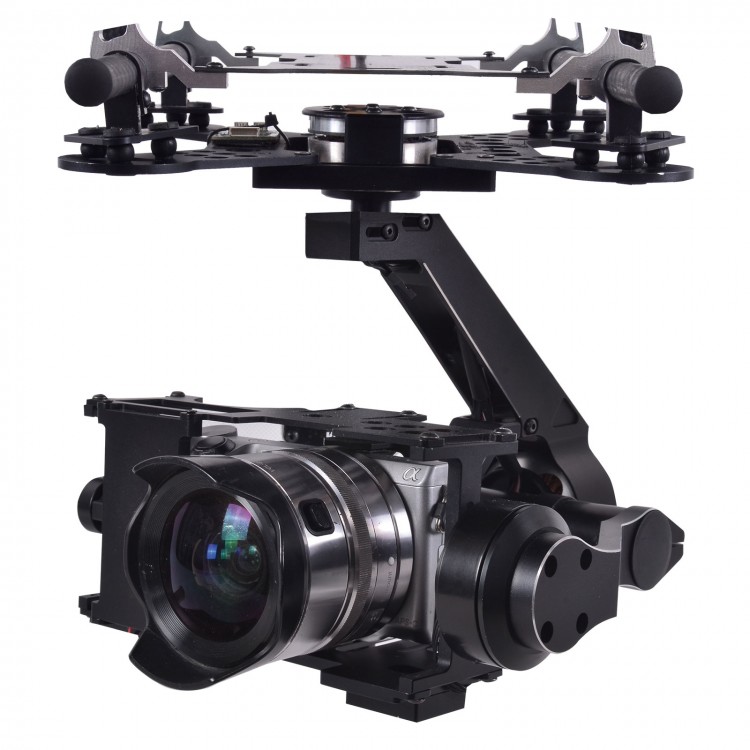
X-CAM A22-3H 3 Axis HD Gimbal PTZ with HDMI Converter for SONY NEX5 NEX7 A5000 A6000 BMPCC
Parameters:
- Weight: 680g (without Camera & Lens)
- Stabilization frequency: 5200Hz
- Input voltage: 11.1v~22.2v (3S ~ 6S Lipo)
- Tilt travel: +-90degree; Rolling travel: +-45 degree
- YAW travel: 360 degrees with unlimited rotation Built-in HDMI to AV Module
- Auto Pilot System supporting is not required Support Lens: 16mm Fixed(Default),16-50mm, 16mm +0.75 wide angle
- Support Camera:SONY NEX5 Series (Default)、NEX7、BMPCC、SONY A5000、A6000
Initial Settings:
1. Set the camera HDMI output to auto resolution mode.
2. Set the video mode to infrared remote control mode.
3. Connect RCD3015G HDMI converter with the camera, connect the servo cable of shutter controlling with the remote control receiver.
4. Initialize the Camera by pressing the shutter once to get the camera out of review mode.
5. Install the optical fiber on RCD3015G converter, stick the other end of the optical fiber over the window of infrared receiver on the camera.
Important Note:
You need to have a transmitter with a 3 position switch. Map this 3 position switch to a spare channel and connect the servo cable from the
RCD3015G to this channel. If there is no connection, RCD3015G works only as a HDMI to AV converter
The control of 3-pos switch:
1. Up: Takes a photo (Shutter is pressed)
2. Middle:Shutter is off / Recording is off
3. Down: Video recording is on.
It is very important that the 3-position switch is set in the middle (neutral) position before you power up your RCD3015G converter. ( Note :
RCD3015G powers up when you turn on the camera or power supply of reciever) When the shutter control 3-pos switch is in the
middle(stop/neutral) position, the red LED is on constantly. If there is no signal from the receiver, the red LED flashes 4 times per second, it reminds
customer to check if the receiver is powered and the transmitter is turned on.
Taking Photos:
Toggle the 3-POS switch from middle position to the up position, the camera will start taking photos until the 3-POS switch is toggled to the
middle position. In this mode the red LED flashes 2 times per second.
Recording video:
Toggle the 3-POS switch from the middle position to down position, the camera starts recording a video till the 3-POS switch is toggled to the
middle position. Video is saved in this position. In this mode, the RED LED blinks continuously.
Attention:
There must be a 5 second interval between each operation of the 3-POS switch. e.g. Switching from neutral to recording position and then
back to neutral (recording stop). Please wait for 5 seconds between each mode change. The 5 second interval is required by the camera firmware.
It allows the camera to clear the buffer and safely write the video file to storage. Operating the the 3-POS switch without observing the 5 second
gap will cause the camera to hang and can result in corrupt video files.
Announcements:
1. Do not touch the gimbal during the initialization after turn on, Keep the gimbal in quietude
2. Do not use BEC for the gimbal power, use 3~6S Lipo battery
3. Strongly recommend using 12mm tube to mount the gimbal
4. Make sure the center of gravity of the gimbal is correct before using
Accessories:
- X-CAM A22-3H Gimbal Frame X 1
- X-CAM A22-3H Main Controller X 1
- USB Cable X 1
- PPM Cable X 1
- The camera fixed screw X 1
- Damping balls X 15
- HDMI To AV Card x 1