| Quantity | 3+ units | 10+ units | 30+ units | 50+ units | More |
|---|---|---|---|---|---|
| Price /Unit | $86.89 | $85.11 | $82.45 | $78.91 | Contact US |
 Cooledit AXF8-Pro (AXF8 PRO) Internal Sound Card Hifi DAC with ES9038Q2M for DSD Hardware Decoding
$79.51
Cooledit AXF8-Pro (AXF8 PRO) Internal Sound Card Hifi DAC with ES9038Q2M for DSD Hardware Decoding
$79.51
 NEOHIPO H1 USB Sound Card Hifi Headphone Amp with EQ USB DAC Designed for Music Movies and Gaming
$44.15
NEOHIPO H1 USB Sound Card Hifi Headphone Amp with EQ USB DAC Designed for Music Movies and Gaming
$44.15
 Cooledit AXF-6Pro ITX Low-Profile Internal Sound Card PCIe Sound Card (without Microphone Input)
$54.25
Cooledit AXF-6Pro ITX Low-Profile Internal Sound Card PCIe Sound Card (without Microphone Input)
$54.25
PiKVM-A3 Pikvm (without Case and PSU) for Raspberry Pi 4 KVM Over IP HDMI CSI Supports PiKVM V3
Description:
PiKVM-A3 is a member of the PiKVM family, which supports for Raspberry Pi 4 with a matching metal case.
PiKVM is a very powerful and open source software which allows for a remote connection via your Raspberry Pi to turn on/off or restart your computer, configure the UEFI/BIOS, and even reinstall the OS using the virtual CD-ROM or flash drive. You can use your remote keyboard and mouse or software platform which can simulate a keyboard, a mouse and a monitor, which are then presented in a web browser as if you were working on a remote system directly. It's true hardware-level access with no dependency on any remote ports, protocols or services!
Features:
- Designed especially for PiKVM (Raspberry Pi based KVM over IP)
- For use with Raspberry Pi 4 Model B 1GB/2GB/4GB/8GB
- Fully compatible with PiKVM OS (refer to user manual)
- Only compatible with PiKVM V3 OS, NOT support V4
- Control a server and computer using a web browser
- HDMI Full HD acquisition based on the TC358743 chip
- OTG Keyboard & mouse; mass storage drive emulation
- Hardware real time clock (RTC) with CR1220 coin battery socket (battery is not included)
- Equipped with solid state relays to protect RPi GPIO pins from computer and ESD spikes
- ATX control via RJ45 connector switch the machine on or off, reset it, and monitor the status of HDD LED & power LED remotely
- Reserves the 10pin SH1.0 connector on X630-A3 for future I2S HDMI audio support
- Reserves the 4pin header & spacers for I2C OLED display
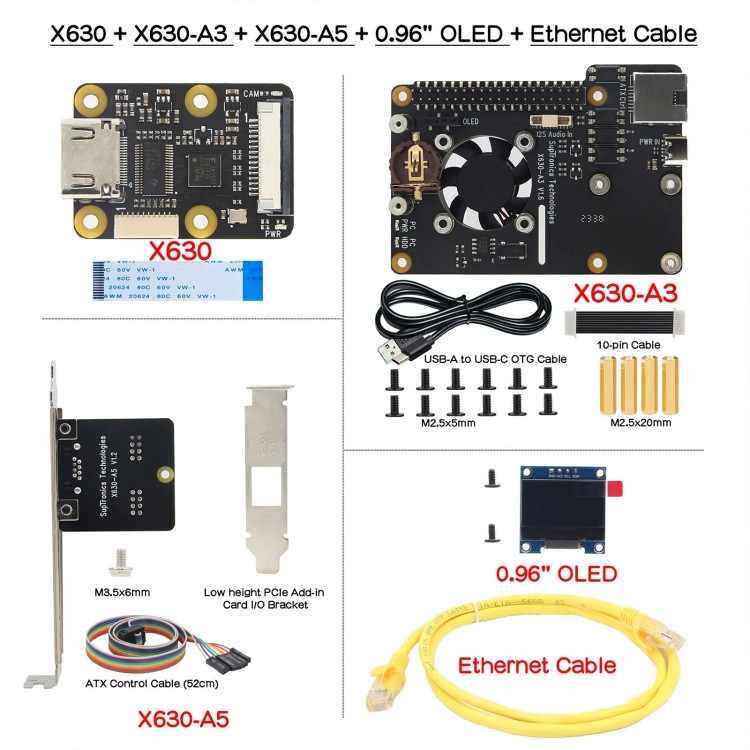
Package Included:
- 1 x X630 HDMI to MIPI CSI-2 Module
- 1 x FFC Cable (5cm/2")
- 1 x X630-A3 Expansion Board
- 1 x USB-A to USB-C OTG Cable (100cm/ 39.4")
- 1 x 10-pin Cable
- 12 x M2.5x5mm Screws
- 4 x M2.5x20mm F/F Spacers
- 1 x X630-A5 V1.2 Adapter Board
- 1 x ATX Control Cable (52cm/20.5")
- 1 x M3.5x6mm Screw
- 1 x Low Height PCIe Add-in Card I/O Bracket
- 1 x 0.96" OLED (Resolution: 128x64 pixel)
- 2 x M2x6 Screws
- 1 x ATX Control Ethernet Cable (100cm/39.4")
Note:
- Raspberry Pi motherboard and battery are not included. It is compatible with Raspberry Pi 4B. It also supports Raspberry Pi 3B+/3B, but since the Pi3 does not have an OTG interface, the OTG keyboard and mouse emulation cannot be used.
- Case and power adapter are not included in the package.
Packaging Details:
- G.W.: 0.25kg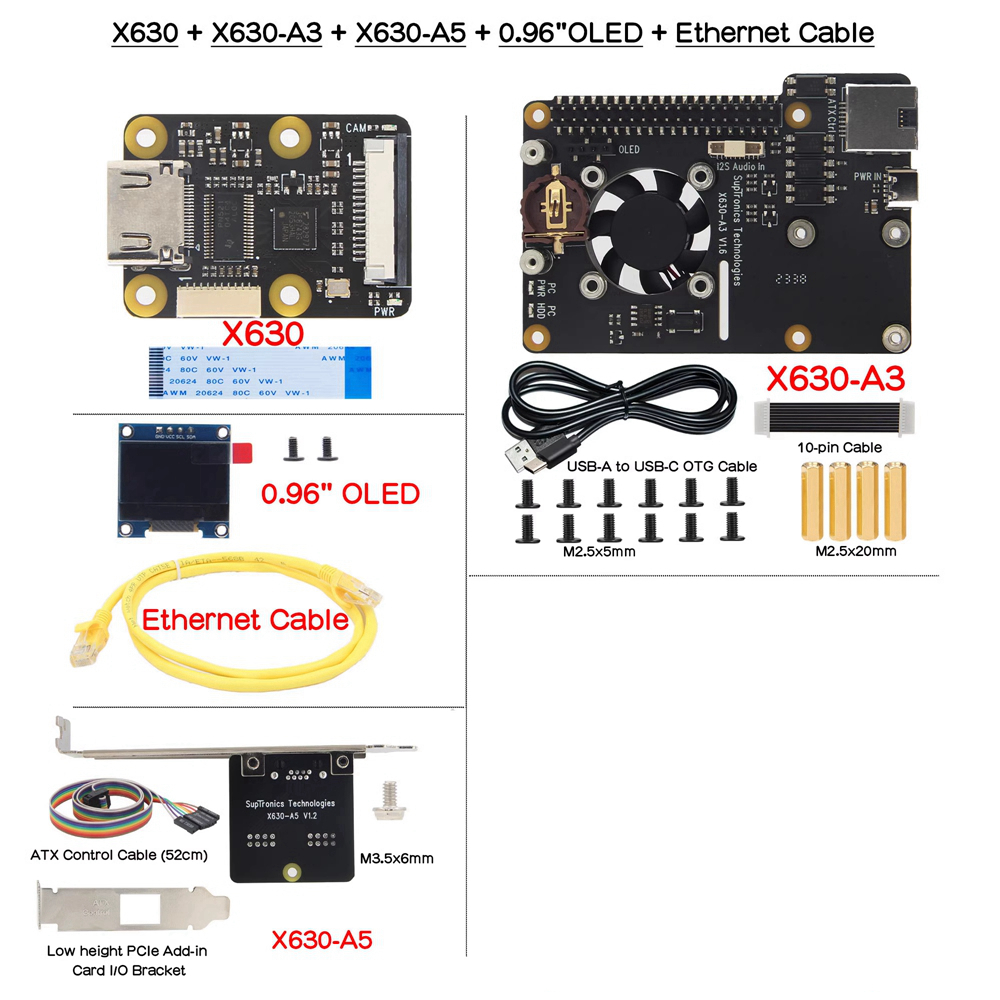
User Manual:
http://wiki.geekworm.com/PiKVM-A3
How to Power:
- Powered by: The Type-C port of X630-A3 expansion board
- Requirements of power adapter: 5.1V +/-5% , ≥3A, DC 5.5x21mm
Attention:
- Do not power through the Raspberry Pi's Type-C port, as it is occupied by OTG.
- It is recommended to use the DC 5V 4A 20W quality power adapter sold by us.
Connection Diagram:
1. The PiKVM-A3 is composed of follow parts: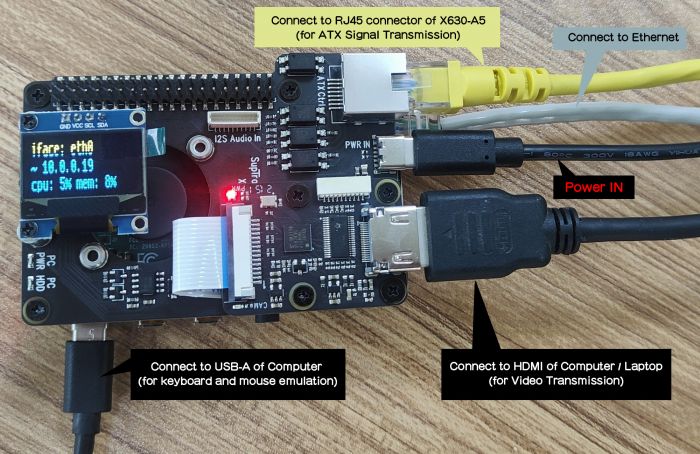
- X630 HDMI to MIPI CSI-2 Module (for video acquisition)
- X630-A3 Expansion Board (for ethernet, cooling, RTC, power in, etc.)
- X630-A5 Adapter Board (it is installed inside a PC case, and it connects the computer motherboard and IO panel of PC case)
- 0.96" OLED (for display; resolution: 128x64 pixels)
- Ethernet Cable (TIA/EIA-568.B connection, and it's ATX control signal cable)
- KVM-A3 Case (Optional part. This case is ONLY compatible with Raspberry Pi 4 and PiKVM-A3 Kit. Not for Raspberry Pi 3 B+/3B)
Attention:
- Please use the supplied Type-C to USB 2.0 data cable and USB-C to USB-A data cable (for keyboard and mouse emulation). Using other data cables might cause instability or damage to the host PC or Raspberry Pi.
- Please make sure to disconnect the 5V connection between the Raspberry Pi and the host to prevent back powering from causing instability or damage to the host or the Raspberry Pi.
- Some PC cases may not have an HDMI port, you need to use a VGA/DVI to HDMI adapter to transfer the HDMI port.
2. Connection Diagram: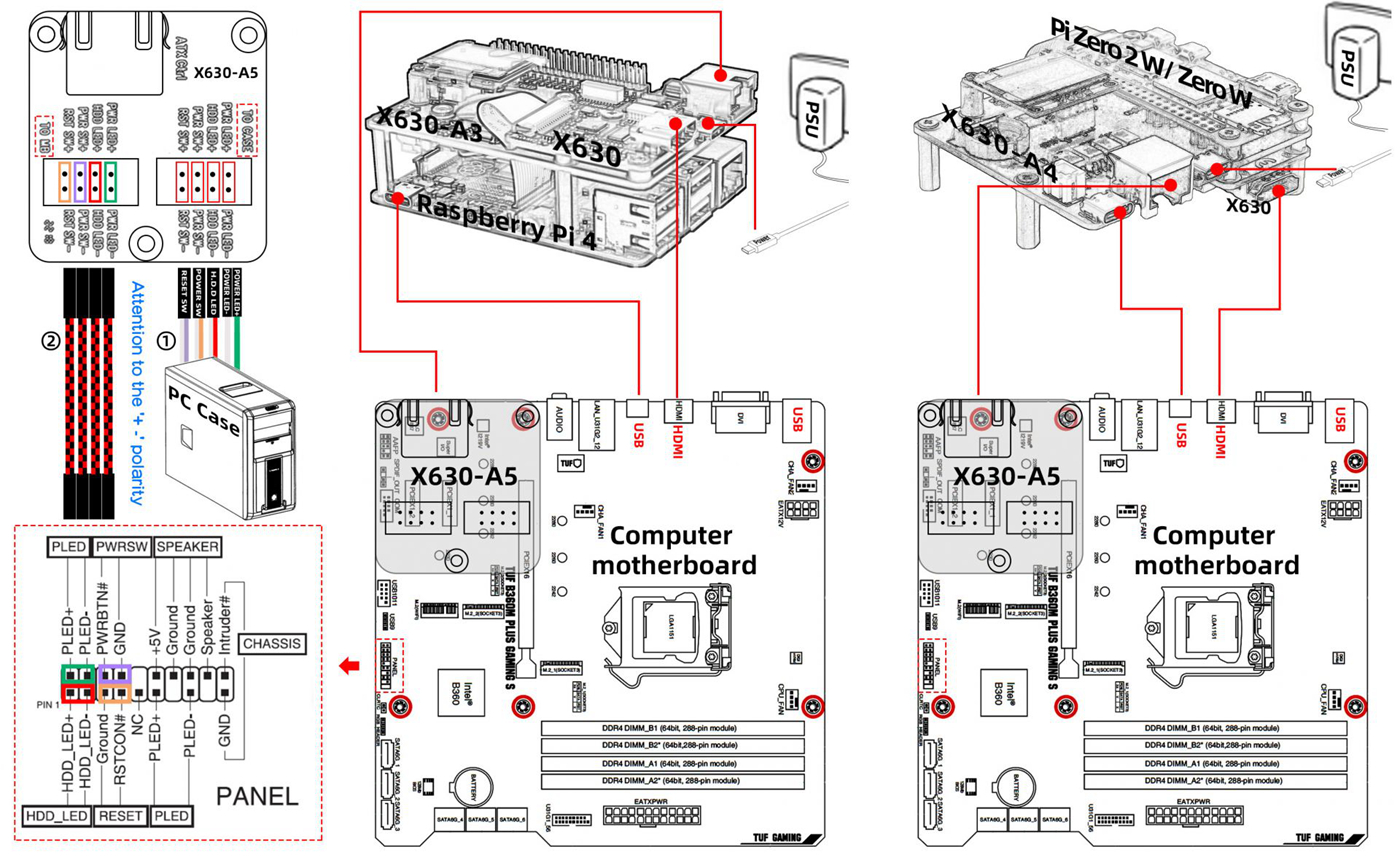
Note:
- The X630-A5 adapter board will be install into the PC Case.
- The wire group ① connect to X630-A5 comes from the PANEL of PC Case.
- The black and red wires (wire group ②) come from X630-A5 accessories.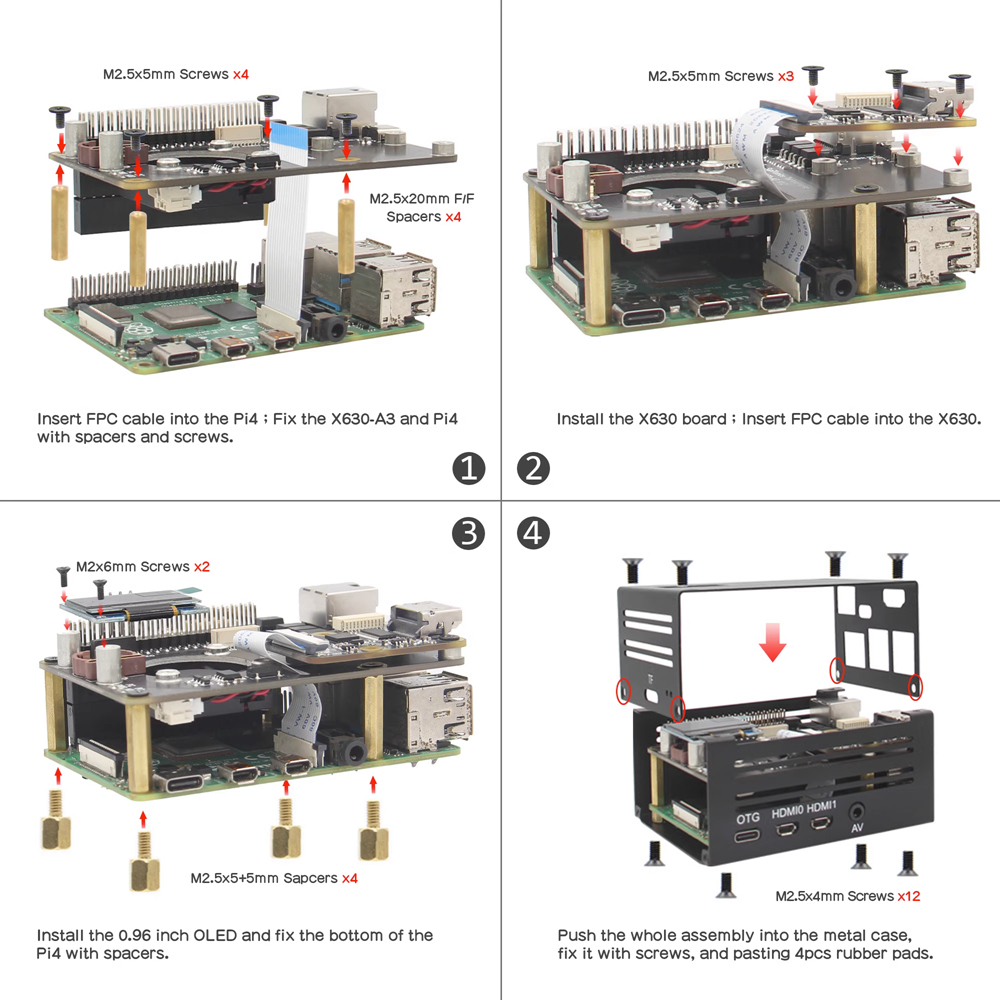
 for Raspberry Pi 4 KVM Over IP HDMI CSI Supports PiKVM V3")
 for Raspberry Pi 4 KVM Over IP HDMI CSI Supports PiKVM V3")
 for Raspberry Pi 4 KVM Over IP HDMI CSI Supports PiKVM V3")

 for Raspberry Pi 4 KVM Over IP HDMI CSI Supports PiKVM V3")


