| Quantity | 3+ units | 10+ units | 30+ units | 50+ units | More |
|---|---|---|---|---|---|
| Price /Unit | $91.54 | $89.67 | $86.87 | $83.13 | Contact US |
 Yellow W909 Wireless Three-mode Bluetooth Digital Keyboard Mechanical Gaming Keyboard with Joystick Support Macro Definition
$34.30
Yellow W909 Wireless Three-mode Bluetooth Digital Keyboard Mechanical Gaming Keyboard with Joystick Support Macro Definition
$34.30
 White W909 Wireless Three-mode Bluetooth Digital Keyboard Mechanical Gaming Keyboard with Joystick Support Macro Definition
$34.30
White W909 Wireless Three-mode Bluetooth Digital Keyboard Mechanical Gaming Keyboard with Joystick Support Macro Definition
$34.30
 Black W909 Wireless Three-mode Bluetooth Digital Keyboard Mechanical Gaming Keyboard with Joystick Support Macro Definition
$34.30
Black W909 Wireless Three-mode Bluetooth Digital Keyboard Mechanical Gaming Keyboard with Joystick Support Macro Definition
$34.30
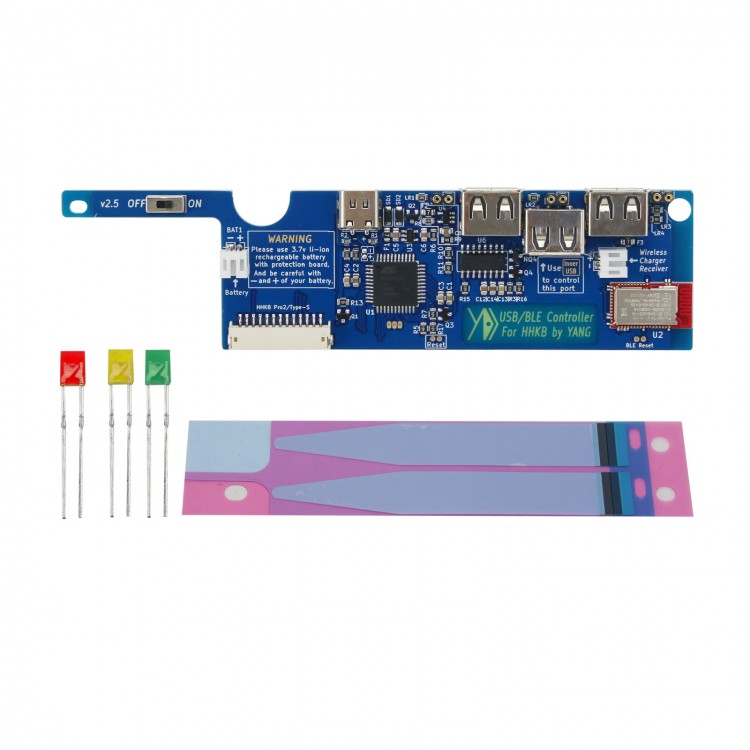
YDKB Keyboard Controller Board USB/BLE Controller (Type C Interface) Suitable for HHKB Pro2 Series
Attention:
- It is easy to install, but there are some things to pay attention to.
-
It is a handmade item. Some parts are purely artificially soldered, and
PCB has flux residues. Users who do not know how to deal with them
should purchase with caution.
- It requires users to have a certain amount of hands-on ability.
-
When using your battery, please connect the positive and negative poles
correctly. There are positive and negative labels next to the battery
socket. When charging, please use a computer USB connection or a 5V
charger.
Recommendations for Using Bluetooth:
- The use
of Bluetooth is affected by the environment. If there is a continuation
of keystrokes, there may be signal interference or poor signal.
-
Some computers may interfere with Bluetooth when connecting to multiple
devices. You can try to connect only one keyboard to see if it works
normally.
- Connect other devices to find the ones that may
interfere. For example, AirPods on some computers may interfere with the
keyboard.
- Other instructions can be found in the help document, Bluetooth keyboard signal optimization related parts.
Supported Model List:
PD-KB400W: for HHKB Professional 2 White with lettering regular version
PD-KB400WN: for HHKB Professional 2 White no Lettering regular edition
PD-KB400WS: for HHKB Professional 2 White lettering Type-S silent version
PD-KB400WNS: for HHKB Professional 2 White no lettering Type-S silent
PD-KB400B: for HHKB Professional 2 Black with lettering regular version
PD-KB400BN: for HHKB Professional 2 Black no lettering regular edition
Main Features:
-
The whole modification does not require welding. Just screw the screw
and pull out the cable to change the main control, which is very easy.
-
USB and Bluetooth 4.0 modes. You can switch between wired and bluetooth
when plugged in, and charge through the USB data interface.
- Under
USB, it supports full-key no-rush (can be switched by left and right
Shift+N); under Bluetooth, it supports any 6-button no-rush.
- All
key positions support customization. The firmware function is based on
tmk, and the [ydkb.io] graphical tool is used, which is simple and easy
to understand.
- Qmk-based firmware that supports VIA is also available. See [via.ydkb.io]
-
Automatic energy saving, extremely fast wake-up. The original Lock Mode
prevents the buttons in the bag from being pressed and consumes power,
making it easy to carry.
- Most new systems support power display.
-
USB HUB (USB2.0, only available in wired mode), mainly for aesthetics.
There are three in total, two external and one internal.
- The main
control comes with charging and LED3 indicator. The front also supports
the installation of three indicator lights (LED1, 2, and 3).
Package Included:
- 1 x Controller Board
- 3 x LED Lights
Note:
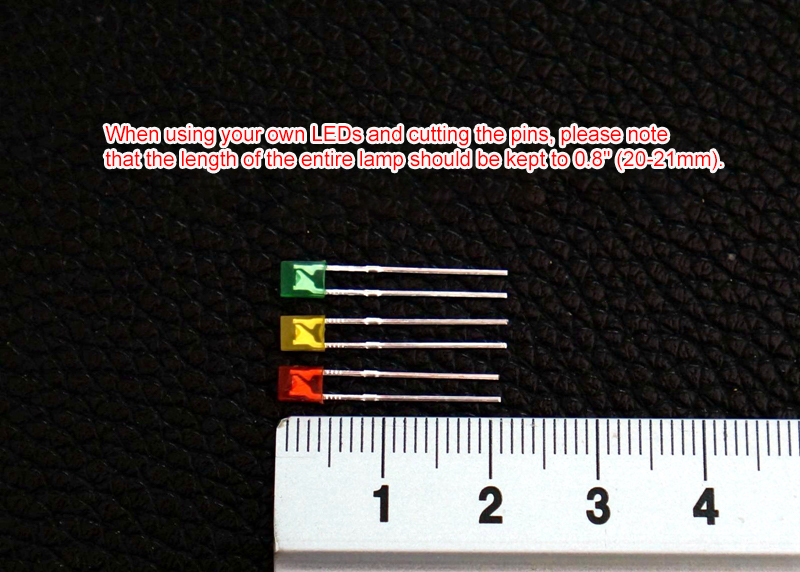
- Battery is not included. 3.7V lithium battery is recommended. Battery size is within 6.6x42x80mm/0.3x1.7x3.1".
- This is not a keyboard, just the master control, you need to bring your own keyboard for HHKB.
- The pictures below are for reference only. Please refer to the actual product.
Charging:
The original data cable interface can be used for charging, and the charging will start when a cable is plugged in.
Installation Notes:
Attention: It doesn't matter if you don't use internal USB and three LED lights, and you don't have to use them.
1.
Unscrew the three screws on the back of your keyboard, and the keyboard
can be opened, but there are still cables connected, and the upper and
lower parts cannot be completely separated.
2. Unscrew the screw in
the upper right corner of the original main control, the main control
can be taken out, and the upper and lower parts can be separated.
3.
Remove the cable, as shown in the figure below, the key is to use a
little force, it is not so fragile. Attention: Pull with a little force,
and you can shake it slightly from side to side while pulling.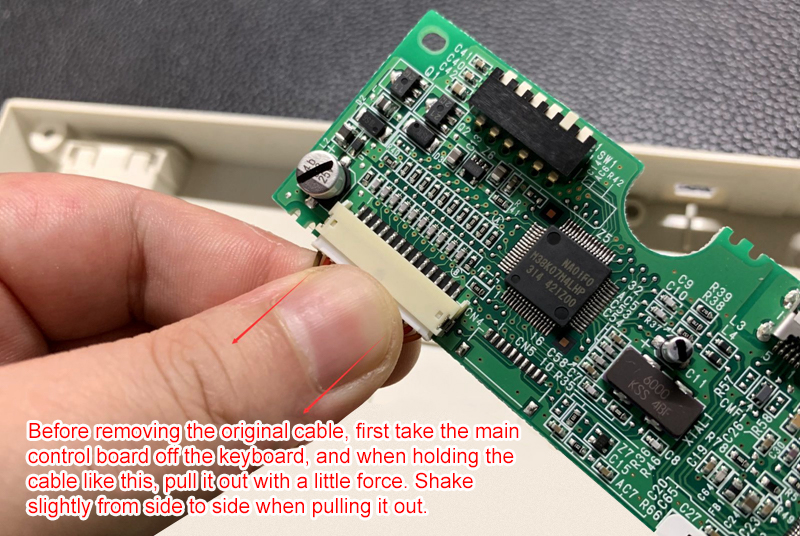
4. Change to a new master controller, install it back in the original order, and then there are some precautions as shown below:
5.
LED lights are available when plugged in, pay attention to the positive
and negative poles when installing. The top cover will hold down the
LED and the LED lights will not fall out normally. If you are still not
at ease, you can use tape to stick the LED light and the lamp holder
together.
6. Use double-sided tape to fix a battery as follows: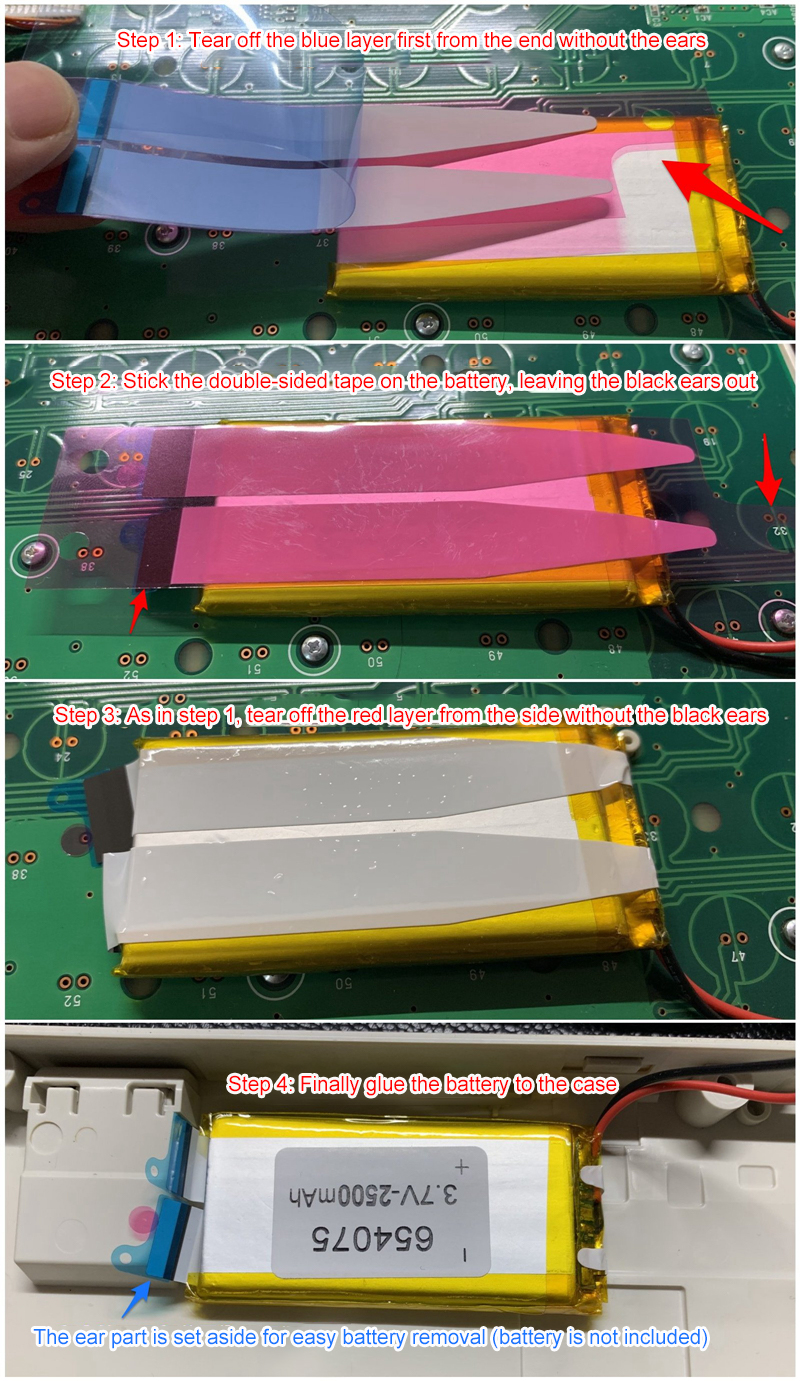
Tips:
-
The bubble film isolation between the battery and the keyboard must be
added. The small problem of many users' keys is because this is not
added at the beginning.
- In normal use, try not to have any
electrical appliances that interfere with the identification under the
keyboard, such as heating table mats (if you must use it, you can try
the firmware for HHKB BLE S).
- If you encounter problems during use,
please refer to the troubleshooting guide in help, which summarizes
most of the possible problems and solutions.
Quick Instructions:
Attention: visit for more details http://hhkb.ydkb.io
To use Bluetooth when a USB cable is not plugged in, first make sure the battery switch is on.
There
are ON and OFF marks on the main control, but they can't be seen after
they are installed. From the outside, the side close to the USB
interface is on (i.e. the left side of the picture below), and the side
far from the USB interface is off (i.e. the right side of the picture
below) . Flip this switch directly with the cover.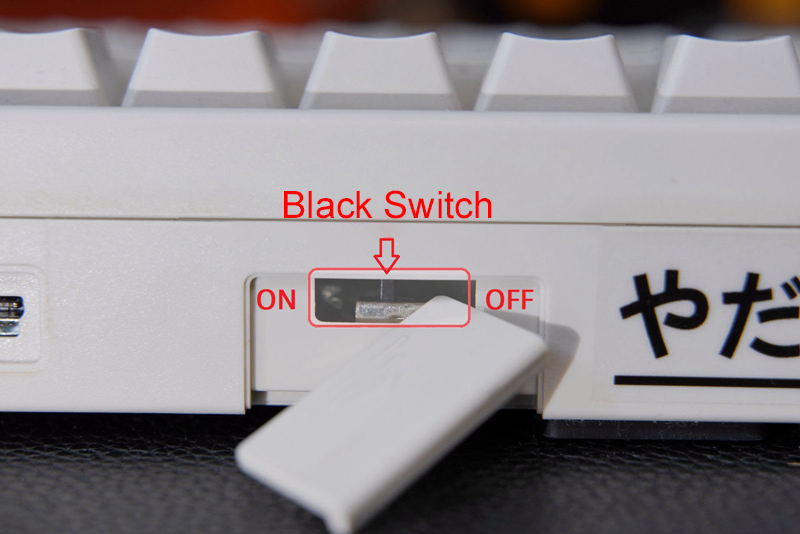
Keyboard
Bluetooth pairing is different from that of mass-produced Bluetooth
keyboards. There is no need to press a specific button to put the
keyboard into pairing mode. As long as the power is normal and the
keyboard is not connected, other devices can search for it and complete
the pairing.
Remind:
For the pairing method of each system,
and troubleshooting when encountering problems, please refer to the
relevant sections of http://help.ydkb.io
The default button, as shown below.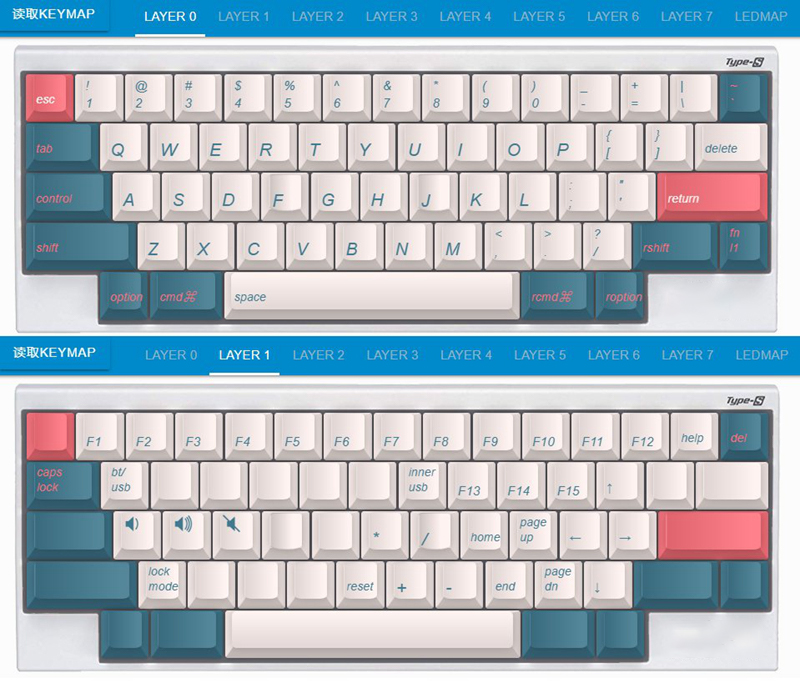
Instructions for Changing Keys:
-
Without the DIP switch, some people question whether the MAC can still
be used normally. You can check the manual for HHKB. The DIP switch is
mainly used to set the functions of some keys in different systems, and
it has a simple function of changing keys.
- The replacement master
itself is fully customizable, with a total of 8 layers. The richness of
the buttons that can be set is more abundant than that of the DIP. The
set buttons can be used in operating systems for Win, Mac, Linux, and
iOS.
- Modify the button, open the website [ ydkb.io or ydkb.gitee.io
], select the keyboard [ HHKB BLE ] and then there is a way to flash on
the page. For more detailed instructions, see the help in the upper
right corner of the website.
Power Saving Mode:
Keyboard
automatically saves energy during daily use, and there is no need to
turn off battery switch when not in use. The power saving modes are
described as follows:
1. After your keyboard is idle for 3 seconds
without pressing any keys, it will enter the first level of energy
saving. In this mode, the frequency of key detection is reduced, but the
wake-up is very fast.
2. If the keyboard is not connected to
Bluetooth for 90 seconds, or is not used for 2.5 hours, it will enter
the secondary energy saving. Press and hold any key for 3 to 5 seconds
to wake up.
3. When using Lock Mode, it will directly enter the
second level of energy saving. The difference from 2 is that at this
time, only press F and J at the same time and only long to wake up,
other keys will not work.
Pay attention:
When waking up from
the secondary energy saving (including Lock Mode), the button is always
pressed for a long time. Press and hold until the connection indicator
lights up.
Detailed Introduction:
If you are familiar
with hasu's tmk master control, this should not need to be introduced.
Simply put, it is a power-saving optimized version.
The power
saving of the hardware comes from two points, one is that Bluetooth uses
the BLE module, and the other is that the working voltage no longer
needs 5v, so there is no need for boosting. The power saving of the
software comes from the power saving strategy formulated according to
the characteristics of the hardware. The two combined, the endurance
time may be 6 to 10 times or more than the hasu version of the bt
controller.
Contrast:
The previous installation has introduced the use of LEDs. If you want to use other LEDs, be careful to cut the length.
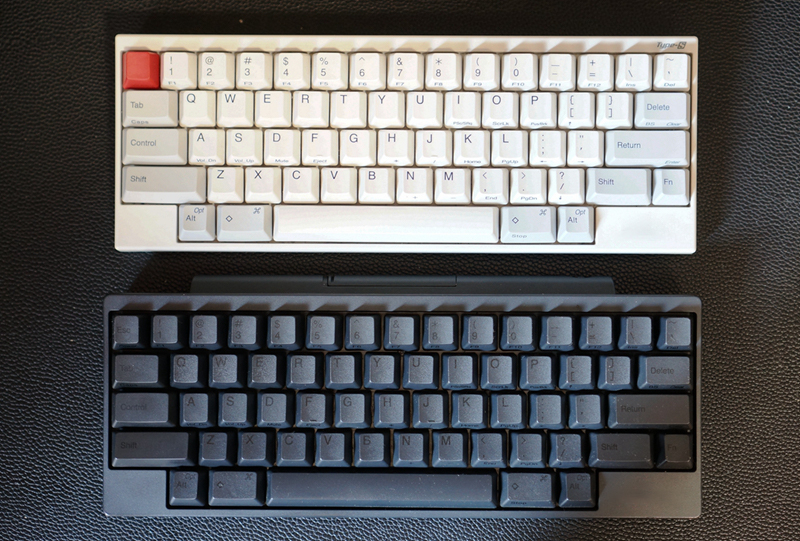
From the appearance, it is basically impossible to see that this is a modified one for HHKB.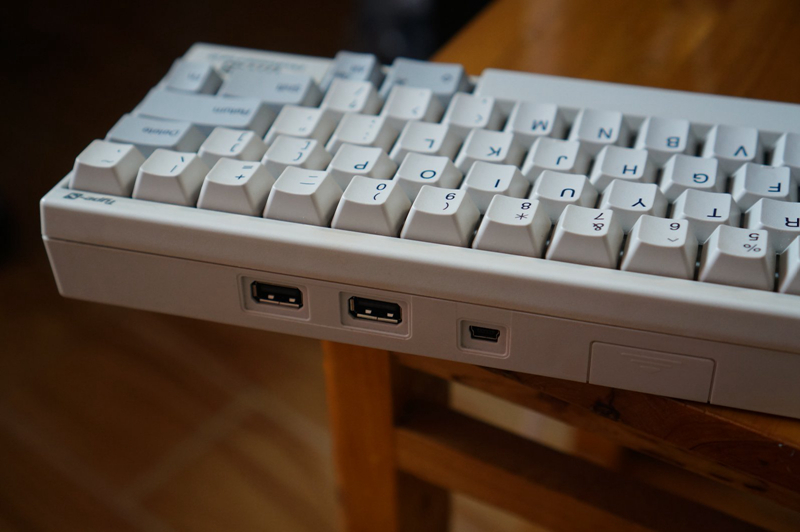
There
are three indicator lights here, the black shell is impervious to
light, and the blue light effect is not obvious. I used LED1 to LED3
from left to right, and used red, yellow, and green in turn. If you want
to test that the LED lights are all on, short-circuit the two reset
buttons on the PCB and enter the flashing mode. At this time, the three
indicators will flash.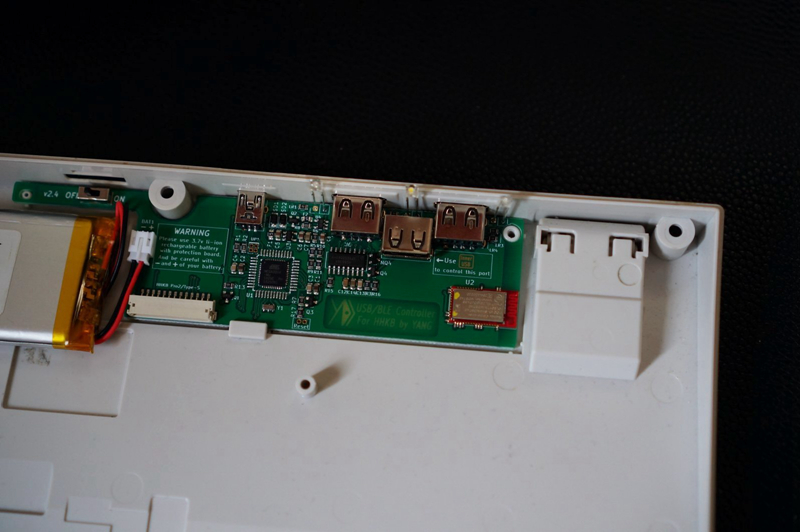
In
the case of not destroying the casing, the effect of the indicator
lights is as shown below. In addition to customization, these indicator
lights will also be used to indicate the flash mode and wake up from
lock mode. Only the white casing can transmit light. Even if these three
indicators are not used, most of the situations can be indicated by
relying on the green light LED3 below the USB, but there is no
convenient indication on the front.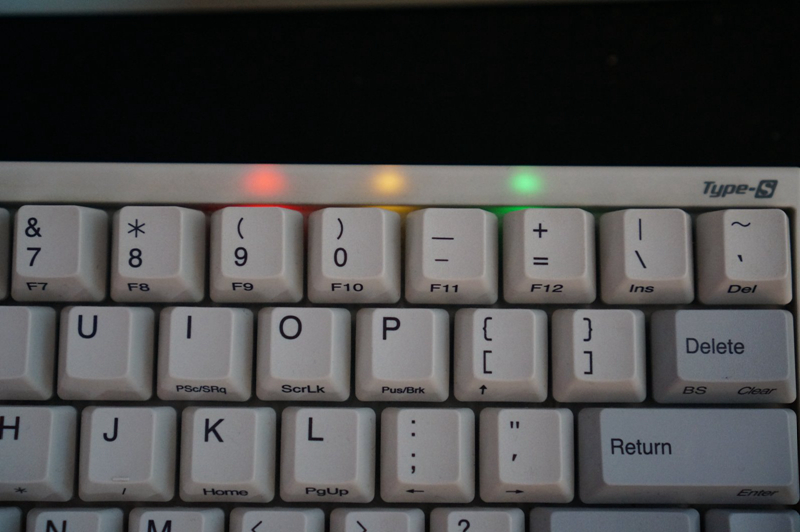
In
addition to these three indicators, there is also an LED light under
the two USB HUBs. The green light has the same function as LED3, and it
is the same as LED3 when customizing, and the red light is the charging
indicator.
The green light here is mainly black and there is no
indicator light on the front, you can also rely on this to confirm some
status indications (generally do not look at the indicator light, but
only when you need to debug or check a special state, then this light is
useful).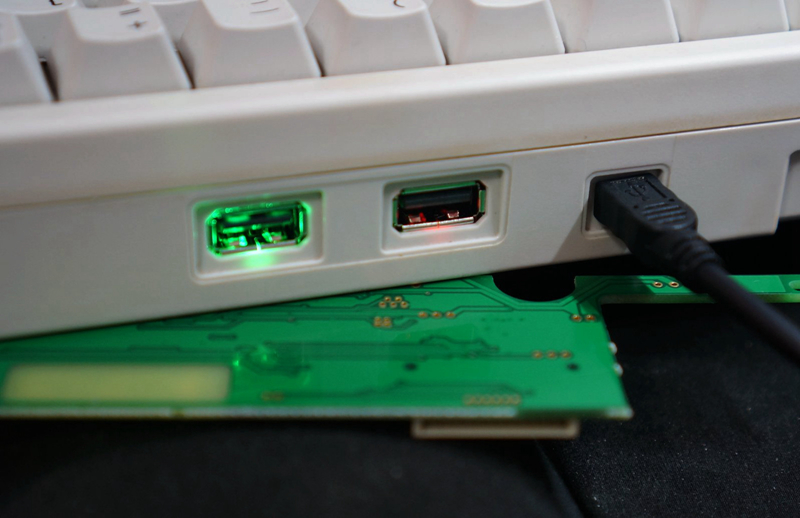
The USB interface keeps using MiniUSB by default.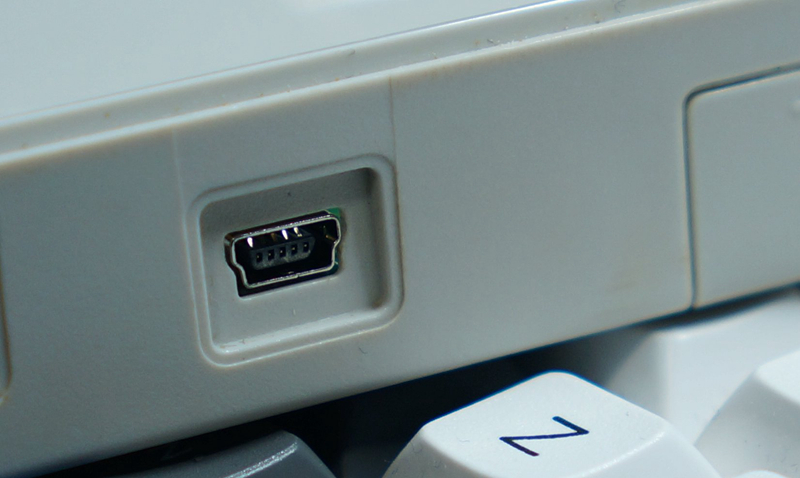
Without
destroying the shell, modify the use of the USB C port, the effect is
as shown below. The heightening adapter board is welded by the seller.
There is no installation step difference for buyers. For the first use,
it is recommended to use your C port data cable to plug and unplug
several times on the shell, and then install the main control.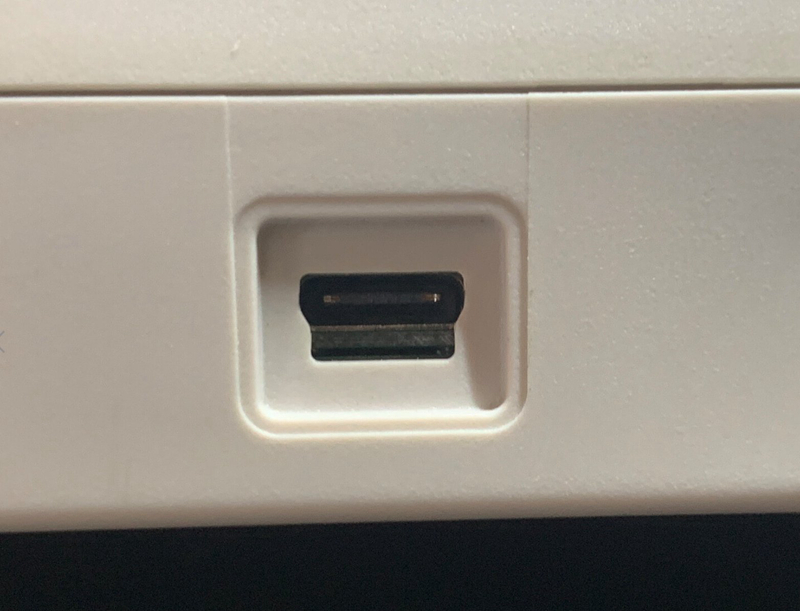
The
USB HUB interface of the keyboard can be connected to a U disk (this is
a matter of course, but the HUB that comes with keyboard for HHKB does
not allow U disk to be connected). However, don't use this to replace
the main control's USB connection to high-current devices, such as
mobile hard drives or charging mobile phones. Most of the time, this USB
HUB is not used (after all, it is only available in wired mode), it is
temporarily used as a hub, and can be used to connect U disks and
mouses.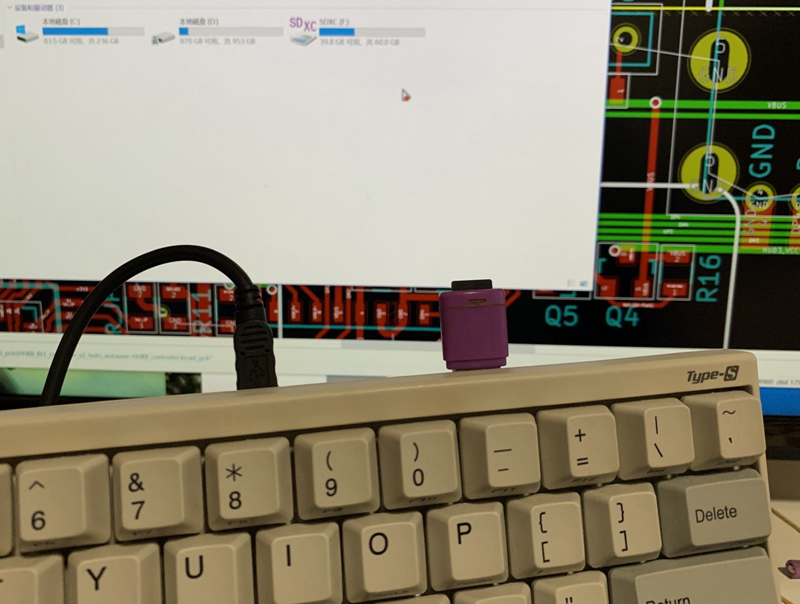
 Suitable for HHKB Pro2 Series")
 Suitable for HHKB Pro2 Series")
 Suitable for HHKB Pro2 Series")
 Suitable for HHKB Pro2 Series")
 Suitable for HHKB Pro2 Series")
 Suitable for HHKB Pro2 Series")
 Suitable for HHKB Pro2 Series")

 Suitable for HHKB Pro2 Series")


