| Quantity | 3+ units | 10+ units | 30+ units | 50+ units | More |
|---|---|---|---|---|---|
| Price /Unit | $17.81 | $17.44 | $16.90 | $16.17 | Contact US |
 M5Stack Paper S3 E-Paper Display Touchable Low Power Consumption 4.7-inch E-ink Display Development Kit ESP32S3
$87.42
M5Stack Paper S3 E-Paper Display Touchable Low Power Consumption 4.7-inch E-ink Display Development Kit ESP32S3
$87.42
 LILYGO Grey Shell Version T-Display-S3 1.9-inch LCD Display Development Board WiFi Bluetooth5.0 Wireless Module for Arduino
$32.47
LILYGO Grey Shell Version T-Display-S3 1.9-inch LCD Display Development Board WiFi Bluetooth5.0 Wireless Module for Arduino
$32.47
 Sketchboard Mechanical Arm Plotter Robot Arm Students Programming Learning DIY Kit for Arduino
$44.05
Sketchboard Mechanical Arm Plotter Robot Arm Students Programming Learning DIY Kit for Arduino
$44.05
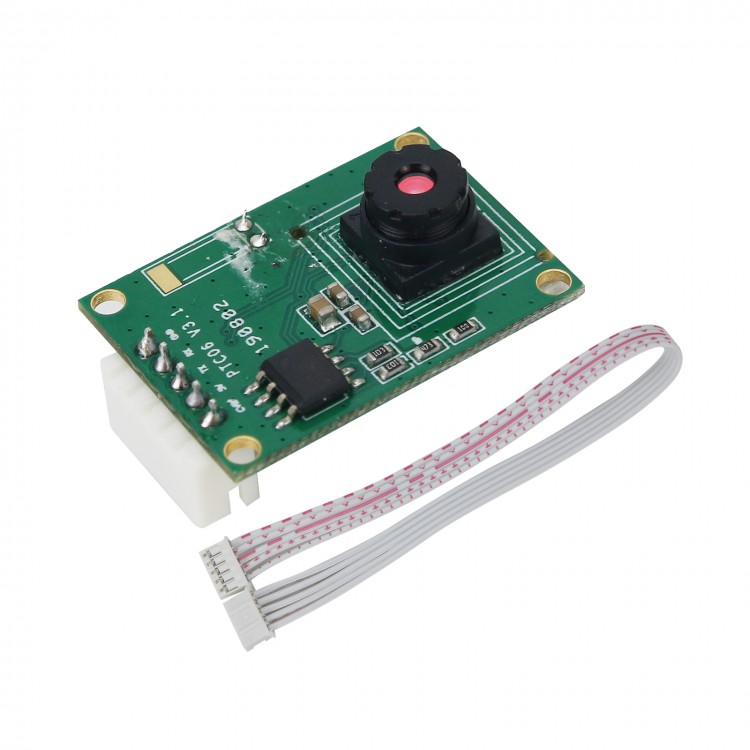
3.3V-5V Camera Module TTL/UART JPEG/CVBS for AVR STM32 Arduino VC0703 Chip
Key Parameters:
- Image Sensor: 1/4-inch CMOS
- Image Pixel: 0.3MP
- Lens focus: 4.3mm
- Vision Angle: 70°
- Pixel Size: 5.6μm * 5.6μm
- Output Format: Standard JPEG/M-JPEG
- White balance: automatic
- Exposure: Automatic
- Gain: Automatic
- Shutter Type: Electronic Rolling Shutter (ERS)
- SNR: 45DB
- Dynamic range: 60DB
- Maximum analog gain: 16DB
- Maximum Frame Rate: 30 Fps at 640*480
- Scan Mode: Progressive
- Vision Distance: 5-15M
- Optional Image Resolution: Default VGA (640*480); QVGA (320*240)
- Optional Night Version Infrared Fill Light
- Baud Rate: Default 115200
- Working Current: 100Ma
- Power Consumption: 500mW
- Working Voltage: 3.3-5V DC (Recommend 5V)
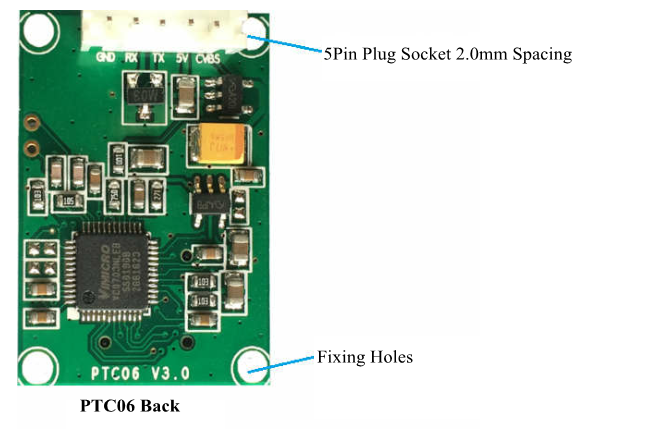
- Communications Ports: TTL Level UART Interface (TX, RX, GND)
- Operating Temperature: -30℃ to +70℃
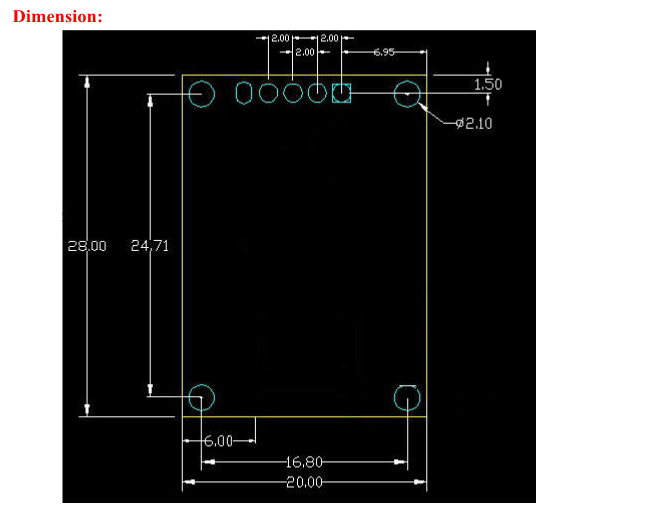
- Module Weight: 5g
Package Included:
- 1 x VC0703 3.3V-5v Camera Module TTL/UART Only (Unfished)
- 1 x Cable
Note: Please note that self-assembly is needed. Thank you! 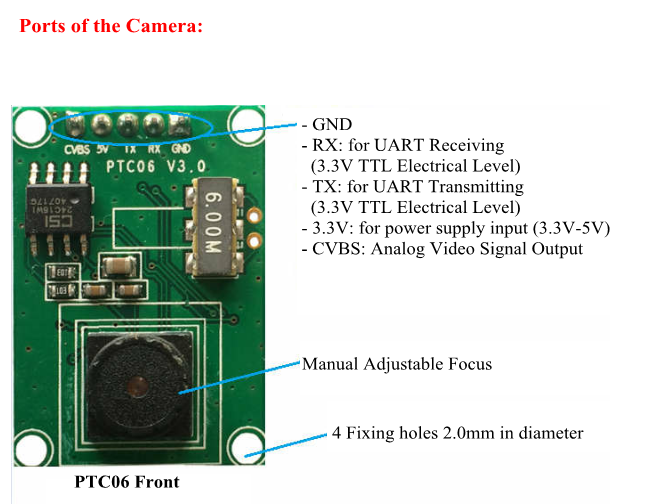
Attention:
- For reading static pictures serial-control camera is connected via GND, RX, TX, and VCC.
- For analog video output, the CVBS port should be connected.
- TX and RX are the signals of 3.3V TTL Electric Level.
- When you use 5V to power the camera, the working current is around 100mA. So we recommend that a controlled switch to control the power supply.
- When it is used for the first time, please receive and send command after 2.5s.
Communications Protocol for the Camera (The numbers of command is hexadecimal)
1. Command to Reset: 56 00 26 00; Return: 76 00 26 00
2. Command to Take Photos: 56 00 36 01 00; Return: 76 00 36 00 00
3. Command to Read the Length of Photos: 56 00 34 01 00; Return: 76 00 34 00 04 00 00 XX YY
XX YY ---data length,XX for higher byte,YY for low byte
4. Command to Read the Data of Photos: 56 00 32 0C 00 0A 00 00 XX XX 00 00 YY YY 00 FF
Return: 76 00 32 00 00 FF D8…FF D9 76 00 32 00 00
00 00 XX XX ------start address(default: 00 00)
00 00 YY YY ------data length(higher one firstly then lower byte)
5. Command to Clear Photo Cache: 56 00 36 01 02; Return: 76 00 36 00 00
6. Command to Set Compression Ratio of Photos: 56 00 31 05 01 01 12 04 XX; Return: 76 00 31 00 00
XX recommend 36 (range:00 to FF)
7. Command to Set the Size of Photos:(default: 640*480)
56 00 31 05 04 01 00 19 11 (320*240); Return: 76 00 31 00 00
56 00 31 05 04 01 00 19 00 (640*480)
56 00 31 05 04 01 00 19 22 (160*120)
8. Command to Modify the Serial Buad Rate (Temporary):56 00 24 03 01 XX YY; Return: 76 00 24 00 00
XX YY Rate
AE C8 9600
56 E4 19200
2A F2 38400
1C 4C 57600
0D A6 115200
Attention:
- Default baud rate: 115200
- With the baud rate modified, it will be 115200 when it is powered on again.
9. Command to Modify the Serial Baud Rate (temporary):56 00 31 06 04 02 00 08 XX YY; Return: 76 00 31 00
XX YY Rate
AE C8 9600
56 E4 19200
2A F2 38400
1C 4C 57600
0D A6 115200
Attention: After modifying the initial baud rate of the serial port, you need to reset or re-power it once, and the new setting will take effect.
Steps to Take Photos with PTC06 Camera:
- Step 1: Power on
- Step 2: No Operation within 2.5s
- Step 3: Set Command to Change the Size of Picture (If it is needed to change the size, please carry out Step 4: Command to Reset)
- Step 4: Command to Reset (Only carried out after Step 3)
- Step 5: Set Command of Compression Rate for Photos
- Step 6: Send Command to Take Photos
- Step 7: Send Command to Read the Length of Photos
- Step 8: Send Command to Read the Data of Photos
- Step 9: Send Command to Clear Cache
- Step 10: Take Photo again please Return to Step 6.


 Kit")
