| Quantity | 3+ units | 10+ units | 30+ units | 50+ units | More |
|---|---|---|---|---|---|
| Price /Unit | $213.68 | $209.32 | $202.78 | $194.06 | Contact US |
 XLT-802 Automatic Screw Feeder 1.0-5.0mm Screw Conveyor with Adjustable Guide Rail and Side Speed Adjustment Knob
$112.87
XLT-802 Automatic Screw Feeder 1.0-5.0mm Screw Conveyor with Adjustable Guide Rail and Side Speed Adjustment Knob
$112.87
 HM-130HP Dual Action Airbrush 8-85PSI 0.3MM High Performance Quick Release Spray Nozzle Air Pressure Gun
$50.69
HM-130HP Dual Action Airbrush 8-85PSI 0.3MM High Performance Quick Release Spray Nozzle Air Pressure Gun
$50.69
 T90C (T65 Tip) Portable Intelligent Soldering Iron IPS LCD Screen 18-130W Soldering Pen with PD 140W Adapter and T65-KU/BC2 Tips
$82.62
T90C (T65 Tip) Portable Intelligent Soldering Iron IPS LCD Screen 18-130W Soldering Pen with PD 140W Adapter and T65-KU/BC2 Tips
$82.62
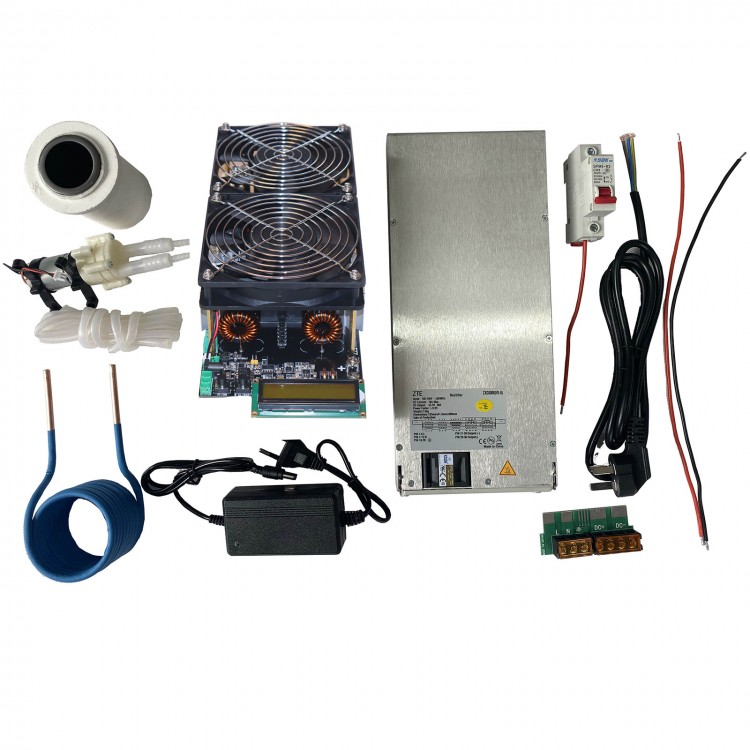
3000W ZVS Induction Heater Kit with 1602 LCD Display Mainboard Crucible and Used 3000W Power Supply
Used DC 48V 3000W Power Supply:
* Due to a shortage of power supplies, 3000e3 for Emerson, ZTE ZXD3000 single-fan, and ZXD3000 dual-fan power supplies will be shipped randomly. Except for the appearance, all other specifications—including weight—are identical across these models.
* Please note these are used power supplies, so the casing may have some scratches, but this does not affect normal power output. Each unit is tested before shipping to ensure proper function. Please make sure that you don't mind before purchasing. Thank you!
Advantages:
* 3000W induction heater
* Input voltage: DC 12–60V
* Supports one-key reset and one-key start
* Low water pressure protection
* Microsecond-level under-voltage and over-current protection
* Anti-interference external switch interface – compatible with PLCs and microcontrollers; suitable for secondary development
Product Features & Functions:
* Designed with 1.6mm thick military-grade PCB, 20Z copper thickness for high current capacity and excellent heat dissipation
* Equipped with dual 120mm cooling fans
* Uses a custom oversized high-power heat sink to ensure efficient cooling of the MOSFETs
* Output terminals feature six M4 copper posts in parallel, supporting connection to heating coils, high-voltage transformers, or high-frequency transformers
* Uses six original IRFP260 MOSFETs and twelve original BM capacitors in parallel resonance, delivering high power and efficiency
* This product can operate continuously for extended periods under proper cooling conditions
1602 LCD Display Contents:
* Input Voltage
* Input Current
* Input Power
* Operating Status
* Alarm Type
Product Specifications:
* Dimensions (L × W × H): 240mm × 120mm × 88mm
* Heating Coil Dimensions: 70mm × 60mm × 73mm
* Input Voltage: DC 12–60V (Recommended: DC 48V)
* Maximum Power: 3000W
* Maximum DC Operating Current: 60A
* Maximum Temperature for Direct Heating of Iron: 800–900°C
* Maximum Crucible Temperature: 1600°C
Package Includes:
* 1 × Mainboard
* 1 × Heating Coil
* 1 × Water Pump
* 1 × Water Pump Tube
* 2 × Fans
* 1 × Power Adapter
* 1 × 70mL Crucible
* 1 × Used DC 48V 3000W Power Supply
* 1 × Circuit Breaker
* 1 × Power Cable
* 1 × Red Wire
* 1 × Black Wire
* 1 × Power Connector
Packaging Details:
* Weight: 5.2kg
Precautions (Must Read Before Use):
1. Never power on the device without a load connected under any circumstances. ("No load" means the output ports are not connected to any load.) Powering on without a load will cause a high-frequency noise from the board, which can lead to irreversible damage to the MOSFETs.
2. Induction heating generates high power, causing significant heat not only in the PCB and electronic components, but also in the heating coil. To avoid burning out the heating coil and damaging the system, a cooling water pump for the coil is absolutely required.
3. Use a power supply that meets the required power rating to prevent under-voltage protection from being triggered:
* For 12V input, use a power supply of at least 500W
* For 24V input, at least 1200W
* For 36V input, at least 2000W
* For 48V input, at least 3000W
* Regardless of voltage, keep the working current under 60A to prevent circuit damage. The hardware current protection limit is 60A, and under-voltage protection triggers at 12V.
4. High-power operation naturally generates heat, so proper heat dissipation is essential.
5. During operation, the heating coil gets extremely hot. Water cooling is recommended to lower its temperature. Use cold water in and discharge hot water directly into the drain to prevent damage to the mainboard caused by excessive heat.
6. Observe correct polarity on the power input terminals, which are clearly marked with "+" and "-". Do not reverse the connection!
7. Never power on without a load connected. (In this context, "no load" means the output is not connected to any load; connecting a heating coil without placing a heated object inside does not count as "no load.")
8. When using a graphite crucible, non-recirculating water cooling is required (i.e., cold water in, hot water out to the drain). This prevents water temperature from becoming too high during long-term, high-power operation. Do not cut off the 12V auxiliary power supply immediately after heating ends if the crucible is still inside the coil—doing so will stop the water pump and may result in the heating coil being damaged by the crucible's residual heat.
Interface Description:
① Heating Coil Output Terminal (Must be wired correctly according to the wiring diagram)
② Bypass Protection for Forced Start (Short to power on forcibly — use with caution)
③ Water Pump Port (Must use the included water pump)
④ Onboard Fan Port
⑤ DC 12V 2A Power Input Port
⑥ ON External Control (Same function as ⑨, reserved for external remote control)
⑦ Momentary External Control (For devices like foot switches — press to power on, release to power off)
⑧ Reset External Control (Same function as ⑩, reserved for external remote reset)
⑨ Start Heating Button
⑩ Reset Button (Stops heating or clears alarms)
⑪ Display Screen
⑫ DC 48V Power Input Port
⑭ Water Cooling Alarm Switch Selector (Insert a jumper cap to disable the onboard water-cooling alarm; this can be done when using your own water pump)
Operating Instructions:
1. Connect all wires according to the wiring diagram. Double-check carefully—incorrect connections are not allowed. (Note: The fans and support posts are separated from the mainboard during shipping and must be correctly assembled according to the wiring diagram.)
2. First, plug the 12V 2A power supply into AC 110V–220V. Check whether the water pump and fans are operating normally, and whether the display screen lights up.
3. If the water pump, fans, and display all work properly, plug the DC 48V power supply into AC 220V. Wait a few seconds, then turn on the air switch (optional). Check if the voltage shown on the mainboard's display is around 48V.
4. If the voltage is correct, press the Reset button to clear the startup alarm. When the display shows no alarm, press the "ON" button to activate heating. The green indicator light should turn on, and the display should show current and "ON", indicating the heater is working.
5. To turn off heating, press the Reset button. The green indicator light will turn off, current on the power meter will drop to zero, and the display will show "OFF".
6. This heating board features overload protection and water shortage protection. If the water pump malfunctions or there's insufficient water, the system will automatically shut down heating and display "LWP" (Low Water Protection). If there is an over-current, the display will show "OCP" (Over-current Protection). If input voltage is too low, the display will show "UVP" (Under-voltage Protection).
7. The forced start switch (Position ②) can be used to force start the system by connecting a switch when the alarm system fails or the control circuit is damaged. Use with caution, and ensure water cooling is functioning—any water interruption during use may burn out the board.
8. If the heating indicator turns off and heating stops, troubleshoot based on the alarm code shown on the display.
9. If heating is stopped due to over-current, under-voltage, or other alarms, you must press the Reset button to clear the alarm before restarting heating.
10. Ports ⑥, ⑦, and ⑧ must be connected to self-resetting switches (e.g., foot switches that automatically pop back after pressing).


 with 1602 LCD Display Mainboard and Heating Coil")


 w/ 2.4\" Color Screen Built-in Power Meter & Protection")
