| Quantity | 3+ units | 10+ units | 30+ units | 50+ units | More |
|---|---|---|---|---|---|
| Price /Unit | $283.23 | $277.45 | $268.78 | $257.22 | Contact US |
 FUZRR ES3000P Multifunctional Micro-controller 3-Wire Ground Resistance Tester 0-20Kohms High Precision Earth Resistance Tester
$275.47
FUZRR ES3000P Multifunctional Micro-controller 3-Wire Ground Resistance Tester 0-20Kohms High Precision Earth Resistance Tester
$275.47
 150W Multifunctional Bluetooth Battery Capacity Tester CC/CR/CP/CV/PT/BRT Intelligent DC Programmable Electronic Load
$59.21
150W Multifunctional Bluetooth Battery Capacity Tester CC/CR/CP/CV/PT/BRT Intelligent DC Programmable Electronic Load
$59.21
 FUZRR ES3090E 220A Loop Resistance Tester Micro-ohmmeter for High Voltage Switch Contact Resistance Measurement
$1,466.23
FUZRR ES3090E 220A Loop Resistance Tester Micro-ohmmeter for High Voltage Switch Contact Resistance Measurement
$1,466.23
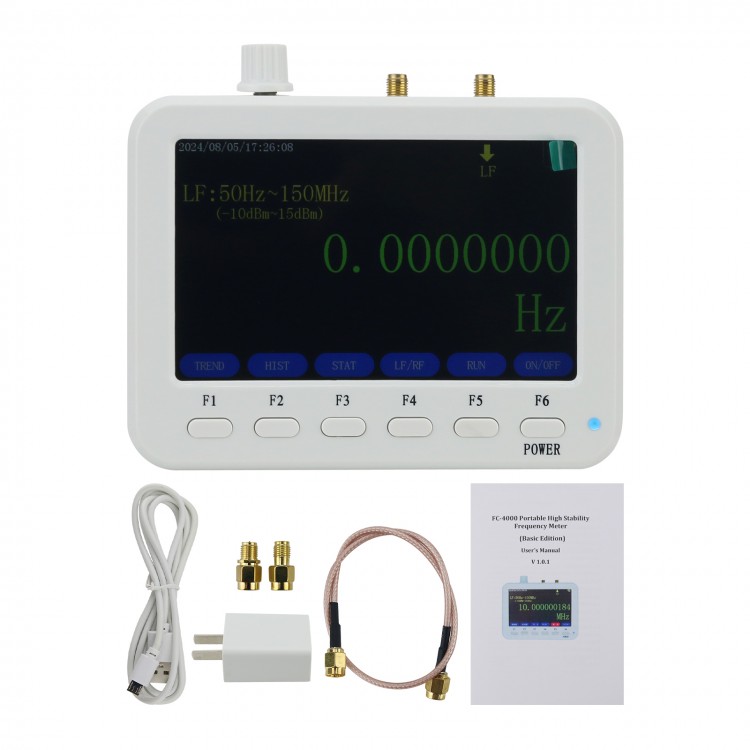
50Hz-4GHz RF Frequency Meter Portable Frequency Counter w/ 5" Color Display FC-4000
Function Introduction:
It is a portable high-precision frequency meter with high-resolution LCD. Built-in OCXO precision reference, and calibrated by atomic clock, its accuracy reaches 0.001Hz (relative accuracy is 0.001ppm for common MHz crystal frequency). Low frequency port supports DCf200MHz, high frequency port supports 100M~4.2GHz.
The instrument features compact size, high resolution and high stability. It can be charged using your phone's standard USB charging port for outdoor measurements. In addition to accurately measuring real-time frequency, it also provides basic statistical values (Max, Min, Avg, Pk~Pk), frequency trend graph, frequency distribution histogram and other statistical functions, which is convenient and easy to use.
Features:
- 5" high-resolution color TFT clearly displays measurement statistics.
- High stability OCXO provides accurate time base for frequency meter. The product is calibrated using an atomic clock while passing factory tests.
- Small (6-inch phone size) and portable.
- High accuracy: 0.001Hz (for common crystal frequency, relative accuracy is 0.001ppm).
- Real-time statistics function: For real-time signal frequency measurement, it can accurately display signal real-time frequency, Max, Min, Avg, Pk~Pk values, and accurately and clearly display signal frequency information.
- Expanded statistical display capabilities, including frequency recording trend graphs and cumulative frequency distribution histograms.
Typical Applications:
1.To measure the exact frequency of a clock, bus CLK, active crystal oscillator, or RF signal generator, as shown in Figure 1.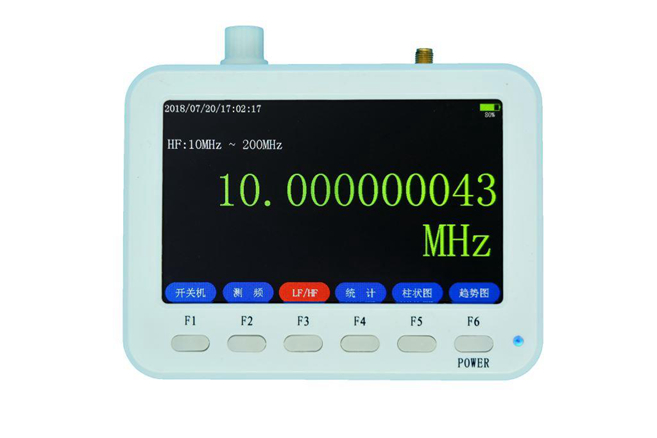
Figure 1: 10MHz atomic clock measurement chart
2.Measurement and analysis of high-precision jitter and drift of communications equipment
Whether performing low-speed, highly accurate measurements over a long period of time, or high-speed measurements over a short period of time, users can use it as an economical, high-precision jitter and drift analysis solution.
A.View the maximum / minimum value, average value, and Pk~Pk values of the batch data, as shown in Figure 2.
Figure 2: 15kHz signal real-time measurement chart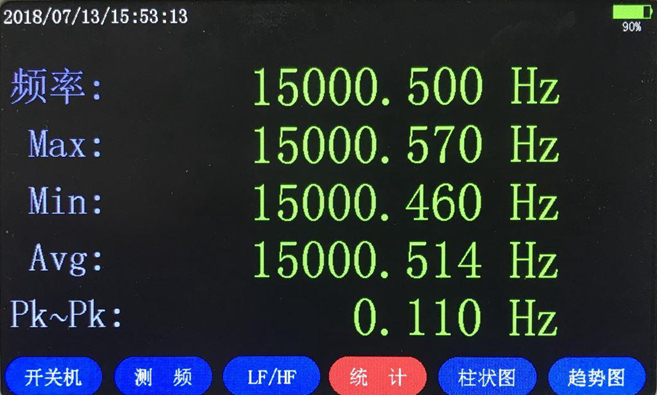
B.See trends and changes in frequency through a series of measurements, as shown in Figure 3.
Figure 3: 15kHz signal source frequency trend graph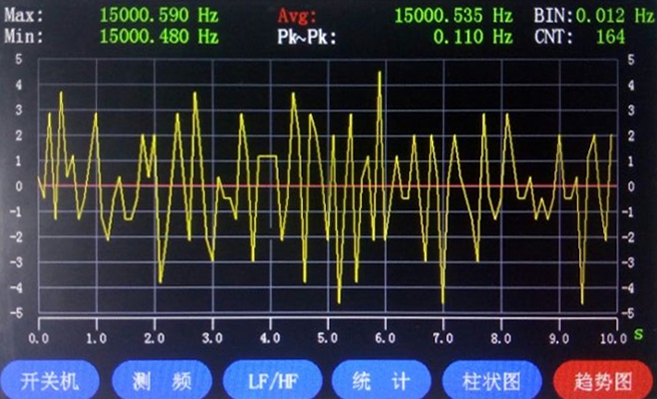
C.View the histogram of the batch data, as shown in Figure 4.
Figure 4: 10kHz signal generator frequency histogram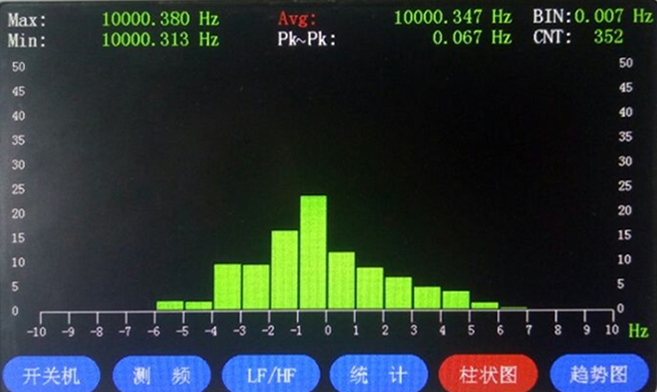
Technical Parameters:
- Input Voltage:
50Hz~100MHz, AC/DC Power: -10dBm~15dBm;
100MHz~4GHz, AC/DC Power: -10dBm~15dBm.
- Time Base: OCXO Frequency 13MHz
- Time Base Characteristics:
Accuracy: <±2X10⁻⁷;
Aging rate: <±5X10⁻¹⁰ / month;
Temperature drift: 0℃~70℃, ±1X10⁻⁸ (Reference 25℃).
- Accuracy: Time base error ±0.001Hz
- Display: Color TFT screen
- Maximum Resolution: 0.001Hz
- LCD Resolution: 800x480
- LCD Size: 5-inch
- RF Port: SMA-K
- Built-in RTC Clock: Support
- Charging Time: 4-5 hours
- Charging Port: Micro USB
- Operating Temperature: -20 to 45℃
- Storage Temperature: -20 to 70℃
Functions of Buttons:
Buttons F1 ~ F6 correspond to LCD menu labels respectively. Select and press buttons to enter corresponding functions.
F1: Turn on/off. Long press F1, the instrument starts to work, and long press F1 again to turn it off ;
F2: Frequency measurement function. To test frequency of each signal, you must press Frequency Test to get the current frequency accurately;
F3: Switch between DC ~ 10MHz and 10MHz ~ 200MHz. After switching, press F2 to test;
F4: Statistics function;
F5: Histogram function;
F6: Trend chart function;
Attention: Only after pressing F2, then F3, F4, F5, F6 are valid.
After the meter is connected to a signal generator, press and hold F1 button to turn on, and the screen displays power-on interface. Release button F1 to enter frequency measurement interface, as shown in the figure below.
Frequency testing interface 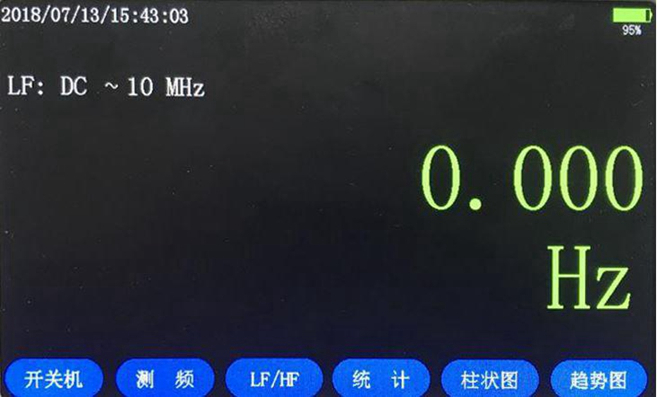
Press F2 and select frequency measurement option. Press F3 to select the test signal frequency band. Signal frequency band is divided into LF (DC~10MHz) and HF (10MHz~200MHz). After the selection is completed, there will be a prompt message in the upper left corner of the interface. For each test, press F2 to test the current frequency.
If the test gear does not match the load signal frequency band, or there is no signal input, the screen will not display frequency. When pressing F3 to change gears, an error prompt interface will appear, as shown in the figure below. This is normal phenomenon. Press F2 again to measure frequency.
Error prompt interface 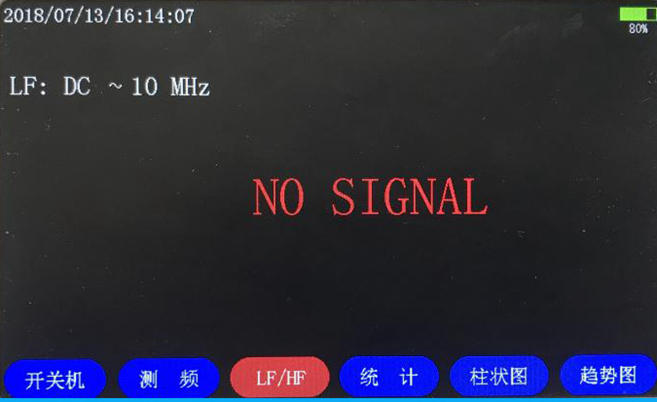
After the frequency measurement is completed, press and hold F1 to shut down, and enter power-off interface.
Real-time Statistics Function:
Take the input frequency of 15KHz as an example. Connect the instrument to a signal source, press F2 to measure frequency, and then press F4 statistical function, the meter can display the present signal frequency, Max, Min, Avg, Pk~Pk values. Avg and Pk~Pk values need to wait for the statistics to complete before they are displayed correctly, as shown in the figure below.
Real-time statistics interface 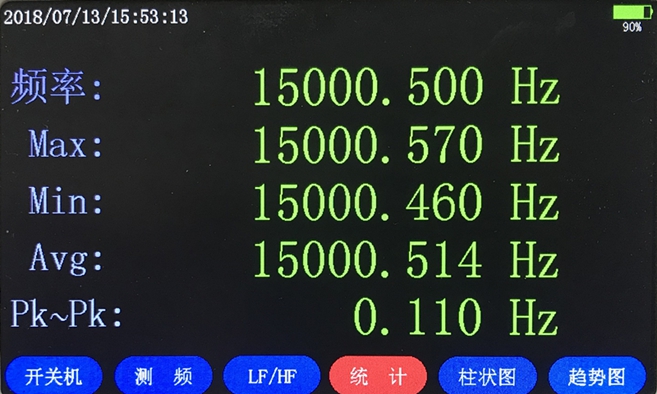
Trend Chart Function:
Based on the above example, after the statistics are completed, press F6 to enter the trend graph interface. Red line on the interface indicates the average value of the current signal. Yellow frequency jitter indicates the average value of real-time frequency offset. If the frequency trend cannot be displayed completely, turn the white knob on the instrument to adjust BIN value (the size of each grid on the Y axis), so as to achieve the effect of displaying the frequency trend completely, as shown in the figure below.
Trend graph interface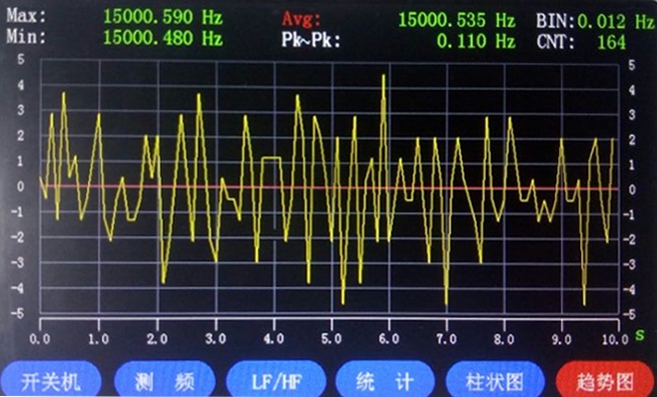
X axis represents time.
Y axis represents the average value of signal frequency offset.
CNT represents the number of acquisition frequencies.
BIN represents average offset per grid. For example, 5 grids mean the average offset is 5 * BIN Hz.
BIN value should be adjusted according to the value of Pk~Pk. 10 * BIN <= Pk~Pk value.
Histogram Function:
Press F5 and wait for about 10 seconds. After the statistics are completed, you can see the percentage of the deviation between the real-time frequency and the average. The height of the histogram represents the percentage, as shown in the following figure. If the histogram cannot be displayed, turn the white knob on the top of the instrument to adjust BIN value (the size of each grid on X axis).
Histogram interface
X axis represents the offset from the average. When negative: less than average. Positive number: greater than average.
Y-axis represents the percentage of the deviation between the real-time frequency and the average.
CNT value represents the number of acquisition frequencies.
BIN represents average offset per grid. For example, 5 grids mean the average offset is 5 * BIN Hz.
BIN value should be adjusted according to the value of Pk~Pk. 20 * BIN <= Pk~Pk value.
Auxiliary Function:
Press and hold F3 and F5 buttons at the same time to enter setting interface, as shown in the figure below.
Setting interface
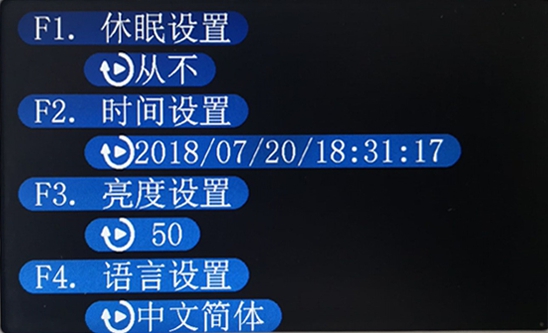
F1, F2, F3, and F4 keys correspond to display settings. When you press and hold the buttons, the corresponding functions are valid. Functions are invalid by short press. Press the knob to determine functions. Turn left or right to adjust the corresponding value. Press F2 to exit the setting interface and return to frequency measurement interface.
Sleep Setting: After selecting, you can adjust time with the knob. After adjusting, you can confirm via OK key. (Attention: The range is 1 to 60 minutes and set to never shut down automatically)
Time Setting: F1~F6 correspond to year, month, day, hour, minute and second respectively. After the setting is completed, press OK to confirm.
Brightness Setting: After selection, brightness can be adjusted by the knob. After adjustment, you can confirm with OK key. (Attention: the relative range of brightness is 0 to 100%)
Language Setting: After selecting, you can set languages through the knob. After setting, you can confirm with button OK. (Note: Chinese and English are optional)
Preparation before Using:
- Use the counter at an ambient temperature of 0~40°C. Do not place it on high-temperature equipment, and ensure the ventilation of the environment around the instrument.
- Do not allow water to penetrate the instrument and do not shake it violently.
- Preheat for 30 minutes before use to stabilize the time base.
Precautions:
- Please make it fully charged before using.
- Do not exceed the signal range to avoid damaging the receiving front end of the instrument.
- Keep enough power to avoid shutdown without power.
- Its USB interface is fragile. Do not use excessive force when inserting or removing, and avoid lateral force.
- Pay attention to the storage temperature and using temperature range. Please not place it in vehicles to expose to sun.
- For long-distance transportation, it should be placed in a box or suitcase to avoid scratching the LCD screen due to mixed hard objects.
- It is recommended to use an adapter to increase the life of original interface.
- RF connector is cleaned every 3 months, and wiped with a cotton swab with absolute alcohol.
- Do not use the instrument if it has water, shakes, or makes other obvious abnormalities.
- Never test outdoor equipment during a thunderstorm, including outdoor equipment with lightning arresters.
- In winter, when enter heated rooms from outdoors, please avoid condensation inside the instrument. If the product is condensed, it should be dried and then turned on.
Package Included:
- 1 x RF Power Meter