| Quantity | 3+ units | 10+ units | 30+ units | 50+ units | More |
|---|---|---|---|---|---|
| Price /Unit | $17.53 | $17.17 | $16.64 | $15.92 | Contact US |
AM FM Radio DIY Kit Frequency Modulation and Amplitude Modulation Digital Radio Kit Spare Parts
Advantages and disadvantages of FM/MW/SW:
- FM (Frequency Modulation Broadcasting): (Radio signal: the amplitude remains unchanged, and its frequency is adjusted) The characteristics of listening to FM broadcasts are that the interference is small, the sound is clean, stereo (two-channel) programs can be received, and the audio range is wide; Disadvantages: Because the FM frequency band mainly propagates through straight-line propagation and reflection from ground objects, the signal transmitted by the radio station has a short propagation distance and small coverage, and generally only local stations can be listened to.
- SW (Shortwave): The propagation of shortwave is mainly carried out by sky waves, which can be transmitted to a long distance with very little power by means of sky waves. Shortwave is characterized by unstable signal drift, loud noise, monophonic, poor sound quality. The advantage is that the transmission distance is long, the coverage is large, and international radio programs can be received.
- MW (Medium Wave): It can be transmitted by sky wave and ground wave. But sky wave is very unstable. In the process of sky wave propagation, factors such as path attenuation, time delay, atmospheric noise, multi-path effect, and ionospheric fading will cause signal weakening and distortion, affecting the effect of communication. It is characterized by noise, strong directionality, weak anti-interference ability, and good sound quality. Due to the influence of the ionosphere, the signal is basically not received during the day.
Description:
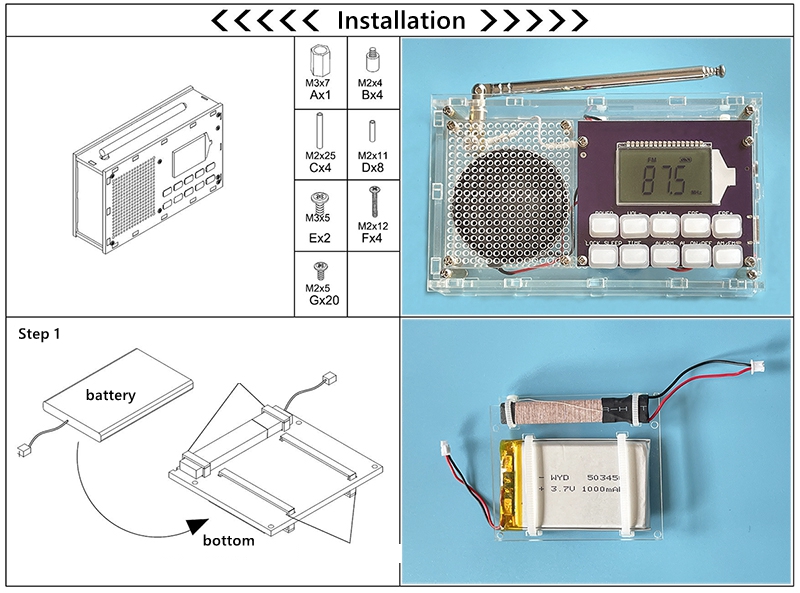
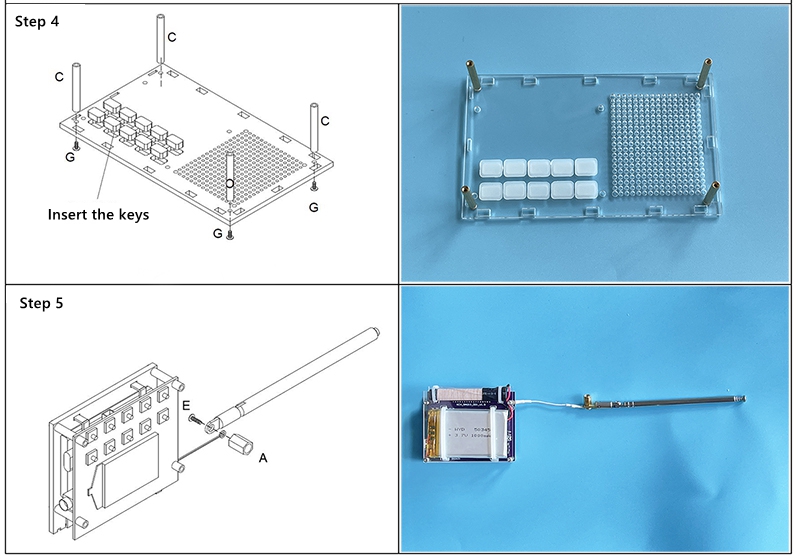
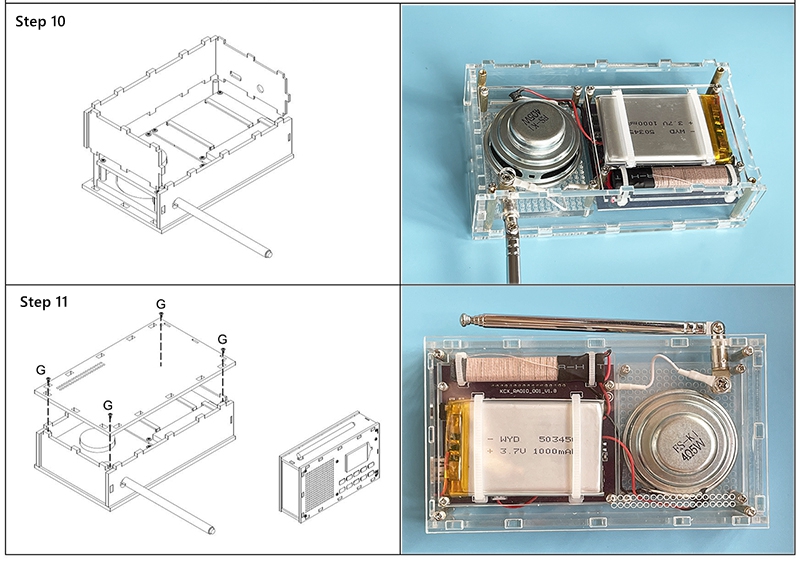
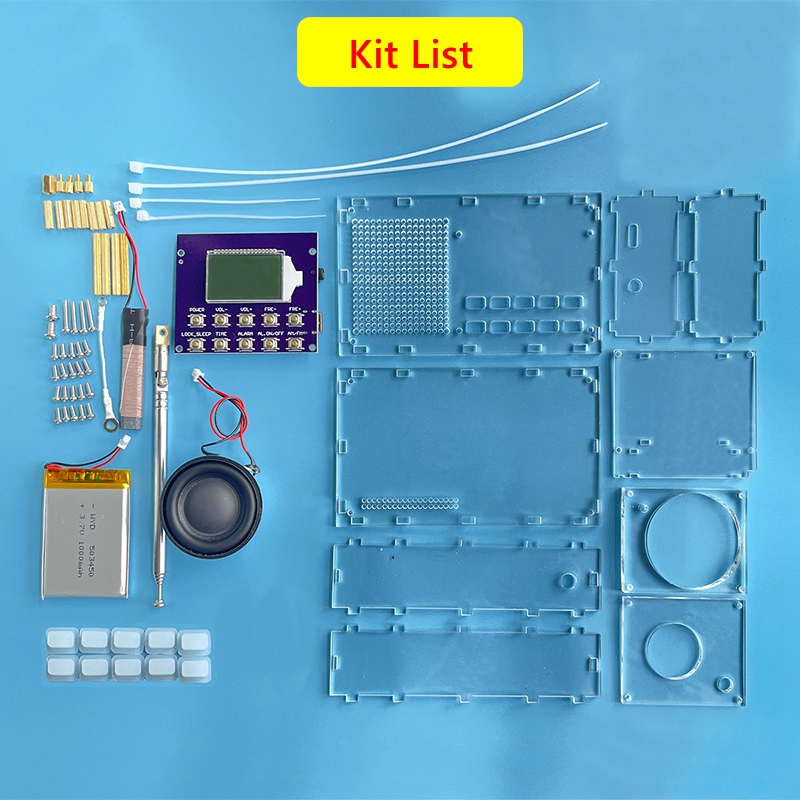
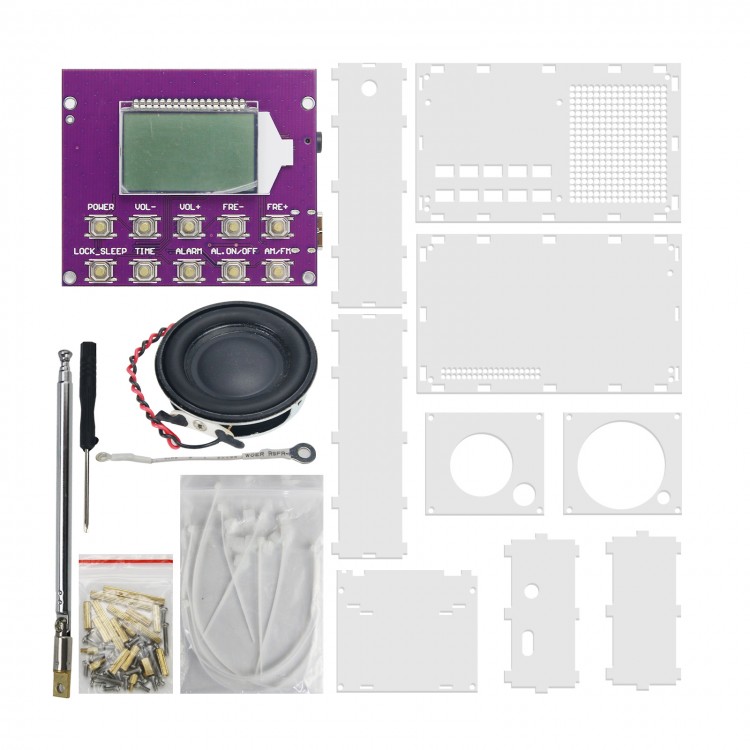
- This product is a high-sensitivity digital clock-controlled radio kit that integrates FM, AM, and SW three bands. It adopts a modular structure of splicing and installation. It is very suitable for radio electronics enthusiasts, electronic DIY enthusiasts and primary and secondary school students to exercise their hands-on ability. The circuit modules are connected by connectors. The installation process only needs to prepare a screwdriver and refer to the installation diagram to complete. A high-sensitivity digital radio can be assembled without using an electric soldering iron.
Specification:
- Frequency range:
Frequency Modulation (FM): 87-108MHz
Medium wave (MW): 522-1620KHz
Shortwave (SW): 4.75-21.85MHz
- Noise limiting sensitivity:
Frequency modulation (FM): 30dB ≤ 8dBu
Medium wave (MW): 26dB ≤ 60dBu
Shortwave (SW): 26dB ≤ 32dB
- Signal to Noise Ratio:
Frequency Modulation (FM): 98MHz ≥ 50dB
Medium wave (MW): 1000KHz ≥ 40dB
- Maximum output power:
Headphone: ≤100mW x 2
Speaker: 5W
- Instantaneous maximum working current: ≤500mA
- Maximum output distortion: ≤10%
- Standby quiescent current in clock mode: ≤20uA (Lithium battery can stand by for 1 year when fully charged)
- Power supply: 3.7V/1000mAH lithium battery
- Dimensions: 109 x 66 x 30mm (excluding the raised part of the antenna)
- Weight of the whole machine: 166g
Function:
1. Power switch (POWER)
- Press the "POWER" button, the screen will display the "ON" pattern after 2 seconds, then display the radio frequency and frequency unit, and receive your favorite radio programs by adjusting other buttons. When this key is pressed again, the "OFF" pattern is displayed on the screen for 2 seconds, and the radio is turned off and returns to the clock state for standby.
2. Volume adjustment (VOL+/VOL-)
- In the playback radio state, short press the VOL+ button to increase the volume once, long press to continuously increase, short press the VOL- button to decrease the volume once, long press to continuously decrease the volume, and the adjustable range of the volume is 00-31.
3. Frequency increase/decrease search (TUNING UP/DOWN)
- In any band in the listening state, press the "UP" frequency to increase the search key and the "DOWN" frequency to decrease the search key to change the current radio frequency. Each short press is one radio frequency step unit. If you press and hold the button for more than 1 second, it will be in continuous step searching mode, the radio frequency will increase or decrease rapidly, until the frequency of a radio program is found, it will automatically stop and play the sound, if you need to replace it again For radio programs, the above operation can be repeated.
4. Sleep switch (LOCK_SLEEP)
- Press the "LOCK_SLEEP" button for the first time, the screen will display the sleep shutdown time and the "sleep icon" will flash. The number "90" means that the radio will automatically turn off after 90 minutes of listening time, and the "sleep icon" means that the radio is in the sleep timing state. When the sleep timer "time number" on the display is flashing, you can press the "sleep switch" button repeatedly, the sleep time can be selected from: "90-60-45-30-15-10-OFF "minutes, select "OFF" to cancel the sleep timer function. During sleep timed listening to the program, when you press the "POWER" button , the radio function can be turned off in advance and automatically return to the clock state for standby.
- Press the button once in the receiving state to query the remaining time of sleep timer playback. If you press it again, you can change the sleep timer parameters!
- Note: Press and hold the "LOCK_SLEEP" button for more than 2 seconds, that is the "key lock" function, press until the "lock" symbol is displayed on the screen, then the "lock" symbol flashes at this moment, indicating that all key functions have been locked (the keys cannot be effect). If you need to unlock, you need to press and hold the "LOCK_SLEEP" button for more than 2 seconds until the "lock" symbol on the screen disappears, the lock is released, and other button functions return to normal use.
5. Clock setting (TIME)
- Press and hold the "TIME" button for 2 seconds, the screen will display "12/24" flashing and you can choose the 12/24 hour format. When the battery is installed for the first time, the display will start running from 12:00 AM (am). The clock setting must be set in the clock display interface. The clock setting button and the radio setting button can be used in combination. When the 12/24-hour format setting item is selected and flashes, press the "TUNING_UP" button or the "TUNING_DOWN" button to switch the clock format. When no operation is performed within 5 seconds, the system will automatically exit the current setting.
- Press the "TIME" button again after the above steps, the 12:00 hour digit on the screen keeps flashing, press the "TUNING_UP" button or press the "TUNING_DOWN" button to change the hour time. The hour changes rapidly after pressing for more than 2 seconds. When no operation is performed within 5 seconds, the system automatically exits the current setting.
- Press the "TIME" button for the third time following the steps above, the 00-minute time bit in the display on the screen keeps flashing, press the "TUNING_UP" button or press the "TUNING_DOWN" button to change the minute time. After more than 2 seconds, the minutes will change rapidly. When no operation is performed within 5 seconds, the system will automatically exit the current setting.
- Continue to step above and press the "TIME" button, the system exits the current setting.
- Note: The current time is divided into 12-hour and 24-hour formats. The "AM" icon is lit to indicate the morning time, and the "PM" icon is illuminated to indicate the time at 12 o'clock in the afternoon, which is a 12-hour format. If there is no AM/PM symbol, it is 24 hour format!
6. Timing boot time setting (ALARM)
- The ALARM timing power-on time setting must be set in the clock display mode. The ALARM timing power-on setting button and the radio function button are used in combination.
- Press and hold the "ALARM" button for 2 seconds, the AL (alarm) hour time displayed on the screen keeps flashing, press the "TUNING_UP" button or "TUNING_DOWN" button to change the AL hour time. After pressing and holding the button for more than 2 seconds, the AL hour time changes rapidly. When no operation is performed within 5 seconds, the system automatically exits the current setting.
- AL minute setting refer to the previous operation. Press the "ALARM" key for the third time to exit the setting.
7. Timed power-on switch (ALARM_ON/OFF)
- The ALARM_ON/OFF timing power-on switch setting must be set in the clock display mode, and the LARM_ON/OFF timing power-on switch setting button is used in combination with the radio function button.
- Press and hold the "AL_ON/OFF" button for 2 seconds, the "alarm clock" icon will be displayed on the screen, indicating that the AL function is turned on, and then press and hold for 2 seconds, the "alarm clock" icon will disappear, indicating that the AL function is turned off.
8. Band selection (AM/FM)
- After selecting one of the above two methods to open the listening function, press the band switch button once to select your favorite band program. The band change of each single press is: FM frequency modulation, AM amplitude modulation (medium wave), SW amplitude modulation (short wave) cycle.
9. Scan and store radio stations
- In any band in the listening state, press and hold the "TIME" button for more than 2 seconds to scan the storage mode, and the frequency of the current station will increase rapidly. During the incremental process, if a radio frequency with a program is encountered, it will be automatically stored in the memory chip. When the number of stored radio stations is equal to or the radio frequency is incremented to the highest (high-end), the scanning storage state ends immediately, and the radio returns to the stored program radio or return to the lowest frequency (low end) state.
10. M+/M - storage and retrieval
- Long press the ALARM key for the "M-" function, long press the ALARM_ON/OFF key for the "M+" function.
- In any frequency band in the listening state, press the "M+" or "M-" button of the storage and access station, the address number of the frequency storage is incremented by one unit or decremented by one unit. The user can quickly change the program by pressing the "M+" or "M-" button.
- To save the current radio frequency, press and hold the "M+" button or "M-" button until the "PRE" symbol appears, while the symbol is flashing, quickly press the "M+" or "M-" button to select the at the address.
- Note: To use the M+/M- store address number fetching function, it is meaningful to complete the scanning of the relevant band to store the radio program or manually store the station, otherwise pressing the fetch key can only return to the lowest radio frequency and then display .
- If the AL function is turned on, when the real-time time and AL time run to the same time, the radio playback function is automatically turned on, and the playback function is automatically turned off after 30 minutes of listening. This AL function can only be listened to, but the buttons cannot be operated. Once the operation is performed, this function will be exited.
- There are three ways to start the radio playback. Since the AL timed radio function cannot be operated by keys, only the other two radio function start methods are introduced.
11. FM stereo switch
- In FM mode, press and hold the "AM/FM" button for 2 seconds to manually turn on and off the FM stereo decoding function. After the stereo decoding is turned on, the stereo symbol icon on the screen lights up.
- Note: The radio will output stereo effect only when the earphone is plugged into the FM mode to listen to the FM stereo station and the signal strength of the station is strong enough. AM, SW band has no stereo broadcast, this function is invalid. The FM stereo decoding function can only be turned on in FM mode, and re-entering FM mode will automatically restore to the default mono decoding mode.
12. Function description of rod antenna
- When listening to FM radio stations or shortwave SW radio programs, the rod antenna needs to be turned on. When a radio program is received, slowly rotate the angle of the rod antenna by hand until the sound of the radio station is clear and loud. For radio programs in different directions, the rod antenna needs to be rotated at different angles. By adjusting the angle of the antenna, the unit can achieve the best reception effect. In addition, a rod antenna is not required to receive MW programs in the medium wave band, it relies on a magnetic rod coil to receive the signal. If you want better reception, you must find the loudest placement direction of the radio by turning the body of the unit.
13. Charging and power reminder
- The battery icon displays the current battery level in real time. When the battery icon is 0, it means that the battery level is low and needs to be charged. Plug in the charger, the battery icon will flash circularly, indicating that it is currently charging, and it will take about 3-4 hours to fully charge. After the battery is fully charged, the battery icon is full and stops flashing. The charger can use ordinary 5V mobile phone charger, compatible with the mobile phone Type-C interface data cable (the charging cable and charger are not included).
Package Included:
- 1 x Set of Radio Kit
Note:
- You need to assemble it by yourself.