| Quantity | 3+ units | 10+ units | 30+ units | 50+ units | More |
|---|---|---|---|---|---|
| Price /Unit | $62.66 | $61.38 | $59.46 | $56.91 | Contact US |
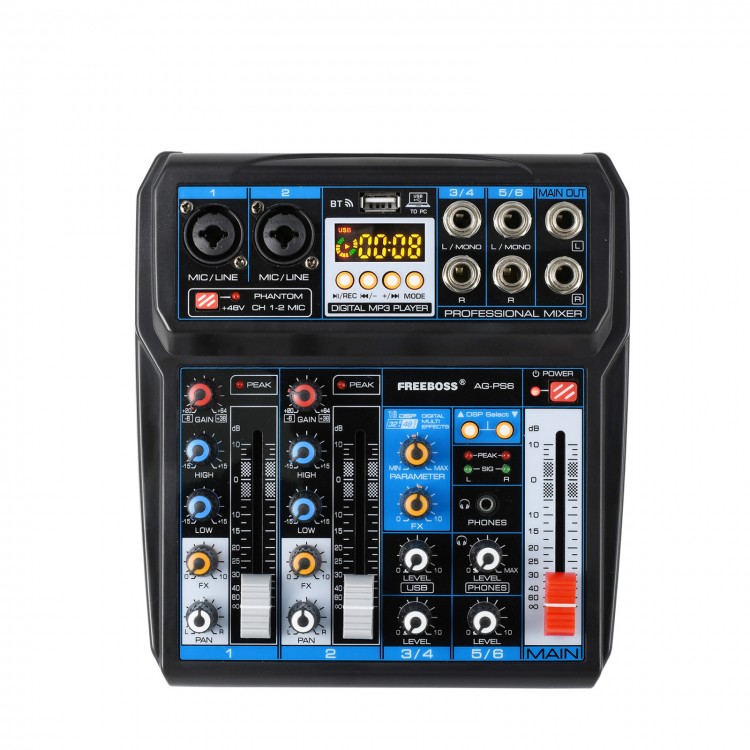
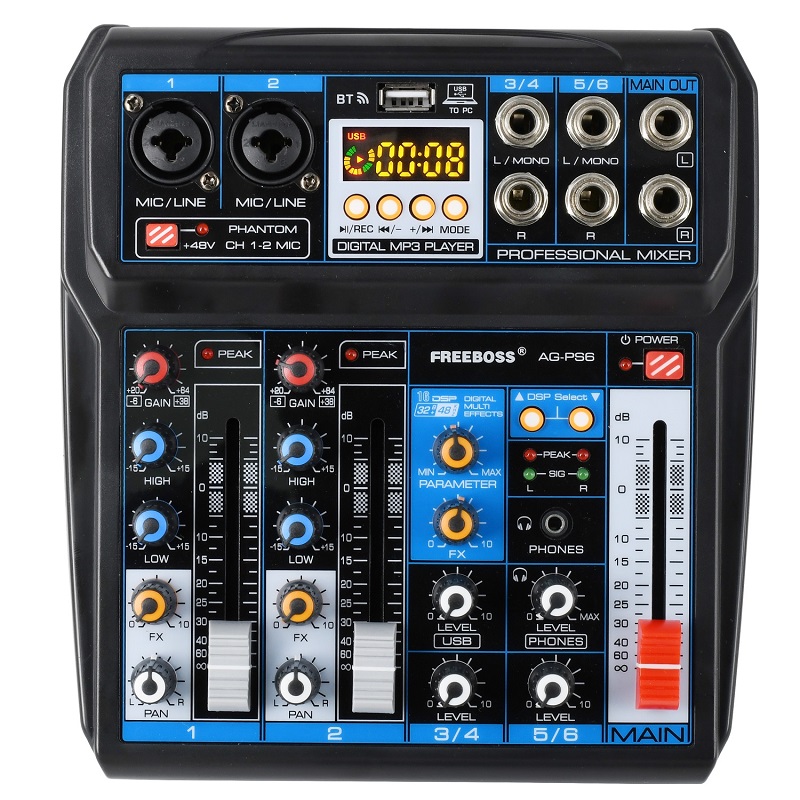
FREEBOSS AG-PS6 6 Channel Audio Mixer DC 5V Power USB Interface 2 Mono 2 Stereo 16 Digital Effects
Features:
1. 16 digital effects
2. USB power supply
3. USB play and record
4. Bluetooth
5. Sound card function
Specifications:
1. 6 input channels mixer.
2. The network broadcasting karaoke mixer with sound card. They combine traditional sound card and mixer function.
3. Built-in Bluetooth, connect with mobile phone and Bluetooth player.
4. Built-in MP3 player to play music in multiple formats and record with LED display.
5. Connect USB to PC to play and record the music.
6. Connect USB to PC or power bank for supplying power, convenient for mobile audio connection and outdoor guitar playing and singing.
7. Exquisite plastic chassis.
8. DC 5V/1A power supply or PC power supply.
16 Digital DSP Effect:
01 HALL1
02 HALL2
03 ROOM1
04 ROOM2
05 REVERB+DELAY
06 125MS DELAY
07 175MS DELAY
08 225MS DELAY
09 285MS DELAY
10 560MS DELAY
11 860MS DELAY
12 1000MS DELAY
13 1400MS DELAY
14 800MS PINGPONG DELAY
15 1000MS PINGPONG DELAY
16 1400MS PINGPONG DELAY
USB and Bluetooth Operating Instructions:
1. Button Function:
a) “REC” Button----Press first time to pause the playing song.
Press again to continue playing.
b) “-“ Button---- Short press to play the previous song.
Long press to reduce the input volume.
c) “+” Button---- Short press to play the next song.
Long press to increase the input volume.
d) "MODE" Button---- Press to switch the functional model.
Select USB, BT, REC in order.
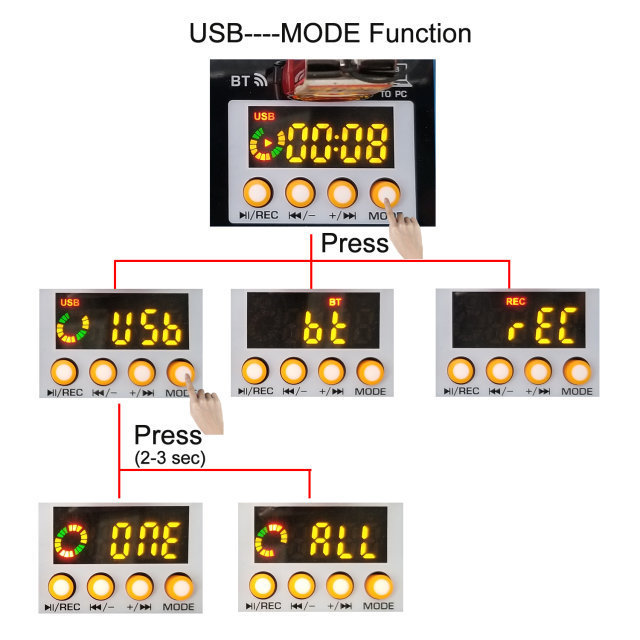
2. Bluetooth Function:
a) Press the “MODE” button in order to select the Bluetooth mode.
After the success of the selection, the Bluetooth icon on display is flashing and display BT.
b) Open the Bluetooth for pairing. After pairing successfully, there will be a sound prompt.

3. USB Recording Operation:
a) Press the “MODE” button to select the REC status.
b) Press “REC” button to start recording, the LED screen shows the recording time.
c) Press “REC” button again to pause the recording.
d) Press the “MODE” button back out the recording.
4. Sound Card Function:
When connect the computer data cable, it will enter the PC playing states automatically.
The computer will install the driver automatically at the first connection, need to wait until the installation finish, to play or record.
Details for Freeboss AG-PS6 DV 5V Power Supply USD Interface 6 Channel 2 Mono 2 Stereo 16 Digital Effects Audio Mixer
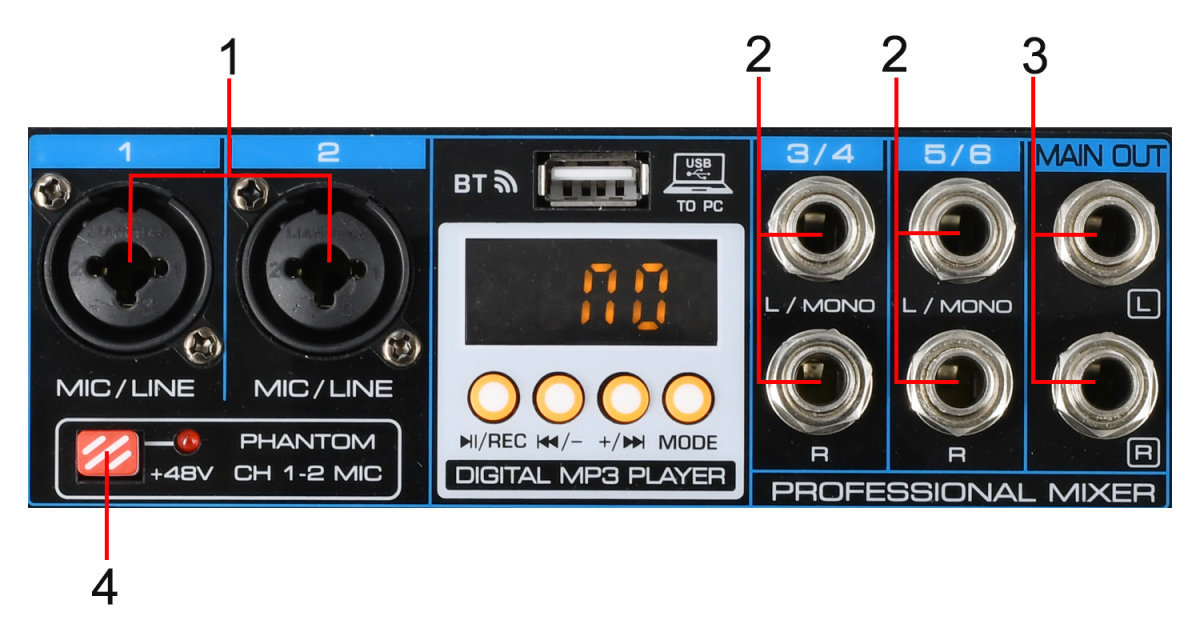
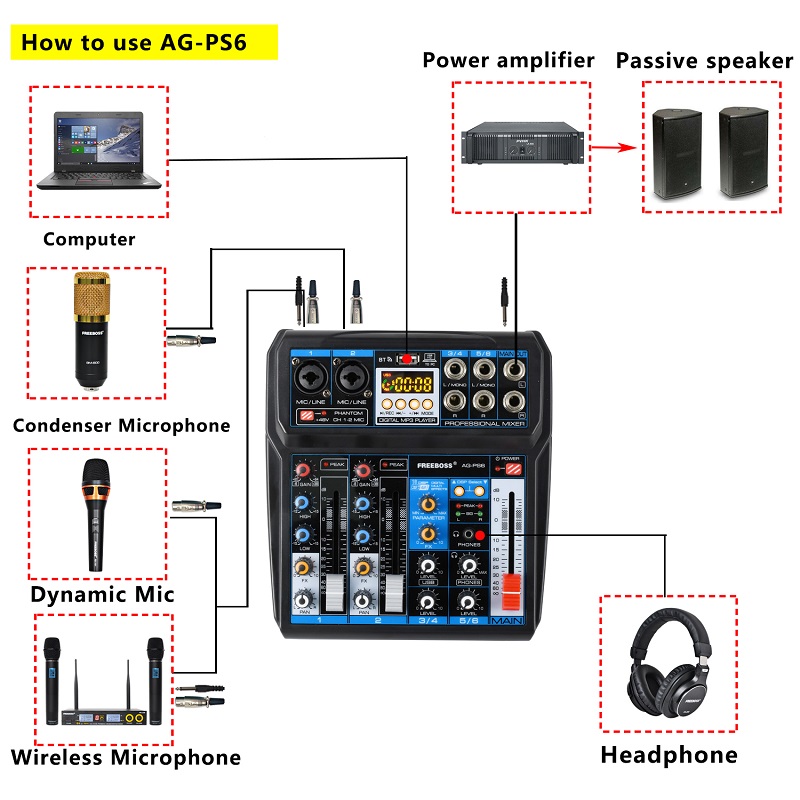
1. [MIC/LINE] MONO input
Connect the microphone, musical instrument or audio device (CD player and so on) to the device.
The sockets are supporting both XLR and UNBALANCED 1/4” PLUG.
2. Stereo channel input.
If only connect to L/(MONO) socket, the mixer will send out the same mono signal to L and R outputs.
3. [MAIN] Output
Connects the active speaker or amplifier.
4. [+48V PHANTOM] Button/LED
When the button is turned on, the LED light is on, provide DC +48V phantom power to XLR plug on MIC mono input.
Please turn on this button when using the condenser microphone which is powered by a phantom power.

5. [PEAK] LED indicator light.
When the volume of input signal or volume after adjusting equalizer is too high, the LED indicator light will keep flashing, please rotate the [GAIN] controller counterclockwise to turn down the volume.
6. [GAIN] Controller
Determine the basic volume of each channel, adjusts them for the maximum volume performance when the volume gets too loud, the [PEAK] LED indicator light will keep flashing.
7. [HIGH] Treble tone controller
Adjust the controller to enhance or attenuate for 15db at 12KHz.
8. [LOW] Bass tone
Knob adjusts the controller to enhance or attenuate for 15db at 80Hz.
9. [FX] Controller
Adjust the signal level from the channel to the reverberation line.
Please note, the single level will vary with the different setting of the channel attenuator. If using the stereo channel, will mix the signals from L and R channels, then send it to reverberation line
10. [PAN Control] The PAN control
Determine the position of the channel signal within the stereo image.
When working with subgroups, you can use the PAN control to assign the signal to just one output, which gives you additional flexibility in recording situations.
11. [CHANNEL FADER] Adjusts the level of the channel signal.
Use these faders to adjust the balance between the various channels.
12. [USB LEVEL] Controller
Adjust the volume of USB channel.
13. [LEVEL] Controller
Adjust to balance the volume of each channels.
14. [PHONES LEVEL] Earphone controller
Adjust the volume of earphone.
15. [LEVEL] Controller
Adjust to balance the volume of each channels.
16. [MAIN LEVEL] Fader
Adjust the overall volume from [MAIN] output signal.
17. [PHONES]
Connect a 3.5mm earphone; the socket support stereo phone plug.
18. [OUTPUT Level Indicator]
This is a stereo signal level indicator configured with green LED lights (SIG) at the bottom and red LED lights (PEAK)at the top for both the left channel side and the right channel side.
Flashing green LED lights indicate normal input signals. When the red LED lights are flashing, the MAIN output signal level may need to be lowered by adjusting the monitor output level control knob.
19. [POWER]
Power controls switch.
20. [DSP SELECT]
Press UP or DOWN button to select from 16DSP.
21. [PARAMETER]
Control the parameter of the sound effect.
22. [FX LEVEL]
Effects return to level controller and adjust the volume of effect.
Product Size:
20 * 19 * 7 CM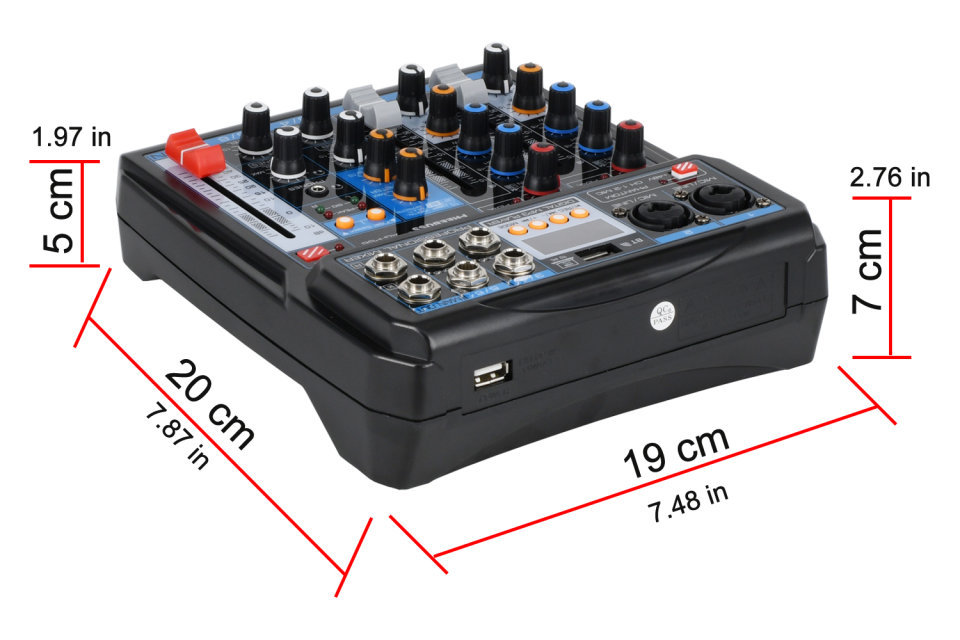
Color Box Size:
23 * 20.5 * 9 CM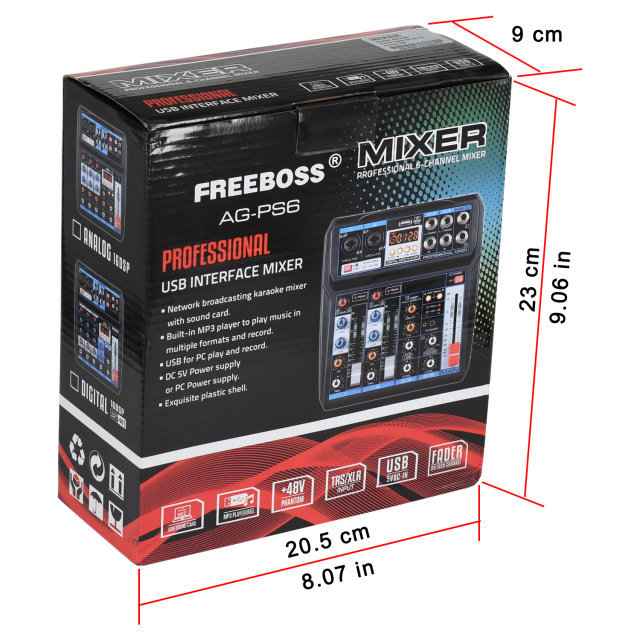
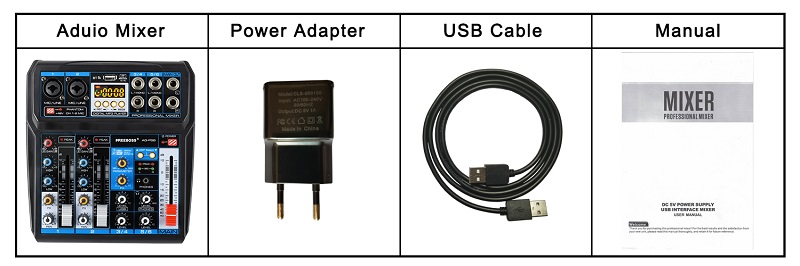
Packing List:
-1 x Audio Mixer
-1 x Power Adapter
-1 x USB Cable
-1 x User Manual
Operation and Maintenance:
1. Do not use the device in the vicinity of a TV, radio, stereo equipment, mobile phone or other electric devices. Otherwise, the device, TV or radio may generate noise.
2. In order to prevent the possibility of panel deformation, unstable operation or damage to the internal components. Do not expose the device to excessive dust or vibration or extreme cold or heat (such as in direct sunlight, near a heater or in a car during the day).
3. Do not place vinyl, plastic or rubber objects on the device since this might discolor the panel.
4. When cleaning the device, use a dry and soft cloth. Do not use paint thinners, solvents, cleaning fluids, or chemical impregnated wiping cloths.
5. Condensation can occur in the device due to rapid, drastic changes in ambient temperature. If the device is in the state of condensation, it can be damaged. There is a way to solve the condensation that leave the device for several hours without turning on the power until the condensation has completely dried out.
6. Avoid setting all controls to their maximum, depending on the condition of the connected devices. This action may cause feedback and may damage the speakers.
7. When turning on the power in your audio system, always turn on the power amplifier LAST, to avoid speaker damage. When turning the power off, the power amplifier should be turned off FIRST for the same reason.
Precautions When Using the USB 2.0 and 5V DC Terminals:
When connecting the USB 2.0 connector to computer, please must abide following points. If not, it may cause computer crash, breakdown or losing data. If the computer or mixer crash, firstly restart the application software or computer operating system, secondly disconnect the mixer and power again.
Use an USB cable. (USB 3.0 cable cannot be used)
Before connecting the computer to the USB 2.0 terminal, exit from any power-saving mode of the computer (such as suspend, sleep, standby).