| Quantity | 3+ units | 10+ units | 30+ units | 50+ units | More |
|---|---|---|---|---|---|
| Price /Unit | $224.34 | $219.76 | $212.90 | $203.74 | Contact US |
 Bitaxe601 x600 Series Gamma 1.2TH/s Silent Bitcoin Miner BM1370 Lottery Machine with OLED Display Module
$123.40
Bitaxe601 x600 Series Gamma 1.2TH/s Silent Bitcoin Miner BM1370 Lottery Machine with OLED Display Module
$123.40
 Bitaxe Orange GT800 2.5TH/s 60W Silent Bitcoin Miner 2xBM1370 Lottery Machine Support for SHA-256 Algorithm
$205.02
Bitaxe Orange GT800 2.5TH/s 60W Silent Bitcoin Miner 2xBM1370 Lottery Machine Support for SHA-256 Algorithm
$205.02
 Bitaxe Black GT800 2.5TH/s 60W Silent Bitcoin Miner 2xBM1370 Lottery Machine Support for SHA-256 Algorithm
$205.02
Bitaxe Black GT800 2.5TH/s 60W Silent Bitcoin Miner 2xBM1370 Lottery Machine Support for SHA-256 Algorithm
$205.02
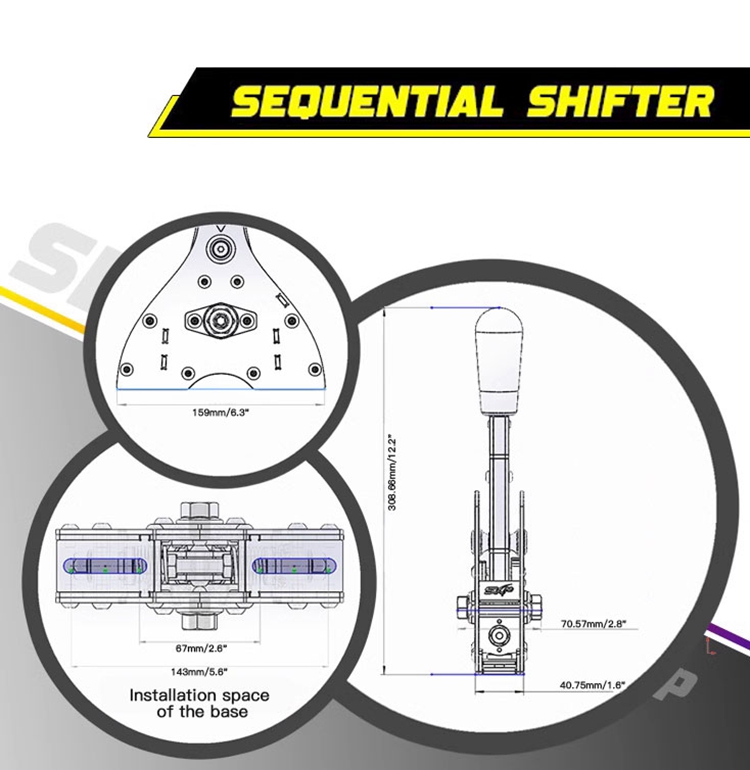
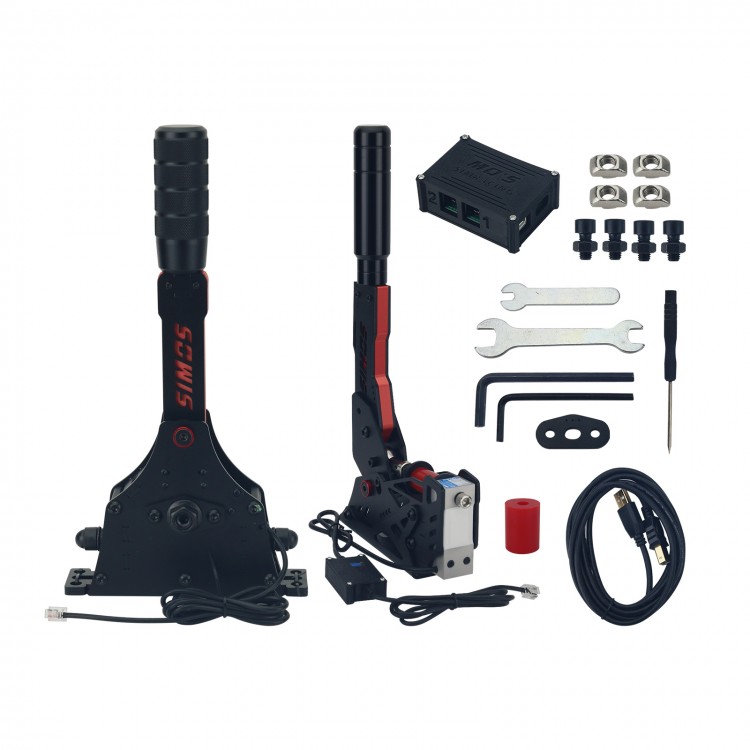
SXP PC Racing Game Simulator Sequential Shifter and Handbrake without Customized Button & Light for Simagic Mini MOZA R5 R9
Features:
- 304 blackened standard parts are rust-proof
- Integrated master control saves USB socket
- USB drive-free: Plug and play
- Easy installation and high compatibility
- 2 travel options and adjustable force
- No gaps, no frames, no looseness
Package Included:
- 1 x Set of Sequential Shifter & Handbrake
Installation and Debugging of Sequential Shifter:
- Tips: Due to the different installation methods and using environment, users need to prepare M8 hexagon socket head cap screws and nuts before installation.
- Installation Tutorial:
1. Unpack.
2. Remove the 8 screws and nuts from the base.
3. Fix the base on a profile or a bracket.
4. Snap the main body on the base, align the screw hole, use 8 screws and tighten the screws.
5. Install the shifter knob, plug in the main control, connect a computer, map buttons, and you can enjoy games.
- Replacement method of travel limit:
1. Remove the panel on the left side of the SXP logo (only remove the peripheral screws).
2. After removing the panel, flip to the inside to see the travel limit piece.
3. Unscrew 2 nuts, replace the limit piece and reassemble.
- Adjustment method of side top beads:
1. Prepare a M18 wrench and a 6MM Allen wrench.
2. Use the M18 wrench to loosen the large nuts on both sides.
3. Use the 6mm Allen wrench to tighten the side top beads on both sides until they are adjusted to a satisfactory hand feeling.
Installation and Debugging of Handbrake:
- Tips: Due to the different installation methods and using environment, users need to prepare M8 hexagon socket head cap screws and nuts before installation.
- Installation Tutorial:
1. Unpack.
2. Remove the 4 screws and spring washers from the base of the handle.
3. The base of the handle is snapped into the main body and aligned with the 4 screw holes on both sides (If it is too difficult to stuff in, you can loosen one of the screws on both sides of the joint bearing. Remember to tighten the screw after installation).
4. Install the 4 screws and 4 spring washers that were removed before. Finally, tighten these accessories.
5. Install the fixed screw (the back): Put the screw that needs to be fixed in the back from the side first and tighten it.
6. Install the fixed screw (front): put the screw into the front notch to install and tighten.
7. Screw the handle of the handbrake, connect the aviation plug to the main control, connect the computer, map the axis, and you can enjoy games.
- Adjust dead zone of games: Use DiView to adjust the dead zone of the device.
- The strength bar in the game is not cleared and does not return to position:
1. You can use DiView to set the dead zone.
2. Remove the screw of the main control box, remove the cover, look at the white motherboard, find the blue cuboid potentiometer, and rotate the potentiometer clockwise with a flat screwdriver until the force bar returns to zero. Install the lid of the main control.