| Quantity | 3+ units | 10+ units | 30+ units | 50+ units | More |
|---|---|---|---|---|---|
| Price /Unit | $105.95 | $103.79 | $100.54 | $96.22 | Contact US |
 SIMDT FELIX PAD Sim Racing Button Box – 3D-Printed Frame, Carbon Fiber Panels, 14 Illuminated Buttons
$159.35
SIMDT FELIX PAD Sim Racing Button Box – 3D-Printed Frame, Carbon Fiber Panels, 14 Illuminated Buttons
$159.35
 HappyGame Foldable Racing Simulator Cockpit 150KG Load w/ Large Bracket for Manual Shifter & Handbrake
$521.07
HappyGame Foldable Racing Simulator Cockpit 150KG Load w/ Large Bracket for Manual Shifter & Handbrake
$521.07
 HappyGame Foldable Racing Simulator Cockpit Sim Racing Cockpit 150KG Load w/ Manual Shifter Bracket
$519.13
HappyGame Foldable Racing Simulator Cockpit Sim Racing Cockpit 150KG Load w/ Manual Shifter Bracket
$519.13
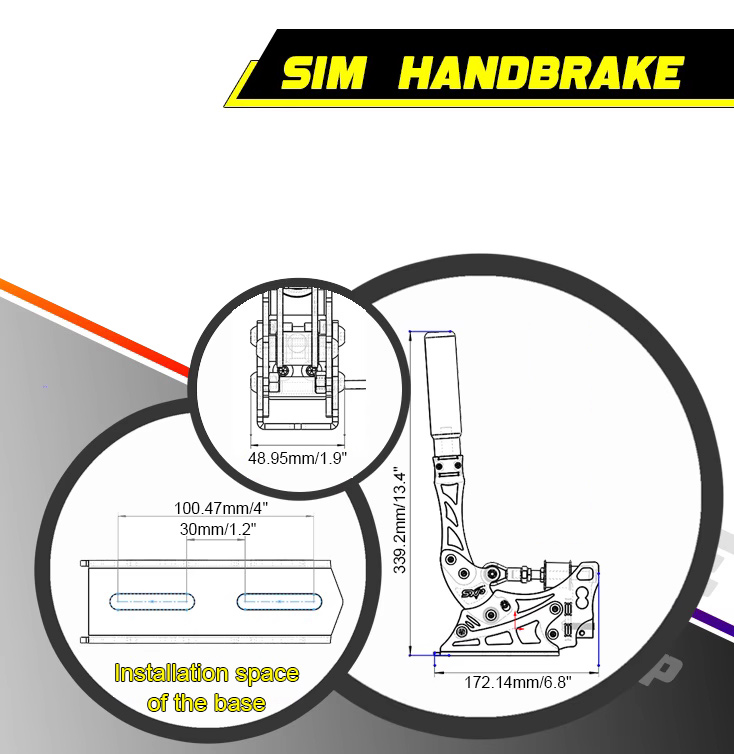
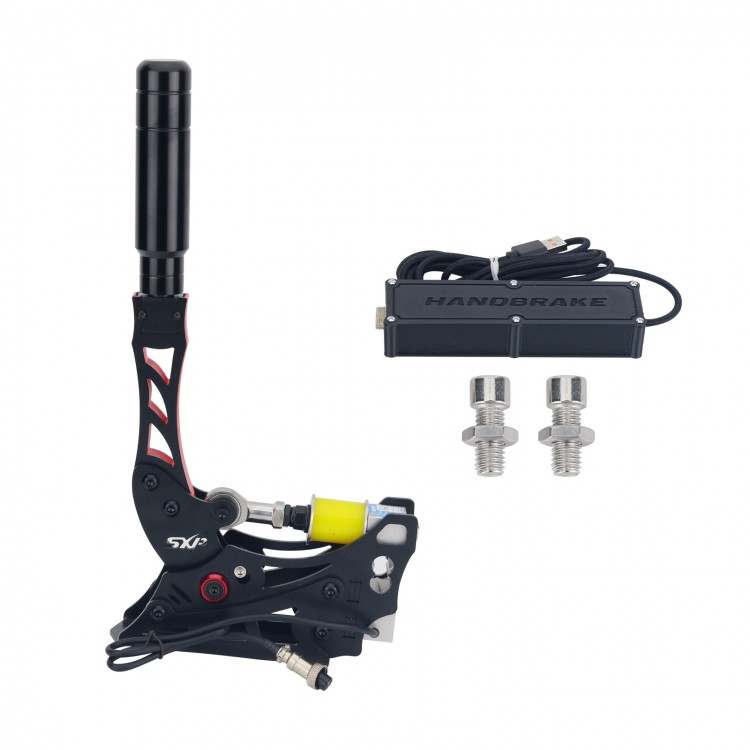
SXP PC Racing Handbrake Game Handbrake Compatible with Simagic Mini MOZA R5 R9 for Video Games
Features:
- No wear because the game handbrake is designed with 3 bearings
- Notch base enables large installation space
- Customized accessories, frame-less
- Only 2 screws are required for installation
- The racing handbrake can be used vertically and horizontally
- Driver-free: USB handbrake is plug-and-play
- The style and size of the handle can be changed
Package Included:
- 1 x Handbrake
Installation and Debugging:
Tips: Due to the different installation methods and using environment, users need to prepare M8 hexagon socket head cap screws and nuts before installation.
I. Installation Tutorial:
1. Unpack.
2. Remove the 4 screws and spring washers from the base of the handle.
3. The base of the handle is snapped into the main body and aligned with the 4 screw holes on both sides (If it is too difficult to stuff in, you can loosen one of the screws on both sides of the joint bearing. Remember to tighten the screw after installation).
4. Install the 4 screws and 4 spring washers that were removed before. Finally, tighten these accessories.
5. Install the fixed screw (the back): Put the screw that needs to be fixed in the back from the side first and tighten it.
6. Install the fixed screw (front): put the screw into the front notch to install and tighten.
7. Screw the handle of the handbrake, connect the aviation plug to the main control, connect the computer, map the axis, and you can enjoy games.
II. Adjust dead zone of games:
Use DiView to adjust the dead zone of the device.
III. The strength bar in the game is not cleared and does not return to position:
1. You can use DiView to set the dead zone.
2. Remove the screw of the main control box, remove the cover, look at the white motherboard, find the blue cuboid potentiometer, and rotate the potentiometer clockwise with a flat screwdriver until the force bar returns to zero. Install the lid of the main control.