| Quantity | 3+ units | 10+ units | 30+ units | 50+ units | More |
|---|---|---|---|---|---|
| Price /Unit | $20.42 | $20.01 | $19.38 | $18.55 | Contact US |
 Black 3D-Printed Mini ESP32 Marauder Development Board Positioning Module with 1.44-inch Screen
$33.36
Black 3D-Printed Mini ESP32 Marauder Development Board Positioning Module with 1.44-inch Screen
$33.36
 White 3D-Printed Mini ESP32 Marauder Development Board Positioning Module with 1.44-inch Screen
$33.36
White 3D-Printed Mini ESP32 Marauder Development Board Positioning Module with 1.44-inch Screen
$33.36
 MPSoC XCZU19EG-F V0.3 AMR+FPGA Development Board Kit QSFP28 10Gbps Ethernet PCIE3.0 Support for Windows/Linux Systems
$1,537.98
MPSoC XCZU19EG-F V0.3 AMR+FPGA Development Board Kit QSFP28 10Gbps Ethernet PCIE3.0 Support for Windows/Linux Systems
$1,537.98
WZ5012L 50V 12A 600W CNC Adjustable Step-Down Module Buck Power Supply Module w/ LCD Display
Parameters:
Model: WZ5012L
Display: LCD
Input voltage range: 6-55.00V
Input voltage resolution: 0.01V
Output voltage range: 0-50.00V
Output voltage resolution: 0.01V
Output current range: 0-12.00A
Output current resolution: 0.01A
Output power range: 0-600.0W
Input voltage accuracy: ±(1%+5 digits)
Output voltage accuracy: ±(0.3%+5 digits)
Output current accuracy: ±(0.5%+5-digits)
Typical value of output ripple: 150mV peak-peak value
Normal operating temperature range: -10℃~40℃
Capacity measurement range: 0-999.9AH
Statistical error of capacity energy: ±2%
Statistical time range: 0-100 hour
Depressurization mode: differential pressure >0.05%+1V
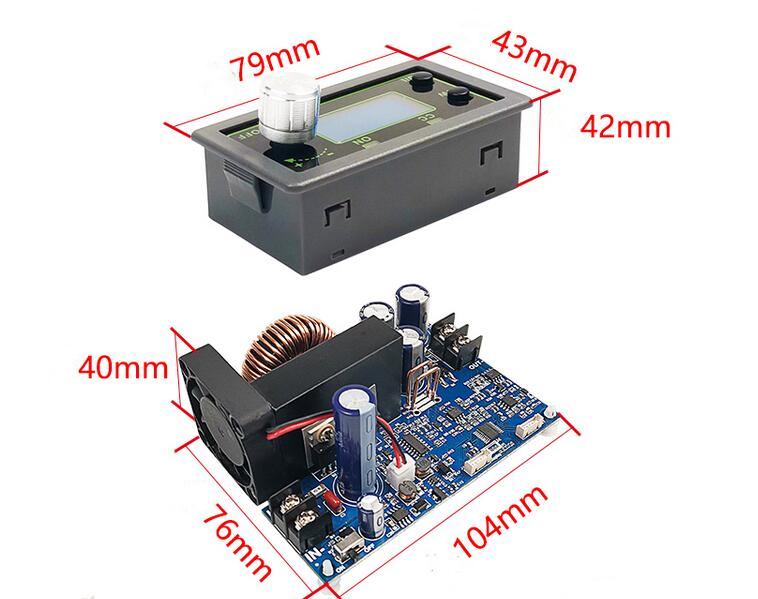
Product size: 79 x 43 x 42 mm
Features:
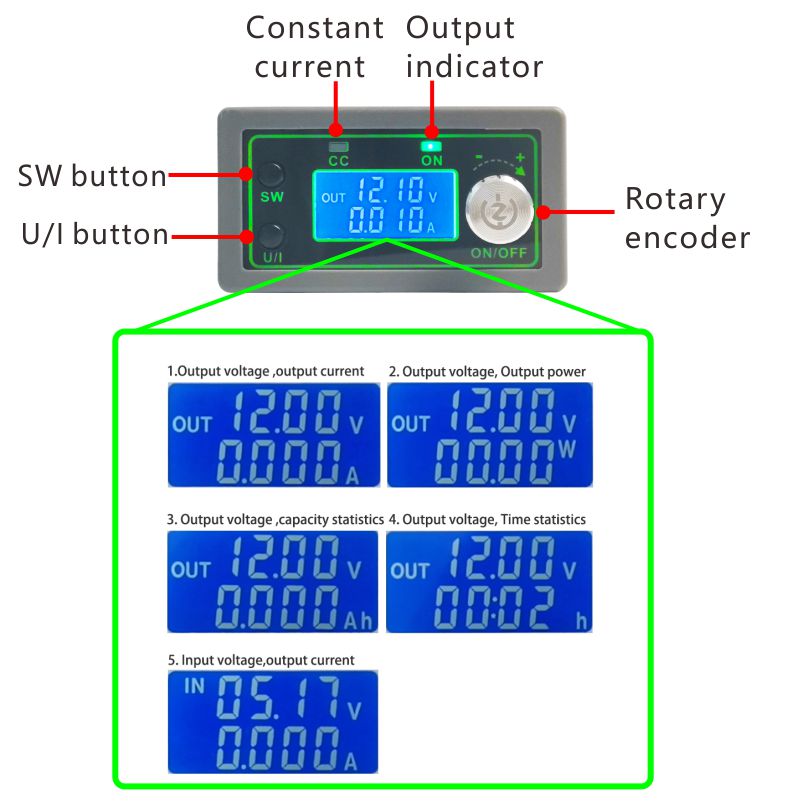
-LCD can display input/output voltage, output current/output power/output capacity/output time.
-CNC adjustment, accurate and fast, buck output, output voltage can be adjusted at will among 0-50.00V, limit current 0-12.00A can be adjusted at will.
-Output end is poured backward without burning.
-The module can be set to open/close by default.
-Multiple software protection mechanisms are available, and protection threshold is adjustable. When the working parameters of module exceed protection threshold, the output will be automatically closed.
- Using synchronous rectification technology, conversion efficiency is high: the efficiency is more than 90%.
-Improved heat sink, install a fan to enhance heat dissipation.
Functions:
-Soft start: Yes
-Protection Mechanism:
*Input under-voltage protection (5.8-50V adjustable, default 5.8V)
*Output over-voltage protection (0-51.00V adjustable, default 51V)
*Output over-current protection (0-12.10A adjustable, default 12.10A)
*Overtime protection (0-100h adjustable, closed by default)
*Over-capacity protection (0-999.9Ah adjustable, closed by default)
Package Included:
-1 x Step-Down Module

Button Instruction:
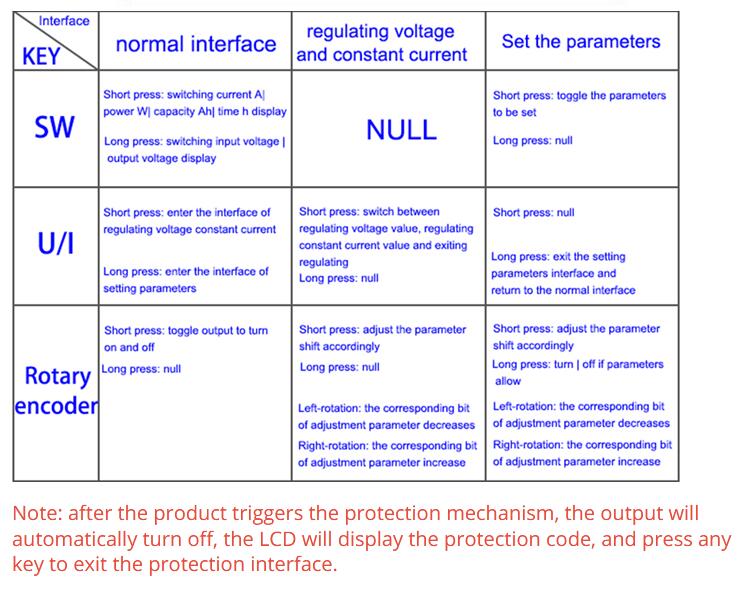
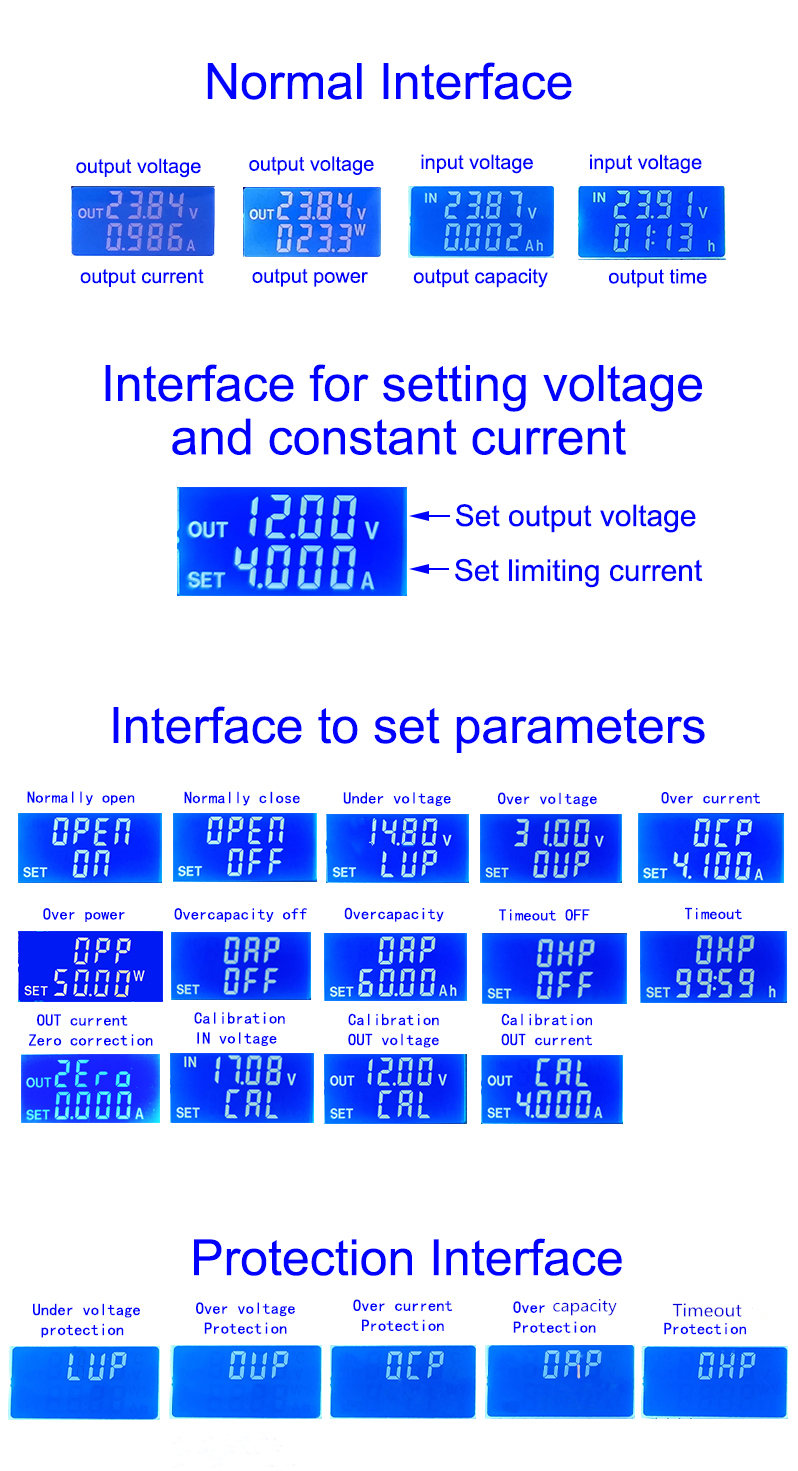
Interface Instruction:
Using Method:
1. Switch Display Parameters:
In normal interface, short press SW to switch the display on the lower line of the display, display content switches among current A, power W, capacity Ah, time h. Press and hold SW button to switch the upper display of the screen, and display content switches between input voltage IN and output voltage OUT.
2. Set Output Voltage Value:
In normal interface, short press U/I button to enter set voltage constant current interface. It can be seen that a certain digit of set output voltage value is flashing, and rotary encoder can be turned left and right to adjust output voltage. Short press rotary encoder to select which digit to set output voltage. After setting, short press U/I button twice to return to normal interface. Or after stopping operation for 10s, it will automatically return to normal interface.
3. Set Constant Current Value (that is, the maximum current value allowed by the module):
Short press U/I button in normal interface to enter voltage constant current setting interface. Short press U/I button again to switch to the setting of constant current value. You can see that a certain digit of the setting of constant current value is flashing. Short press the rotary encoder to select which digit to set constant current value. After the setting is completed, short press U/I button to exit setting voltage constant current interface and return to normal interface. Or after stopping operation for 10s, it will automatically return to normal interface.
4. Set the module to be turned on/off by default at power-on:
In normal interface, long press U/I button to enter parameter setting interface. You can see display of OPEN OFF or OPEN ON. OPEN OFF means that the output is turned off by default at power-on, and OPEN ON means that the output is turned on by default at power-on. Long press rotary encoder to switch between these two states. After setting, long press U/I button to return to normal interface.
5. Set protection parameter on state and threshold:
In normal interface, long press U/I button to enter parameter setting interface. Short press SW button until the protection parameters you want to set appear.
LUP: Under-voltage protection threshold;
OUP: Over-voltage protection threshold;
OCP: Over-current protection threshold;
OAP: Over-capacity protection threshold;
OHP: timeout protection threshold.
Short press rotary encoder to select which digit you want to set the protection parameter. Long press rotary encoder to set the protection parameters on or off (only timeout protection and over capacity protection can be set on/off, other protection parameters are on by default.). Rotary encoder can make parameter bigger and smaller. After setting, long press U/I button to return to normal interface.
6. Calibration Voltage and Current:
In normal interface, long press U/I button to enter parameter setting interface. Short press SW button until the interface with Zero appears, with Zero+OUT+A symbol, long press rotary encoder to complete zero calibration. Short press SW button, the parameter interface of CAL appears. CAL+IN+V symbol is calibration input voltage interface; CAL+OUT+V symbol is calibration output voltage interface; CAL+OUT+A symbol is calibration output current interface. The rotary encoder can adjust the parameter size to the value actually measured with a multimeter. After the adjustment is completed, long press rotary encoder to confirm that the adjustment is complete. At this time the parameter value is not flashing. Press and hold U/I button to return to normal interface.
Note: In order to ensure the accuracy of calibration, calibration voltage: can start calibration when voltage is above 12V; calibration current: can start calibration when current above 1A.
Precautions:
-Module input IN- and output OUT- cannot be short-circuited, otherwise the constant current function is invalid.
-Please ensure that the power of power supply is always greater than the power required by output load!
-This module is a buck module, input voltage is higher than output voltage, and a certain margin is left. If you want to output at full load, input voltage should be 55V.
-The module generates severe heat when used in high power, and temperature is high. Be careful of burns! Please pay attention to ventilation and heat dissipation when using for a long time with high power!
-The module has input under-voltage protection function, the default is about 5.8V (can be set). When lower than this value, it will automatically disconnect the input. Attention: The voltage at the module port is lower than under-voltage protection threshold. When input current is relatively large, do not ignore the voltage division on input wire.


")


