| Quantity | 3+ units | 10+ units | 30+ units | 50+ units | More |
|---|---|---|---|---|---|
| Price /Unit | $93.09 | $91.19 | $88.34 | $84.54 | Contact US |
 SWPG Electronic Handwheel 5 Axis Control Wireless MPG CNC Manual Pulse Generator for SIEMENS/FANUC
$159.43
SWPG Electronic Handwheel 5 Axis Control Wireless MPG CNC Manual Pulse Generator for SIEMENS/FANUC
$159.43
 ZWPG Electronic Handwheel 4/5/6 Axis Control Wireless MPG CNC Manual Pulse Generator for SIEMENS/FANUC
$155.55
ZWPG Electronic Handwheel 4/5/6 Axis Control Wireless MPG CNC Manual Pulse Generator for SIEMENS/FANUC
$155.55
 STWGP 6-Axis CNC MPG Wireless Handwheel E-Stop Manual Pulse Generator + Receiver for SIEMENS MITSUBISHI FANUC FAGOR
$253.60
STWGP 6-Axis CNC MPG Wireless Handwheel E-Stop Manual Pulse Generator + Receiver for SIEMENS MITSUBISHI FANUC FAGOR
$253.60
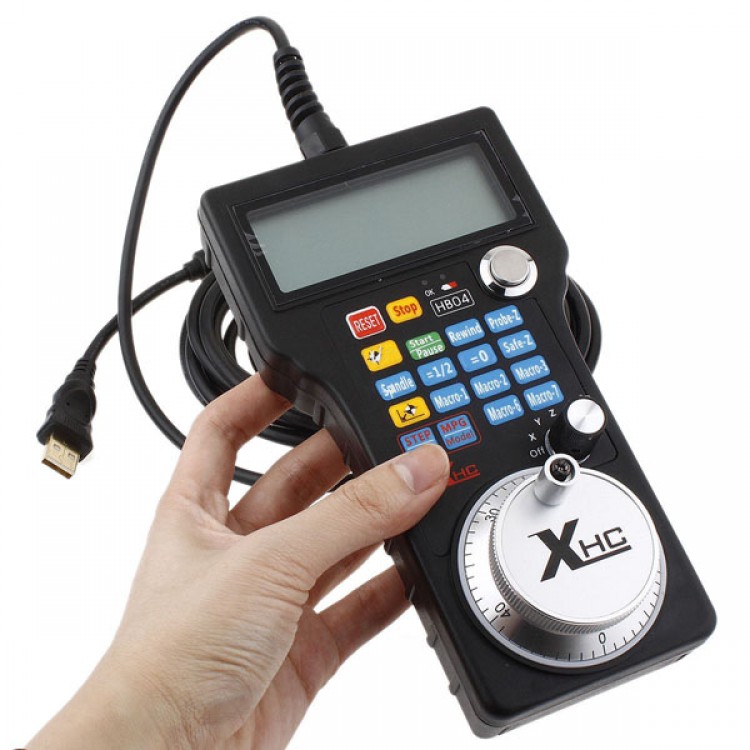
CNC Mach3 USB Hand Wheel 4 Axis USB HandWheel Pulse 50PPR Optical Encoder Generator MPG Pendant
Features :
- work for Mach3
- support 4 axis. the 4th axis- A axis, no A=0 function ( A axis functions are not as much as the other 3 axis)
- All the buttons can be programmable
- About the hand wheel, you move slow, the machine runs slow; also you move fast, the machine runs fast.
- Rich real-time display of large screen LCD:
- display machine status,run,pause,idle,step value
- display X y Z axis workplace coordinate and x y z axis machine coordinate
- show the feed rate、spindle speed
Band switch for easy operation:
- switching X-axis coordinate regulation
- switching y-axis coordinate regulation
- switching z-axis coordinate regulation
- switch hand wheel guide
- feed adjustment switch
- speed control switch
ShuttlePro Installation
1. When Mach3 is installed , there will be a folder created named “PlugIns” in the Mach3 folder. This folder is the location to put and Plugin files that you want Mach3 to know about. Place
“ShuttlePro.dll” in the \Mach3\PlugIns folder. Check and make sure it is there.
2.Setup diver for automatically set the knife height function
M930.m1s copy the installation directory to the MACH3
..\Mach3\macros\Mach3Mill
3. Now that the ShuttlePro.dll file is in \Mach3\PlugIns, the next step is to connect the huttlePro. If you are certain that your ShuttlePro is working and your hardware is working then you can simply plug in the ShuttlePro to one of the USB ports.
4. Once the ShuttlePro is connected, start Mach3 and go to the “Config” menu choice and select “ConfigPlugins”. You should see the ShuttlePro choice with a green checkmark in front of it. If it is not checked, you can check it. The checkmark means that Mach3 found the ShuttlePro on tartup. Click the “CONFIG” in yellow and set the buttons as you wish.
5. Once you have the proper button selected in the Mach3 ShuttlePro Plugin CONFIG menu, your Shuttle device should be working properly.
User manual download
Package list:
-1 * CNC USB MPG Optical Encoder with 5 meters USB cable
- 1 * CD for mach3 software and datasheet


")

