| Quantity | 3+ units | 10+ units | 30+ units | 50+ units | More |
|---|---|---|---|---|---|
| Price /Unit | $114.27 | $111.94 | $108.44 | $103.77 | Contact US |
 Bjorn Automated Autonomous Network Scanning Vulnerability Assessment E-Ink Network Security Tool
$93.60
Bjorn Automated Autonomous Network Scanning Vulnerability Assessment E-Ink Network Security Tool
$93.60
 V1600GS-F (VSOL-V1600GS-F) 1-Port GPON OLT Boasts 1 GPON 2 RJ45 1 SFP/SFP+ and Cooling Fan
$319.19
V1600GS-F (VSOL-V1600GS-F) 1-Port GPON OLT Boasts 1 GPON 2 RJ45 1 SFP/SFP+ and Cooling Fan
$319.19
 TF200 NTP Time Server NTP Network Time Server Time with 10m Antenna for Beidou GPS GLONASS and QZSS
$170.25
TF200 NTP Time Server NTP Network Time Server Time with 10m Antenna for Beidou GPS GLONASS and QZSS
$170.25
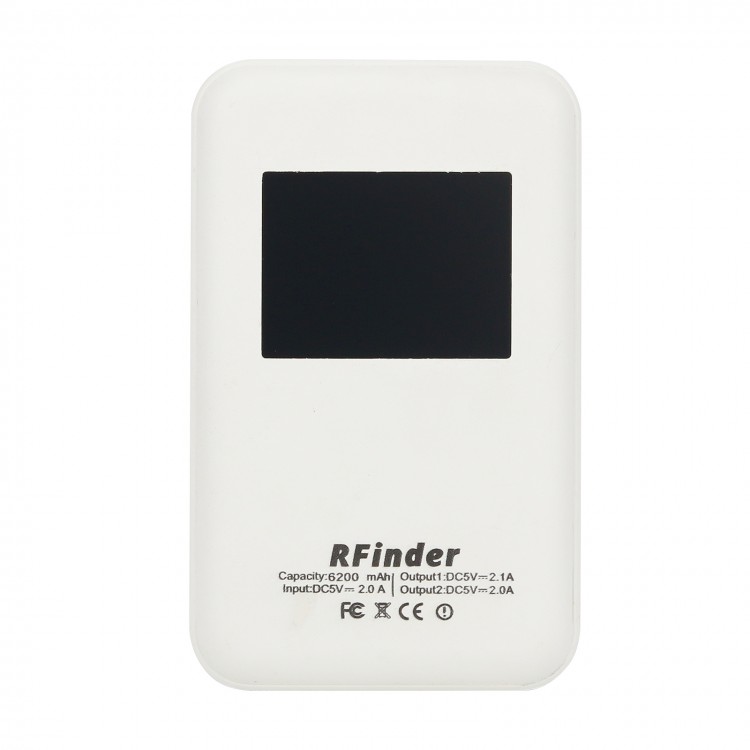
Duplex MMDVM Hotspot UHF VHF Portable Power Bank 2.3" LCD for Raspberry Pi C4FM/DMR/D-STAR/P25/NXDN
Features:
- Fully tested
- Controller board for Raspberry Pi
- Output voltage: USB1-DC 5V/1A; USB2-5v/2A
- Battery: 6800mAh 18650 battery
- Charge input voltage: 5V 1-2A
- Widely compatible: Support for DMR, P-25, D-Star and System Fusion
- 2.3" screen can display date, time, CPU working status and other information
- Designed with two USB output ports and one micro USB charging input port
- Size: 104 x 75.2 x 22.8mm/4.1 x 3 x 0.9"
- Weight: about 190g/0.4 lb
From March 8, 2023, the WiFi connection is as follows:
- IP: 192.168.8.1
- WiFi password: mmdvm0000
Package Included:
- 1 x Set of MMDVM Hotspot
Note:
- It supports WiFi, but does not produce a pi-star hotspot. Plug in an Internet cable into the system first, configure the WiFi and then restart. And then you can use the WiFi.
Setup Tutorial:
I. Preparation
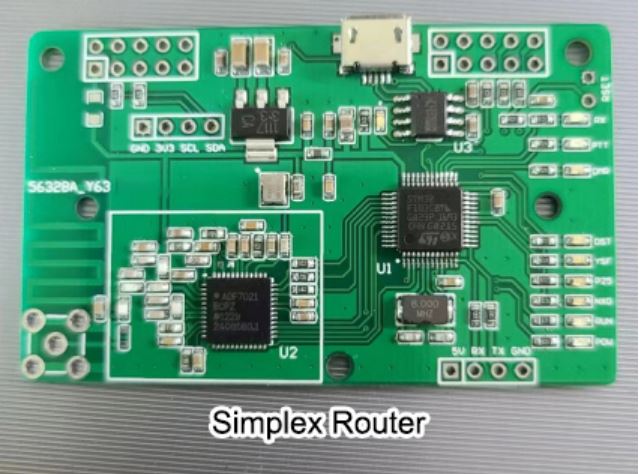
1. Things we need: router, simplex router or duplex hotspot board (with USB to TTL chip on the board).
2. The router has been flashed with firmware, and your computer can open the router management page normally.
3. The computer is wired into the LAN, or the computer WIFI is connected to the router hotspot, and the WIFI name is generally: openwrt; password: none. WAN inserts the higher-level route (note that the router modifies the LAN IP address and then inserts the higher-level route).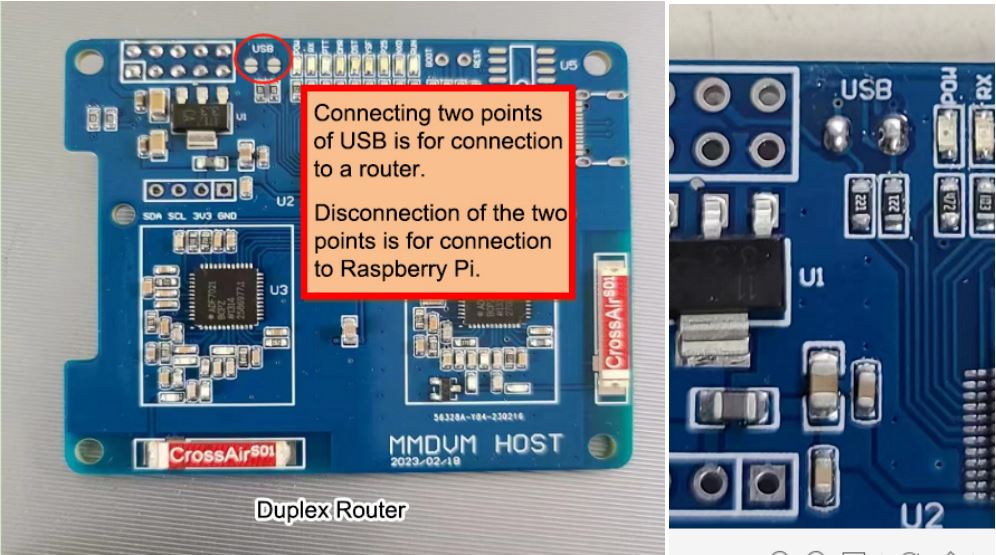
II. Router Settings
1. The duplex board is connected to the data cable router, and then powered on (required). After 1 minute, RUN will start flashing slowly on the hotspot board.
2. Open 192.168.1.1 on the computer (if not, please see Local Connection), and open the page as follows. Password: password and log in.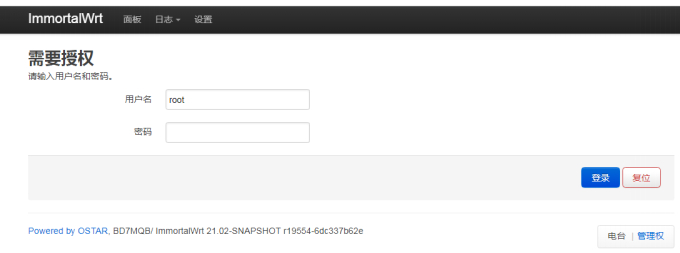
3. After logging in, click Manage in the lower right corner, and then click the top network --- interface.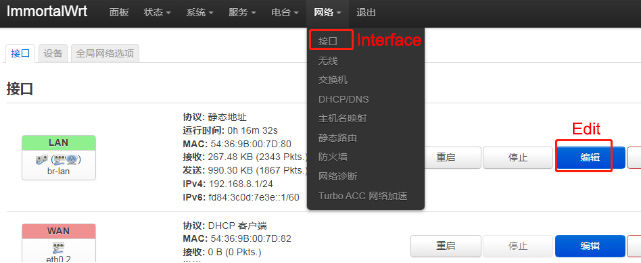
4. Edit at the LAN port and modify the IP of the LAN. Generally, I change it to be: 192.168.8.1. Others remain the same, and then save. The page will close after saving. Click in the lower-right corner of the page: save and apply. The router IP is: 192.168.8.1.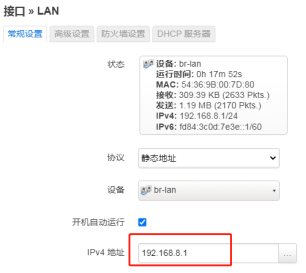
After the saving is completed, you can plug in a network cable in the WAN and connect it to the higher-level router. At this time, it is recommended to restart the router.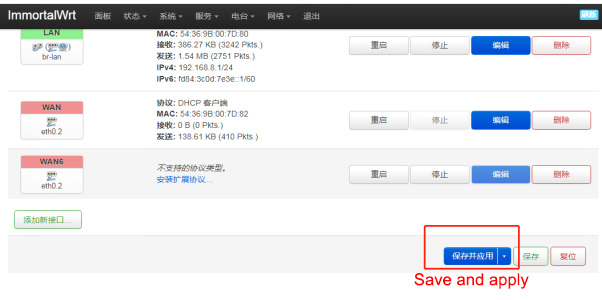
III. MMDVM Settings
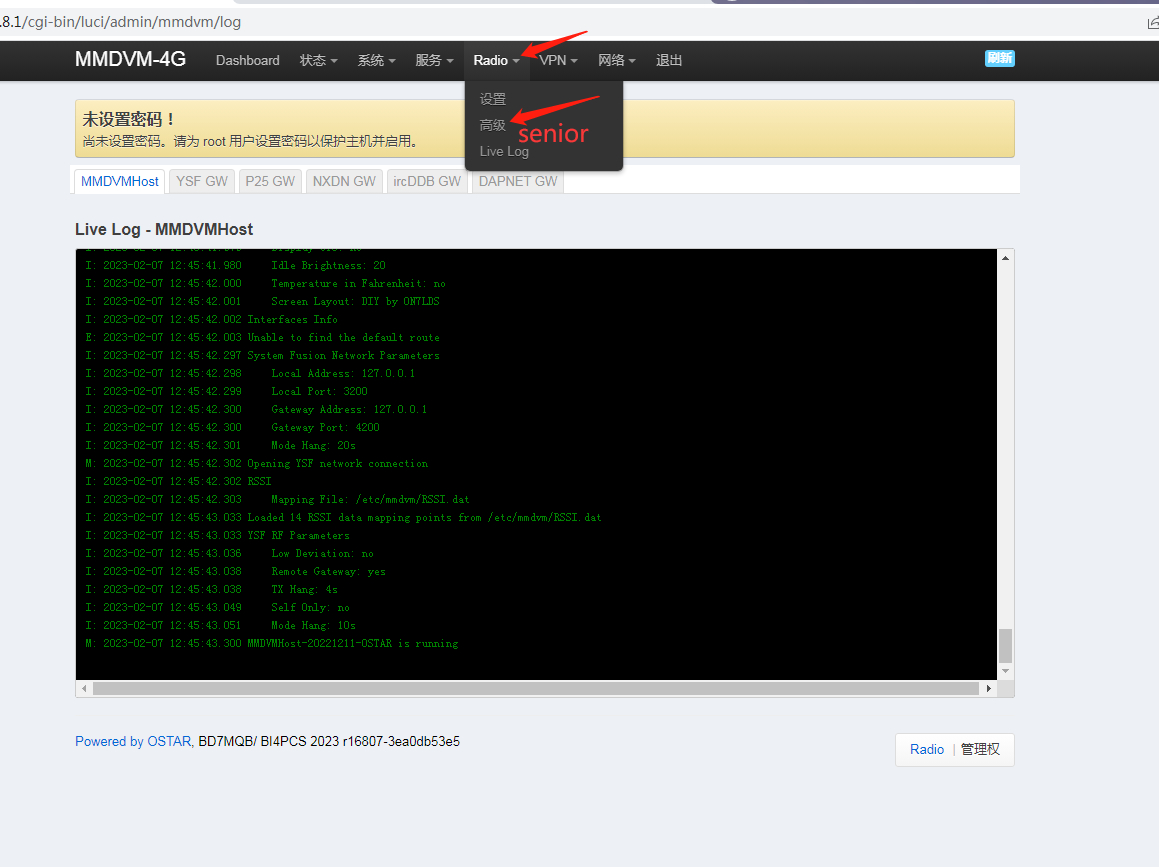
1. After the router restarts, open the set IP (my IP is 192.168.8.1) and enter the management page. You can set up MMDVM. Click on the station --- Advanced Modes and the page is as follows: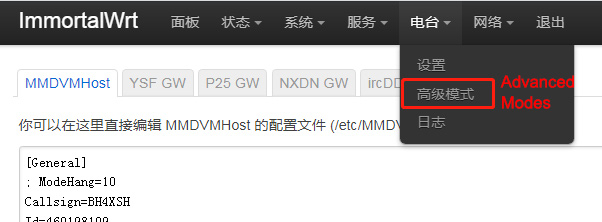
2.Here is the MMDVM setting. Below is a notepad file, the original has some defects, please replace it with the template I sent. The template uses DMR as an example, let's talk about some settings for yourself.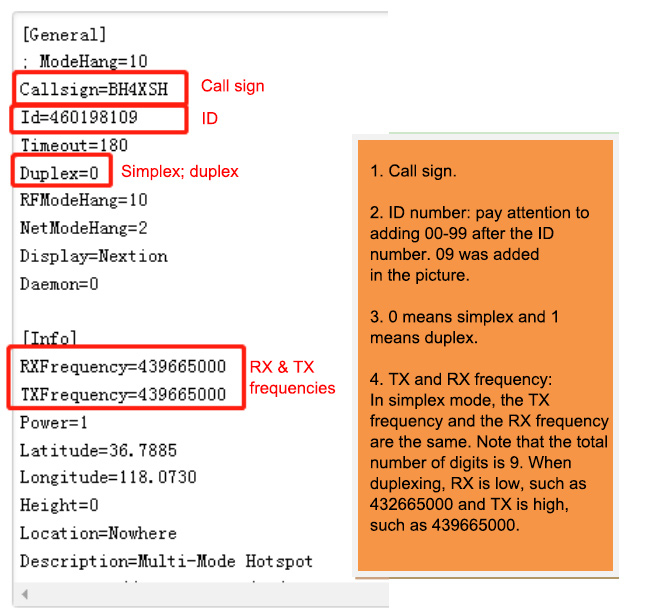

3. After modification, click the lower right corner to save and restart. After a while, the RUN light of the hotspot board will flash fast (when it is just powered on, the RUN light will flash slowly), which means that the hotspot board is working.
4. The following are possible problems: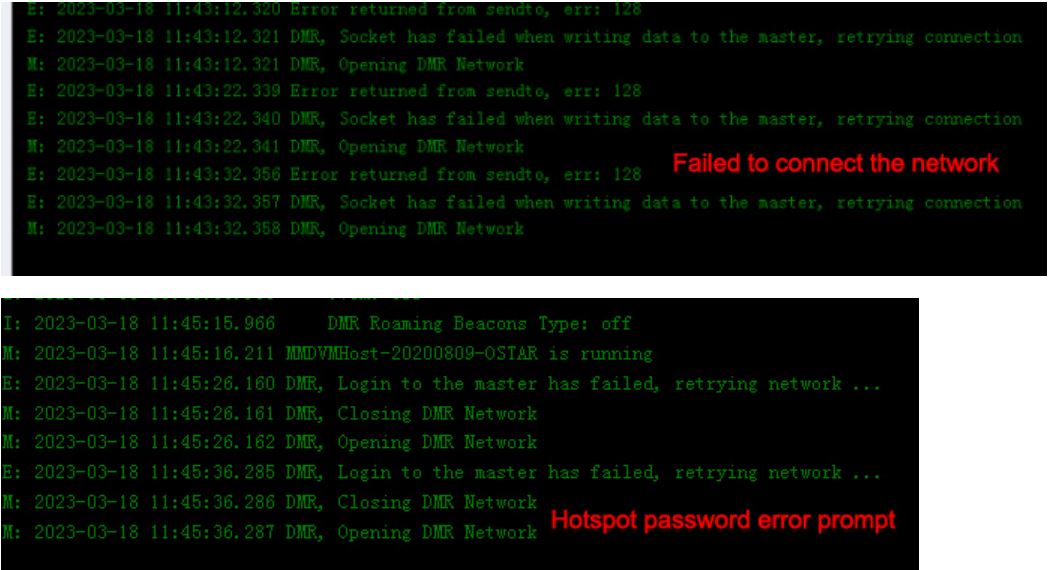
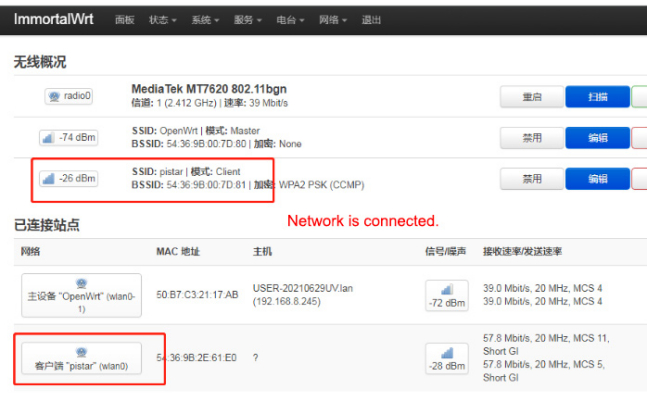
IV. Connect the router to the the upper WIFI or mobile phone hotspot setting in a wireless way.
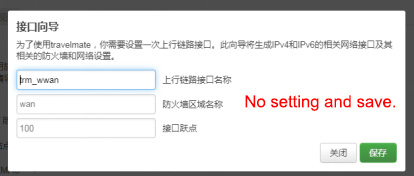
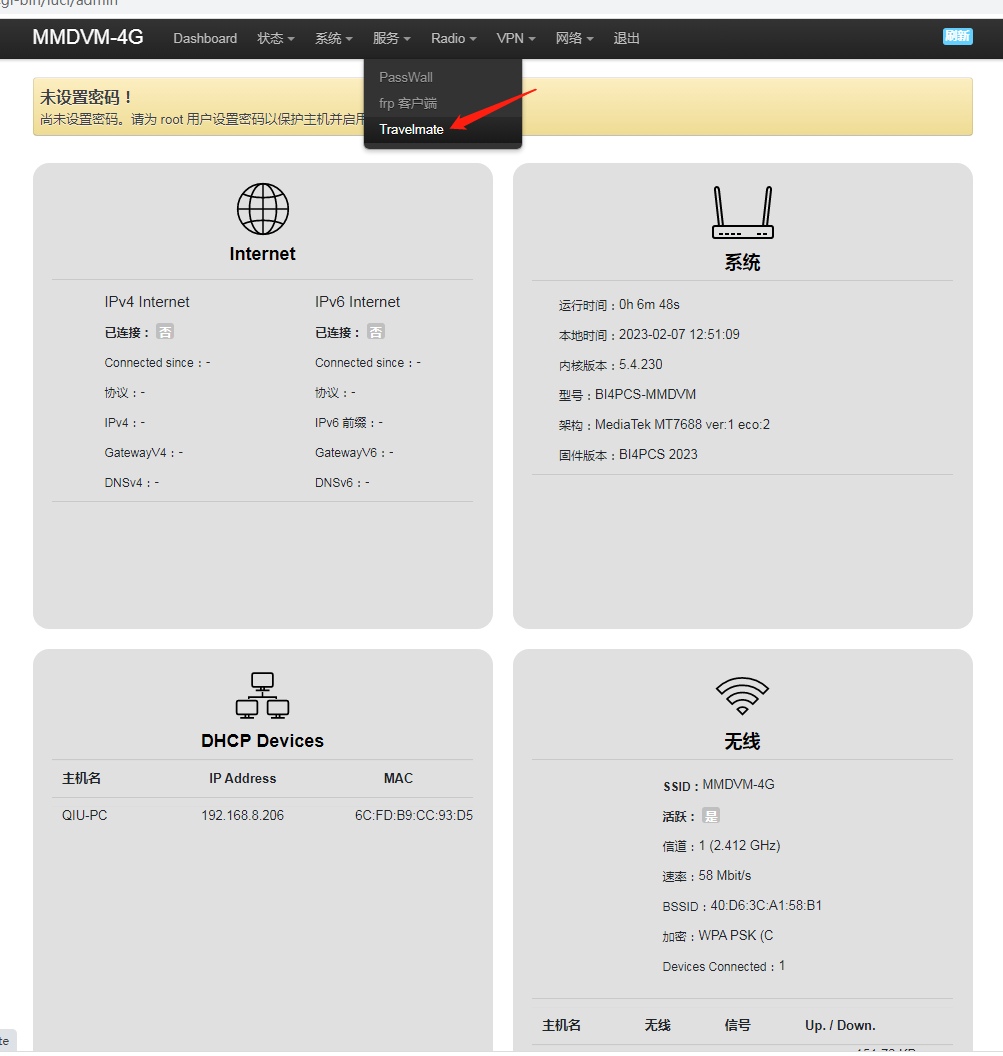
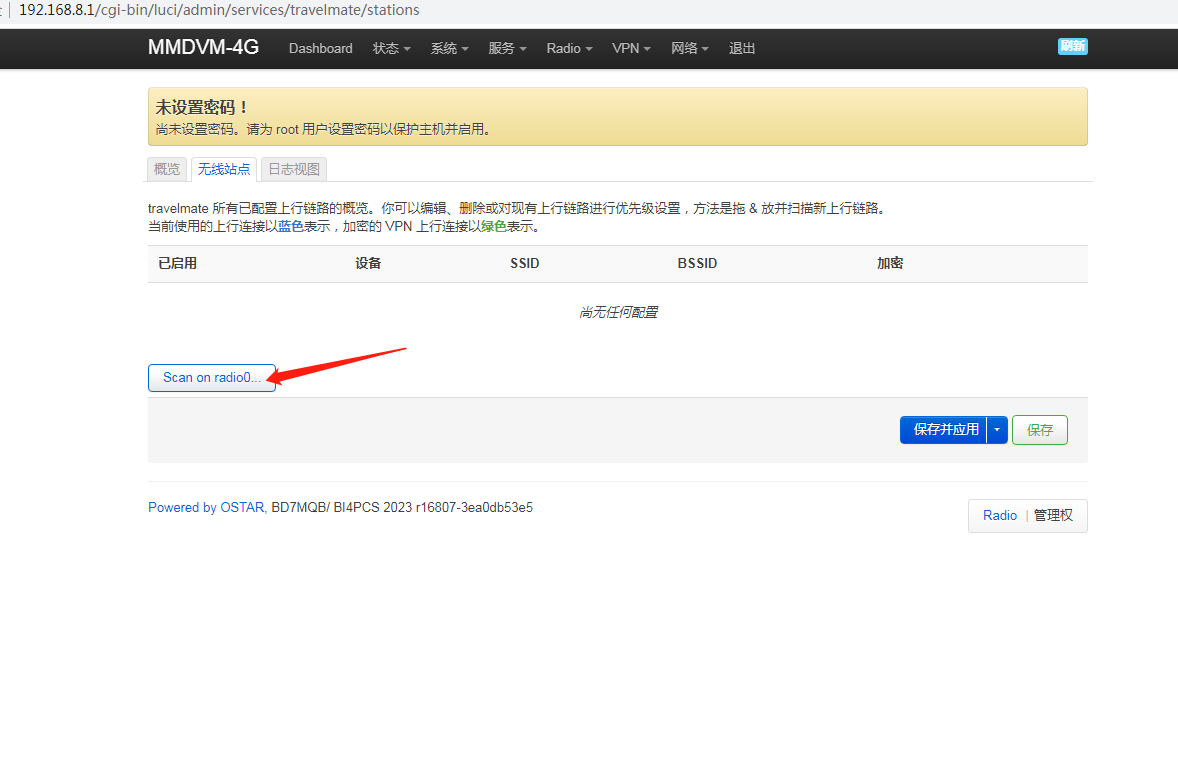
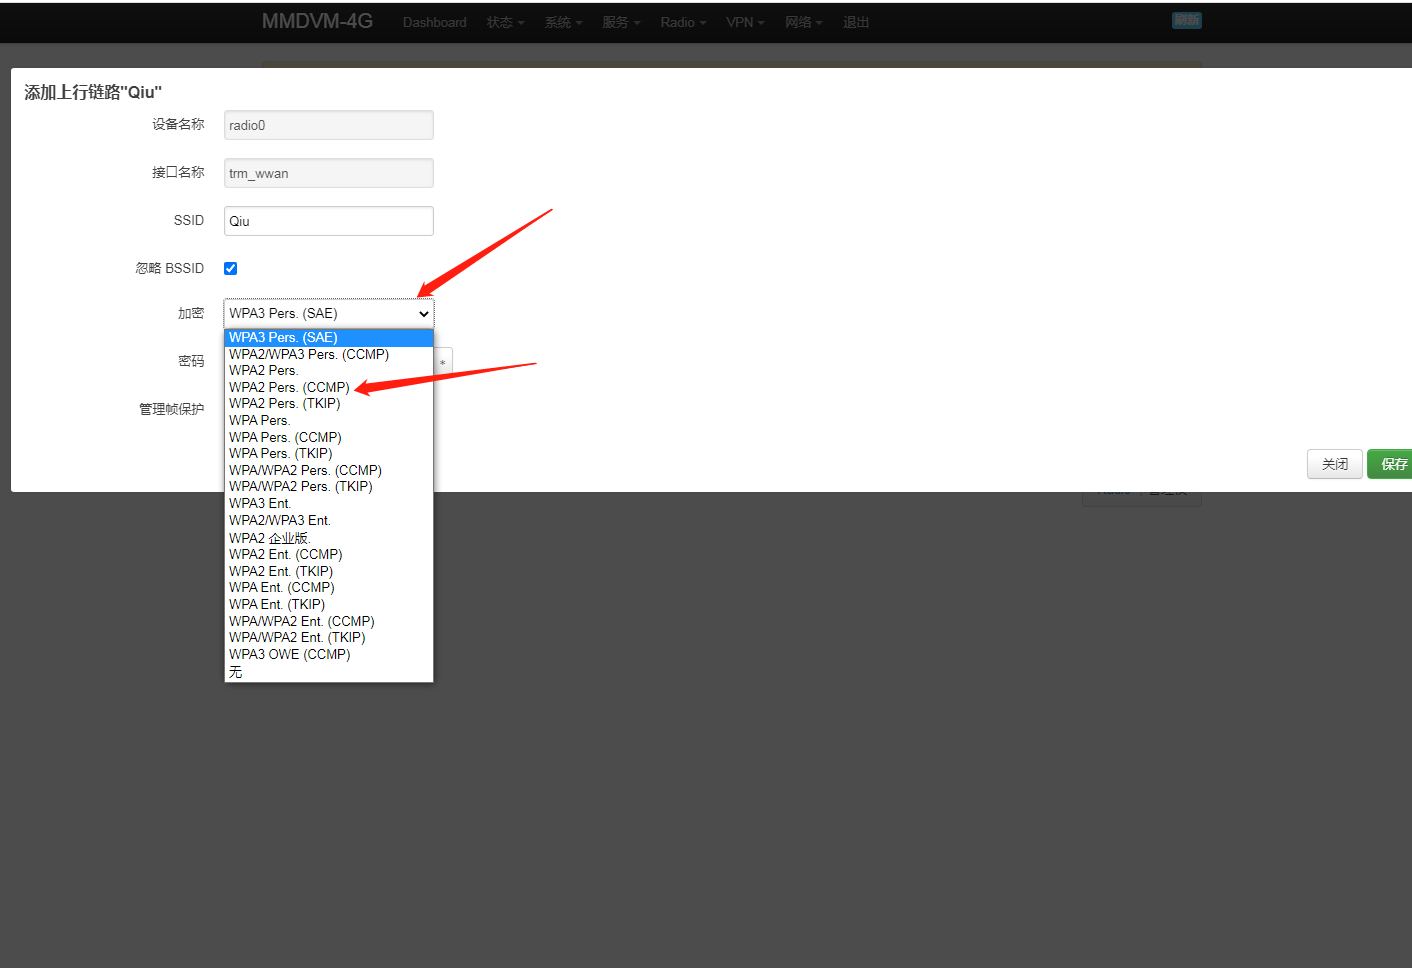
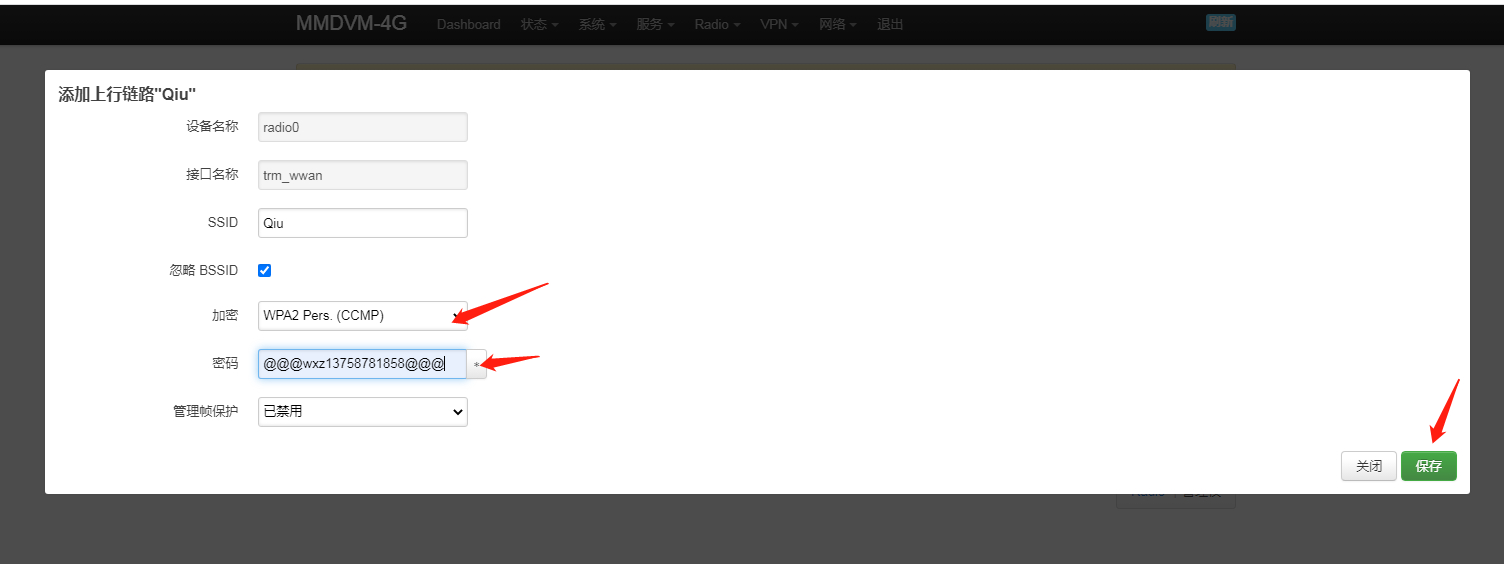
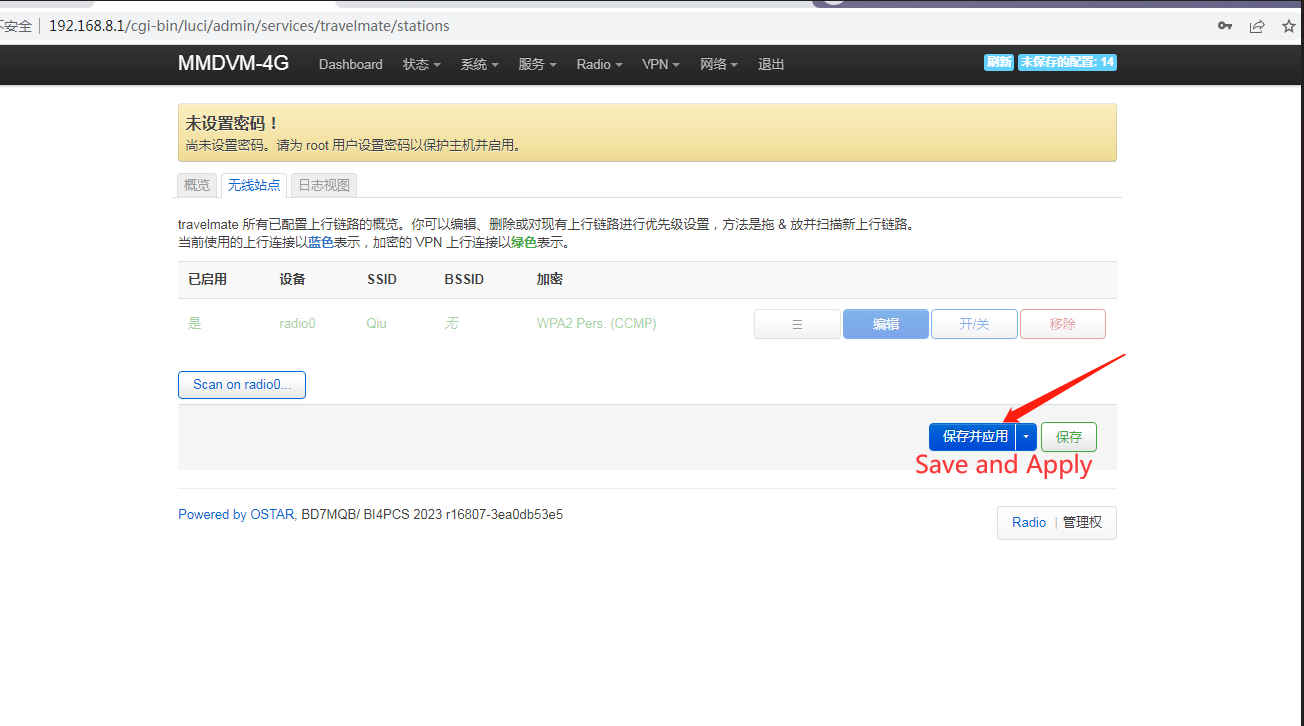
1. Click Service - Travelmate to enter the following page. On first use, it executes the Interface Wizard once. Save it in the wizard, save it again after it comes out and apply it.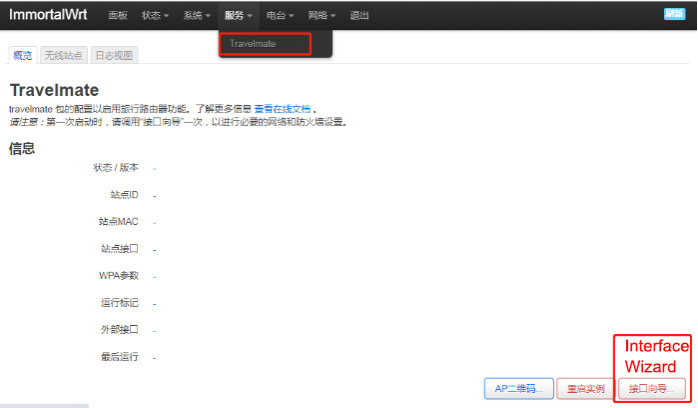
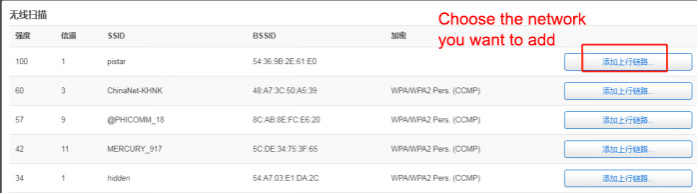
2. Add wireless site after saving and applying. Click the wireless site on the page (also in the Service). Click Scan.....scan wireless network--- add network---- enter network information---- save----- save and apply. You can also add multiple wireless networks here.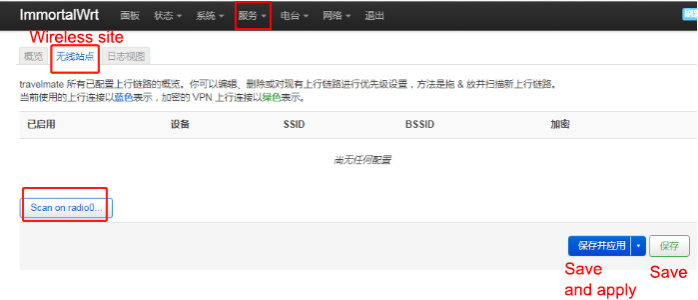
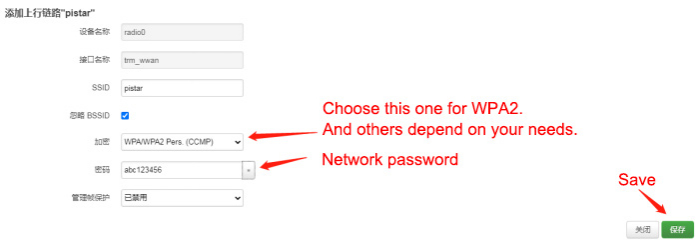

3. Wireless is disabled when it is first added. Enter the network --- Wireless --- Enabled. In this way, it can connect to the network normally.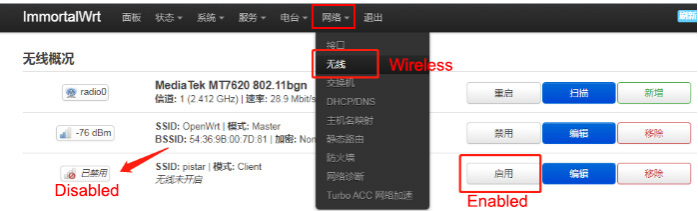
Ostar System Setting: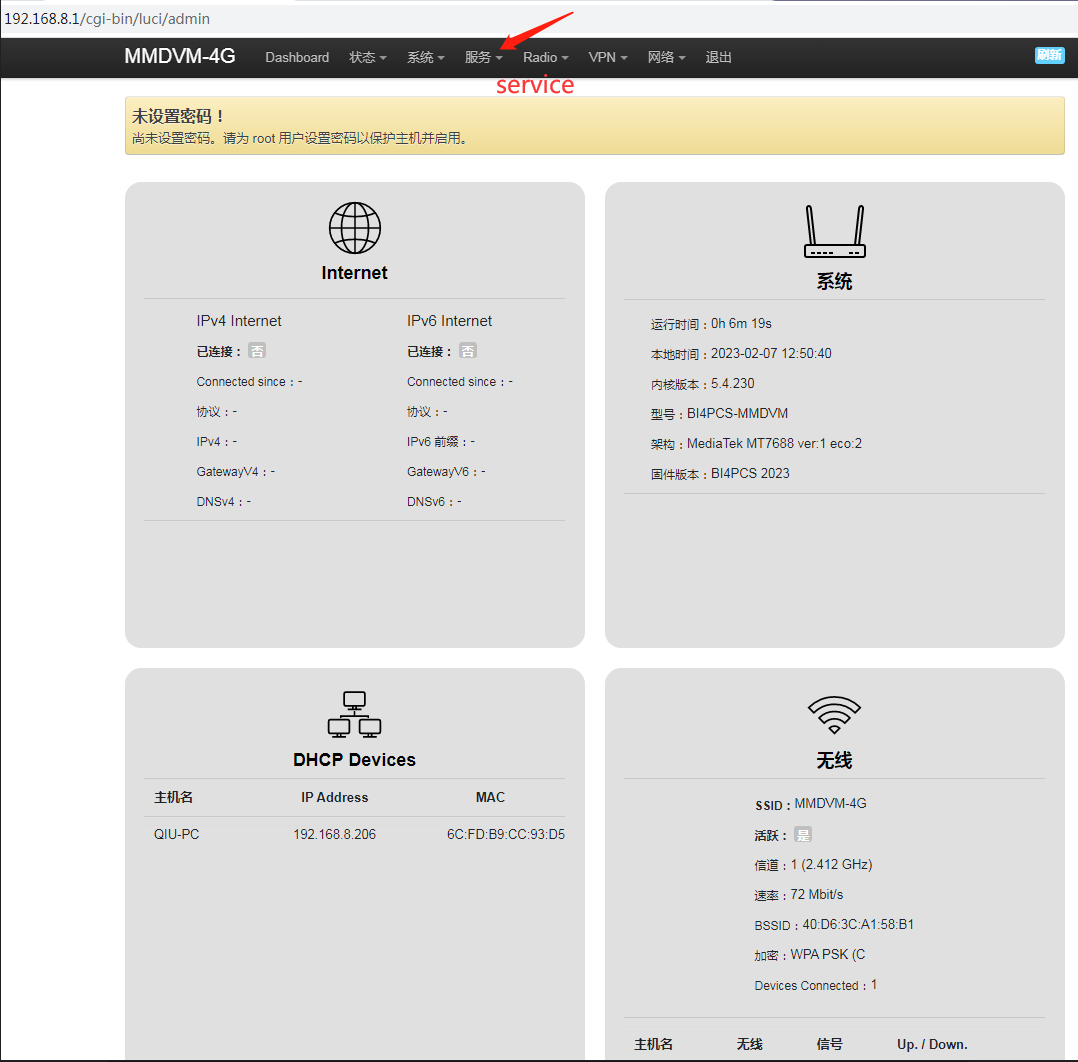

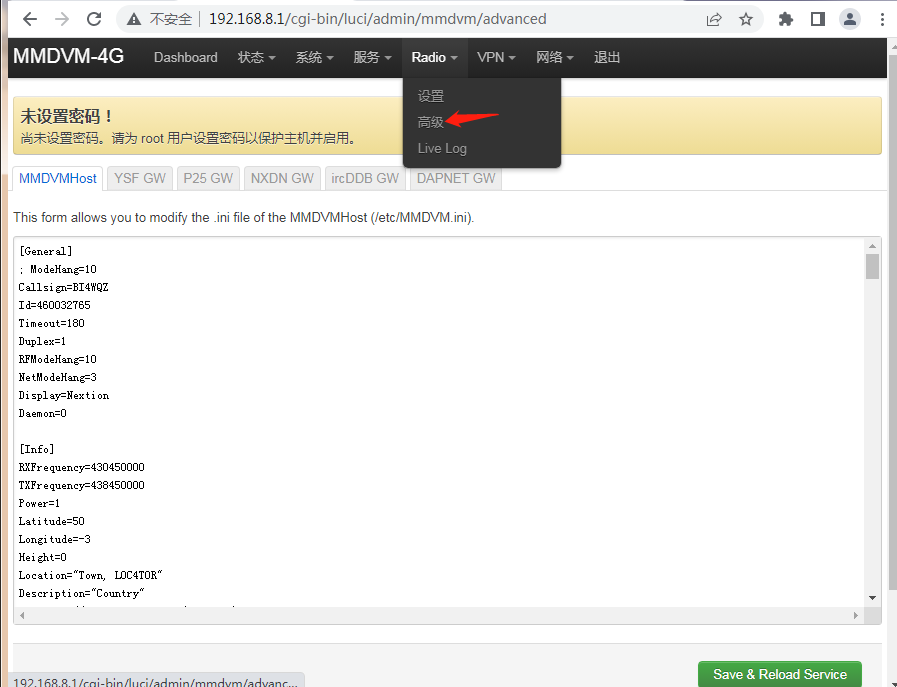
Text:
[General]
; ModeHang=10
Callsign=BI4WQZ
Id=460032765
Timeout=180
Duplex=1
RFModeHang=10
NetModeHang=3
Display=Nextion
Daemon=0
[Info]
RXFrequency=430450000
TXFrequency=438450000
Power=1
Latitude=50
Longitude=-3
Height=0
Location="Town, L0C4T0R"
Description="Country"
URL=http://www.mw0mwz.co.uk/pi-star/
[Log]
; Logging levels, 0=No logging, 1=Debug, 2=Message, 3=Info, 4=Warning, 5=Error, 6=Fatal
DisplayLevel=1
FileLevel=2
FilePath=/var/log/mmdvm
FileRoot=MMDVM
[DMR Id Lookup]
File=/etc/mmdvm/DMRIds.dat
Time=24
[NXDN Id Lookup]
File=/etc/mmdvm/NXDN.csv
Time=24
[Modem]
; Port=/dev/ttyS1
; Port=/dev/ttyACM0
; Port=/dev/ttyAMA0
; DMRTXLevel=50
; YSFTXLevel=50
; P25TXLevel=50
; NXDNTXLevel=50
; POCSAGTXLevel=50
; Port=/dev/ttyS1
Port=/dev/ttyS1
TXInvert=1
RXInvert=0
PTTInvert=0
TXDelay=100
RXOffset=0
TXOffset=0
DMRDelay=0
RXLevel=50
TXLevel=50
RXDCOffset=0
TXDCOffset=0
RFLevel=100
CWIdTXLevel=50
RSSIMappingFile=/etc/mmdvm/RSSI.dat
Trace=0
Debug=0
[Transparent Data]
; SendFrameType=0
Enable=0
RemoteAddress=127.0.0.1
RemotePort=40094
LocalPort=40095
[UMP]
; Port=\\.\COM4
Enable=0
Port=/dev/ttyACM1
[D-Star]
; ModeHang=10
Enable=0
Module=C
SelfOnly=0
AckReply=1
AckTime=750
AckMessage=0
ErrorReply=1
RemoteGateway=0
[DMR]
; Prefixes=234,235
; Slot1TGWhiteList=
; Slot2TGWhiteList=
; ModeHang=10
Enable=1
Beacons=0
BeaconInterval=100
BeaconDuration=3
ColorCode=1
SelfOnly=0
EmbeddedLCOnly=0
DumpTAData=1
CallHang=3
TXHang=4
[System Fusion]
; DSQ=1
; ModeHang=10
Enable=0
LowDeviation=0
SelfOnly=0
TXHang=4
RemoteGateway=0
[P25]
; ModeHang=10
Enable=0
NAC=293
SelfOnly=0
OverrideUIDCheck=0
RemoteGateway=0
[NXDN]
; ModeHang=10
Enable=0
RAN=1
SelfOnly=0
RemoteGateway=0
[POCSAG]
Enable=0
Frequency=439987500
[D-Star Network]
; ModeHang=3
Enable=0
GatewayAddress=127.0.0.1
GatewayPort=20010
LocalPort=20011
Debug=0
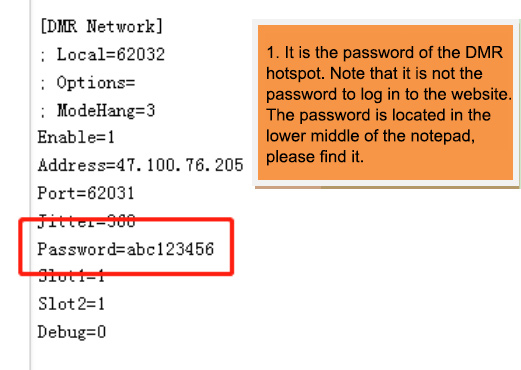
[DMR Network]
Enable=1
Address=47.100.76.205
Port=62031
Jitter=360
Password="661858"
Slot1=1
Slot2=1
Debug=0
ModeHang=20
RemoteAddress=4601.master.brandmeister.network
RemotePort=62031
Type=Direct
[System Fusion Network]
; ModeHang=3
Enable=0
LocalAddress=127.0.0.1
LocalPort=3200
GatewayAddress=127.0.0.1
GatewayPort=4200
Debug=0
[P25 Network]
; ModeHang=3
Enable=0
GatewayAddress=127.0.0.1
GatewayPort=42020
LocalPort=32010
Debug=0
[NXDN Network]
; ModeHang=3
Enable=0
LocalAddress=127.0.0.1
LocalPort=14021
GatewayAddress=127.0.0.1
GatewayPort=14020
Debug=0
[POCSAG Network]
; ModeHang=3
Enable=0
LocalAddress=127.0.0.1
LocalPort=3800
GatewayAddress=127.0.0.1
GatewayPort=4800
Debug=0
[TFT Serial]
; Port=modem
Port=/dev/ttyAMA0
Brightness=50
[HD44780]
Rows=2
Columns=16
Pins=11,10,0,1,2,3
I2CAddress=32
PWM=0
PWMPin=21
PWMBright=100
PWMDim=16
DisplayClock=1
UTC=8
[Nextion]
;Port=/dev/ttyAMA0
Port=modem
Brightness=50
DisplayClock=1
UTC=8
ScreenLayout=3
IdleBrightness=20
WaitForLan=1
LogLevel=2
SleepWhenInactive=0
DataFilesPath=/etc/mmdvm/
RemoveDim=0
DMRidFile=stripped.csv
ShowModeStatus=0
[NextionDriver]
Port=modem
DataFilesPath=/etc/mmdvm/
LogLevel=2
GroupsFile=groups.txt
DMRidFile=stripped.csv
ShowModeStatus=0
RemoveDim=0
WaitForLan=1
SleepWhenInactive=0
[OLED]
Type=3
Brightness=0
Invert=0
Scroll=0
Rotate=0
Cast=0
LogoScreensaver=1
[LCDproc]
; LocalPort=13667
Address=localhost
Port=13666
DimOnIdle=0
DisplayClock=1
UTC=8
[Lock File]
Enable=0
File=/tmp/MMDVM_Active.lck
[Mobile GPS]
Enable=0
Address=127.0.0.1
Port=7834
[Remote Control]
Enable=0
Port=7642
[Nextion]
;Port=/dev/ttyAMA0
Port=modem
DataFilesPath=/etc/mmdvm/
LogLevel=2
DMRidFile=stripped.csv
ShowModeStatus=0
RemoveDim=0
WaitForLan=1
SleepWhenInactive=0
UTC=8
DisplayClock=1
IdleBrightness=20
Brightness=50
ScreenLayout=3