| Quantity | 3+ units | 10+ units | 30+ units | 50+ units | More |
|---|---|---|---|---|---|
| Price /Unit | $42.00 | $41.15 | $39.86 | $38.15 | Contact US |
 SUP-C703S Signal Generator & Process Calibrator – mA, V, Ω, RTD, Thermocouple Output & Measurement
$156.44
SUP-C703S Signal Generator & Process Calibrator – mA, V, Ω, RTD, Thermocouple Output & Measurement
$156.44
 6000A 20µH Air Core Inductor for Dual Pulse Testing and High-Performance Electrical Experiments
$86.76
6000A 20µH Air Core Inductor for Dual Pulse Testing and High-Performance Electrical Experiments
$86.76
 DP8000 Max IGBT Pulse Generator with Internally Integrated IGBT Driver (Air Core Inductor Included)
$384.16
DP8000 Max IGBT Pulse Generator with Internally Integrated IGBT Driver (Air Core Inductor Included)
$384.16
VI Curve Tester Two-Channel Input (With Plastic Shell Alternate Display) Shows Four Test Frequencies
Features:
- Plastic shell with alternate display
- Dual-channel signal input
- Alternately display 4 frequencies
- Adjustable internal resistance and alternation speed
- One key to open one-channel or alternate display
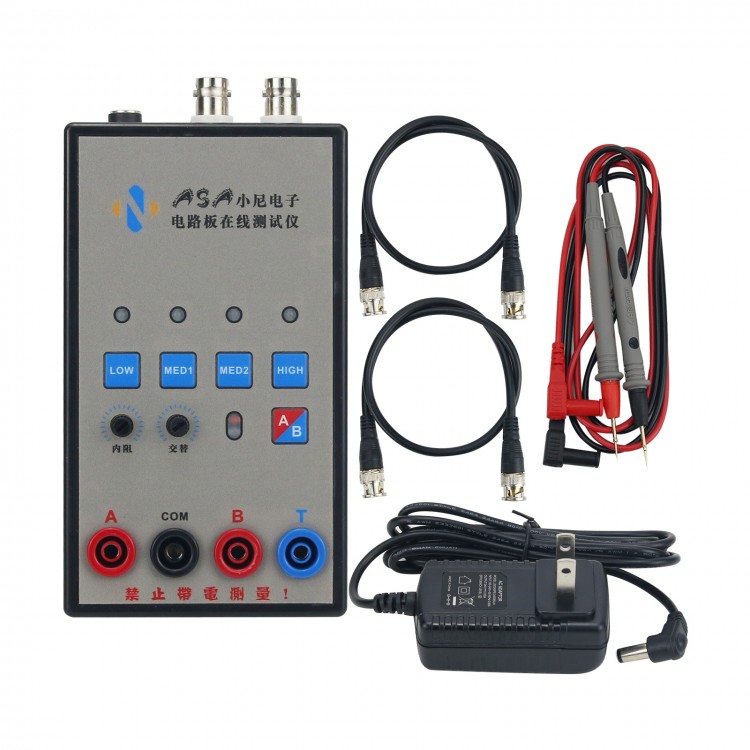
Package Included:
- 1 x VI Curve Tester
- 1 x Set of Test Leads
- 1 x BNC Connecting Cable
- 1 x Power Adapter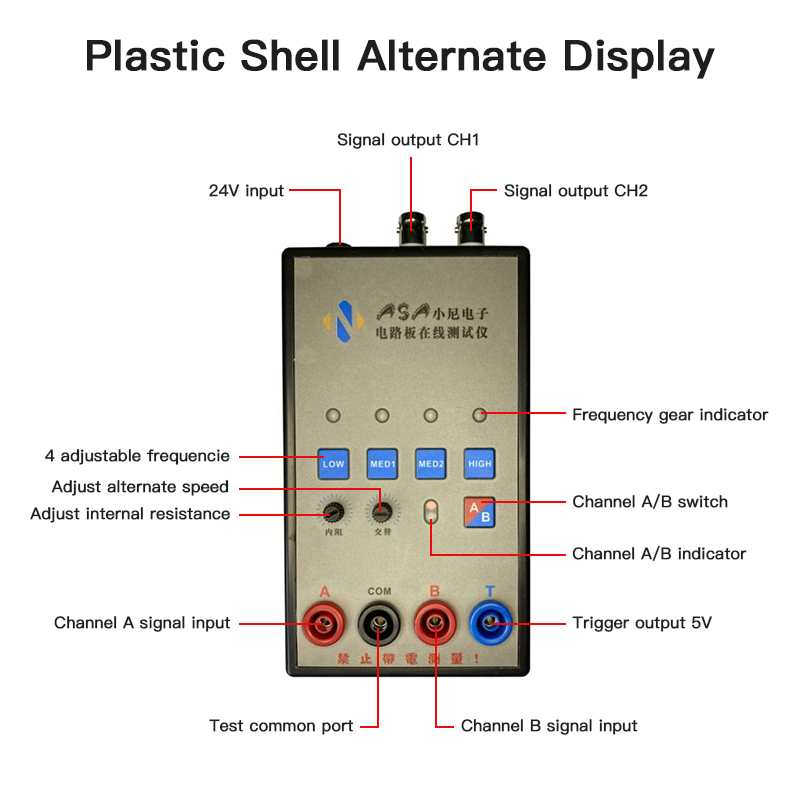
Oscilloscope Parameter Settings:
- Adjust your oscilloscope to X-Y mode (different oscilloscopes have different adjustment methods, please explore by yourself)
- The vertical parameters of X/Y 2 channels are adjusted to 1V/div, and a single trace oscilloscope only needs to adjust one.
- Analog oscilloscope does not need to adjust the time base; digital oscilloscope time base is adjusted to 1-5ms
- When connected correctly, the oscilloscope will display a horizontal line. If the vertical line is displayed, the XY plugs need to be reversed.
- The horizontal and vertical lines are in the display frame when adjusting the vertical and horizontal parameters.
Connect Analog Oscilloscope:
The connection of the analog oscilloscope is relatively simple. Different oscilloscopes are slightly different. Adjust an oscilloscope to the X-Y mode. Some oscilloscopes are selected by pressing buttons, and some are selected by the knob to the XY mode. Please research by yourself. Connect your oscilloscope with a BNC cable and then power on, a horizontal line will be displayed under normal conditions. Adjust the XY vertical channel parameters by about 1V/div, and then adjust the XY attenuation so that the horizontal line is in the display frame. The horizontal line length can also be adjusted via the X attenuation potentiometer on the VI tester board. Short-circuit the test leads, a vertical line will be displayed under normal conditions. If the vertical line is too long or too short, you need to adjust the Y channel parameters so that the vertical line is within the display frame, generally half a grid or 1 grid to the edge. When the horizontal and vertical lines are normal, you can enter the normal measurement.
Connect Digital Oscilloscope:
Enter the XY mode of your digital oscilloscope through the menu or keys, and adjust the two channels of X and Y to 1V/div. The single-trace oscilloscope only needs to adjust the Y channel. The adjustment time base is 1-5ms. Select DC coupling for X Y channels with 1X attenuation. When the oscilloscope is not connected, the screen should be a bright spot, adjust the horizontal and vertical so that the bright spot is centered. After the VI tester is connected, there is normally a horizontal line. Adjust the 103 potentiometer at the top of the VI board so that the horizontal line is within the display frame, half a grid or 1 grid to the edge. Short-circuit the test leads, the display should be a vertical line at this time, adjust the Y channel parameters so that the vertical line is in the display box. At this point, the debugging is over.
Test Online Circuit Board:
When testing a circuit board online, the circuit board should not be charged. If there is a large capacitor on the circuit board, discharge the capacitor first, otherwise the VI test board will be burnt out.
 Shows Four Test Frequencies")
 Shows Four Test Frequencies")
 Shows Four Test Frequencies")
 Shows Four Test Frequencies")
 Shows Four Test Frequencies")
 Shows Four Test Frequencies")
 Shows Four Test Frequencies")

 Shows Four Test Frequencies")

 Shows Four Test Frequencies")


 Shows Four Test Frequencies")

