| Quantity | 3+ units | 10+ units | 30+ units | 50+ units | More |
|---|---|---|---|---|---|
| Price /Unit | $11.25 | $11.02 | $10.68 | $10.22 | Contact US |
 DM40B Standard Version 10Hz-50MHz Portable Digital Multimeter Oscilloscope Signal Generator with Magnetic PVC Sleeve
$124.94
DM40B Standard Version 10Hz-50MHz Portable Digital Multimeter Oscilloscope Signal Generator with Magnetic PVC Sleeve
$124.94
 QDB-5A DC9-26V 100W Automobile Actuator Drive Detector Stepper Motor Ignition Coil PWM Signal Drive Tester
$43.17
QDB-5A DC9-26V 100W Automobile Actuator Drive Detector Stepper Motor Ignition Coil PWM Signal Drive Tester
$43.17
 QDB-4A Automotive Ignition Coil Tester Injector Solenoid Valve Idling Stepper Motor Instrument Fault Detector
$59.69
QDB-4A Automotive Ignition Coil Tester Injector Solenoid Valve Idling Stepper Motor Instrument Fault Detector
$59.69
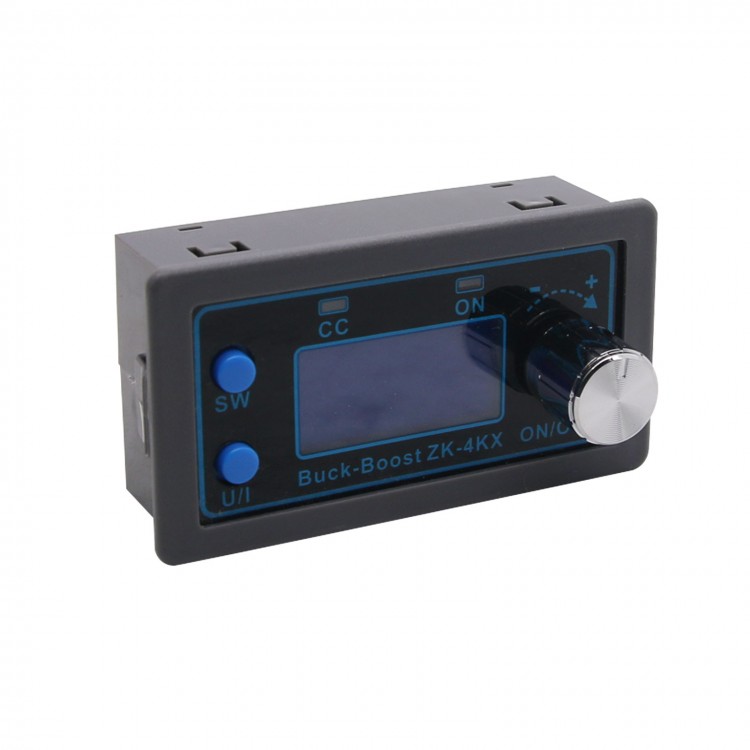
DC-DC Buck Boost Converter CC CV Output 0.5-30V Adjustable Power Supply Module ZK-4KX
Features:
- LCD displays input/output voltage, output current/output power/output capacity/output time.
- CNC adjustment enables accurate and fast adjusting. It can boost and lower voltage, with adjustable output voltage 0.5-30V, and adjustable current limit 0-4A.
- Anti-reverse connection protection of input end, so that it will not burn out when there is reverse connection.
- Anti-backflow protection at the output end. No need to add anti-backflow diode when charging.
- The module can be set to ON/OFF by default.
- Multiple software protection mechanisms are available, and the protection threshold is adjustable.When the working parameters of the module exceed the protection threshold, the output will be automatically turned off.
- Output ripple is small andπfilter is available.
- Thick heat sink.
Specifications:
- Input voltage: 5.0-30V
- Output voltage: 0.5-30V
- Output current: can work stably at 3A for a long time, and can reach 4A under enhanced heat dissipation
- Output power: natural heat dissipation 35W; strengthen heat dissipation 50W
- Voltage display resolution: 0.01V
- Current display resolution: 0.001A
- Conversion efficiency: about 88%
- Soft start: yes (it may fail when the module is power-on with high-power load)
- Operating frequency: 180KHZ
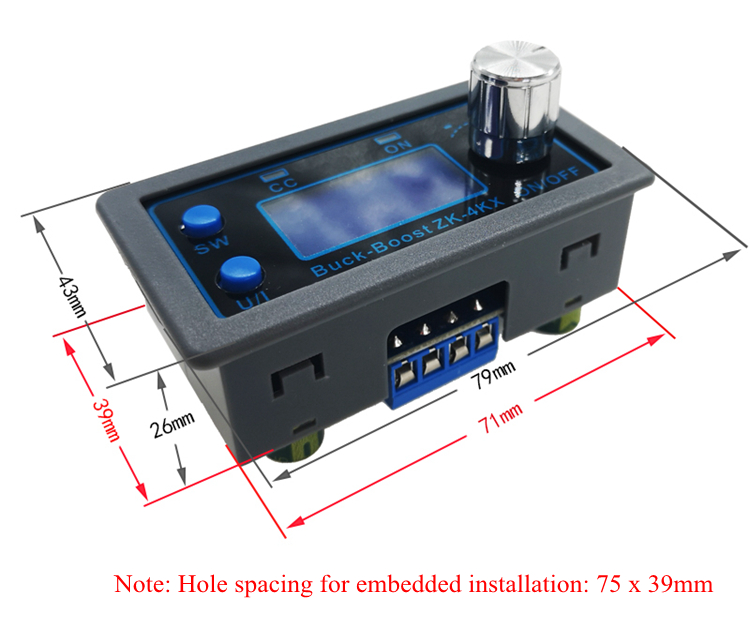
- Hole spacing For embedded installation: 75 x 39mm
Protection Mechanism:
- Input anti-reverse connection
- Output against backflow
- Input under-voltage protection (4.8-30V adjustable, default 4.8V)
- Output over-voltage protection (0.5-31V adjustable, default 31V)
- Output over-current protection (0-4.1A adjustable, default 4.1A)
- Over-power protection (0-50W adjustable, default 50W)
- Over-temperature protection (80-110℃ adjustable, default 110℃)
- Timeout protection (0-100h adjustable, OFF by default)
- Over-capacity protection (0-60Ah adjustable, OFF by default)
Package Included:
- 1 x Buck Boost Converter 

Note: After the product triggers protection mechanism, output will automatically turn off, and LCD screen will display protection code. Press any button to exit the protection interface.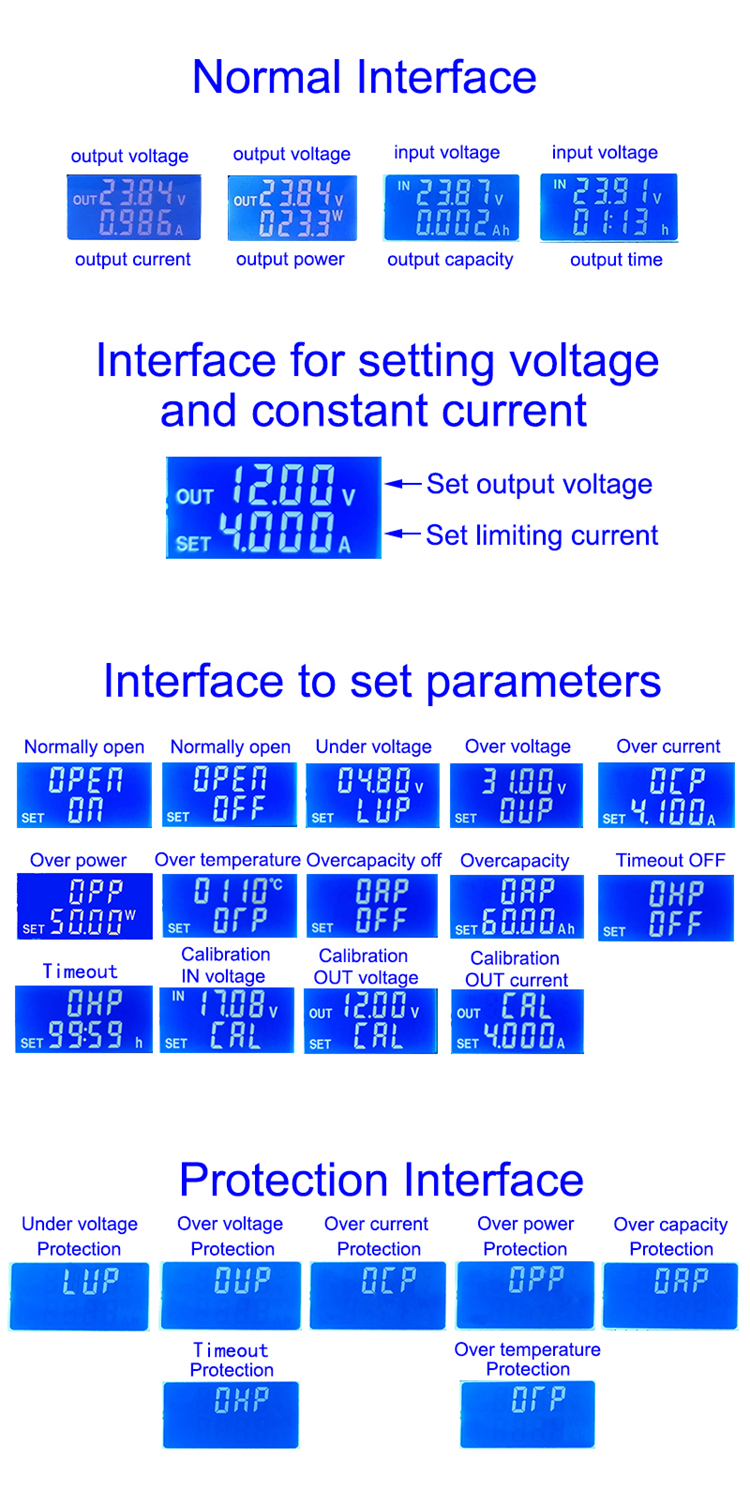
How to User It?
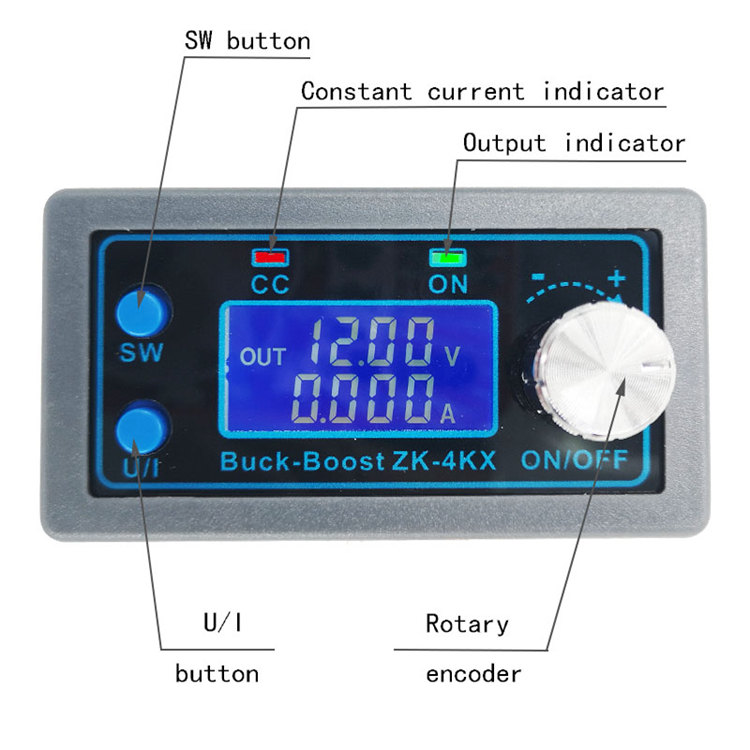
1.Switch Displayed Parameters:
In the normal interface, short press SW to switch the displayed content in the lower line. Current A, power W, capacity Ah, and time h can be switched. Long press to change the top displayed content, switching between input voltage IN and output voltage OUT.
2.Set Output Voltage Value:
In the normal interface, short press U / I button to enter into voltage CC setting interface. A certain digit of set output voltage is blinking. Rotate the encoder knob to increase or decrease output voltage. Short press the knob to select which digit of the output voltage to set. When the setting is completed, short press U / I button twice to return to the normal interface. Or it will automatically return to the normal interface, without operation in 10s.
3. Set Constant Current Value (That is, the maximum output current allowed by the module):
In the normal interface, short press U / I button to enter voltage constant current setting interface. Short press U / I button again to switch to set constant current value. It can be seen that a certain bit of the constant current value is blinking. Turn the encoder knob to increase or decrease the value. Short press the encoder to select which digit of the constant current value to set. When the setting is completed, short press U / I button to exit the setting interface and return to the normal interface. Or it will automatically return to the normal interface, without operation in 10s.
4. Set the Module to be ON/OFF by Default:
In the normal interface, press and hold U / I button to enter parameter setting interface. It displays OPEN OFF or OPEN ON. OPEN OFF means the output is turned off by default when power-on, and OPEN ON means the output is turned on by default when power-on. Press and hold the rotary encoder to switch between these two states. After the setting is completed, press and hold the U / I button to return to the normal interface.
5. Set Protection Parameters ON and Threshold:
In the normal interface, press and hold U / I button to enter parameter setting interface. Short press SW button until the protection parameter you want to set appears.
LUP: Under-voltage protection threshold
OUP: Over-voltage protection threshold
OCP: Over-current protection threshold
OPP: Over-power protection threshold
OAP: Over-capacity protection threshold
OHP: Timeout protection threshold
OTP: Over-temperature protection threshold
Short press the rotary encoder to select which digit of the protection parameter you want to set. Long press the encoder to set protection parameters ON or OFF (Note: Only timeout protection and over-capacity protection can be set on / off, other protection parameters are turned on by default.). Rotate the encoder to change the parameters. After the setting is completed, press and hold U / I button to return to the normal interface.
6. Voltage & Current Calibration:
In the normal interface, press and hold U / I button to enter parameter setting interface. Short press SW button until the parameter interface with CAL appears.
Interface with CAL + IN + V is the input voltage calibration interface
Interface with CAL + OUT + V is the output voltage calibration interface
Interface with CAL + OUT + A is the output current calibration interface
Rotate the encoder left and right to adjust parameters. Press and hold the encoder to confirm that the adjustment is complete. At this time, the parameter value does not flash. Long press the U / I button to return to the normal interface.
Attention: To ensure the accuracy of calibration, only when the voltage is over 12V can voltage be calibrated. And only when the current is over 1A can current be calibrated.
Note:
- The input terminal IN- of the module must not be short-circuited with the output terminal OUT-, otherwise the constant current function will fail.
- Please ensure that the power of your power supply is greater than the power required by the output load.
- When users need the module to output at full load, input voltage needs to be larger than 8V. When input voltage is 5V, output power is about 15W. The maximum current of module is 4A, which is limited by the maximum output power. For example, if the output is 17V, current should not be greater than 2A.
- When this module is used over 3A, 35W, please strengthen heat dissipation devices.
- The module has input under-voltage protection function. The default value is about 4.8V (can be set). If it is lower than this value, output will be automatically disconnected (Attention: The voltage at the port of module is lower than the under-voltage protection threshold. When input current is relatively large, please not ignore the divided voltage on input wire).